Profile and Account
This Article Is Licensed Under CCO For Maximum Reuse.
The following is a Table of Contents that links directly to specific sections within the guide.
- Overview
- Create an OSF Account
- OSF Profile
- Sign in to OSF
- Claim an Unregistered Account
- Reset Your Password
- Account Disabled or Spam Flagged
- Edit Your Profile
- Configure Email and Notification Preferences
- Create a Personal Access Token
- Change Your Password
- Merge Your Accounts
- Add a New Email Address
- Enable or Disable Two-Factor Authentication
- Connecting to OSF via Single Sign-On (SSO)
- Deactivate Your Account
- FAQs
Overview
You can explore the OSF without signing in; however, you will need to be signed in in order to use OSF products and manage your work. The OSF is free to use, and creating a new account is simple.
If you have an ORCID account or are affiliated with one of our Partner Institutions, you can also create your OSF account using these credentials. See our help guide for more information on Signing In Through Your Institution, or read below to sign-in with ORCID.
Create an OSF Account
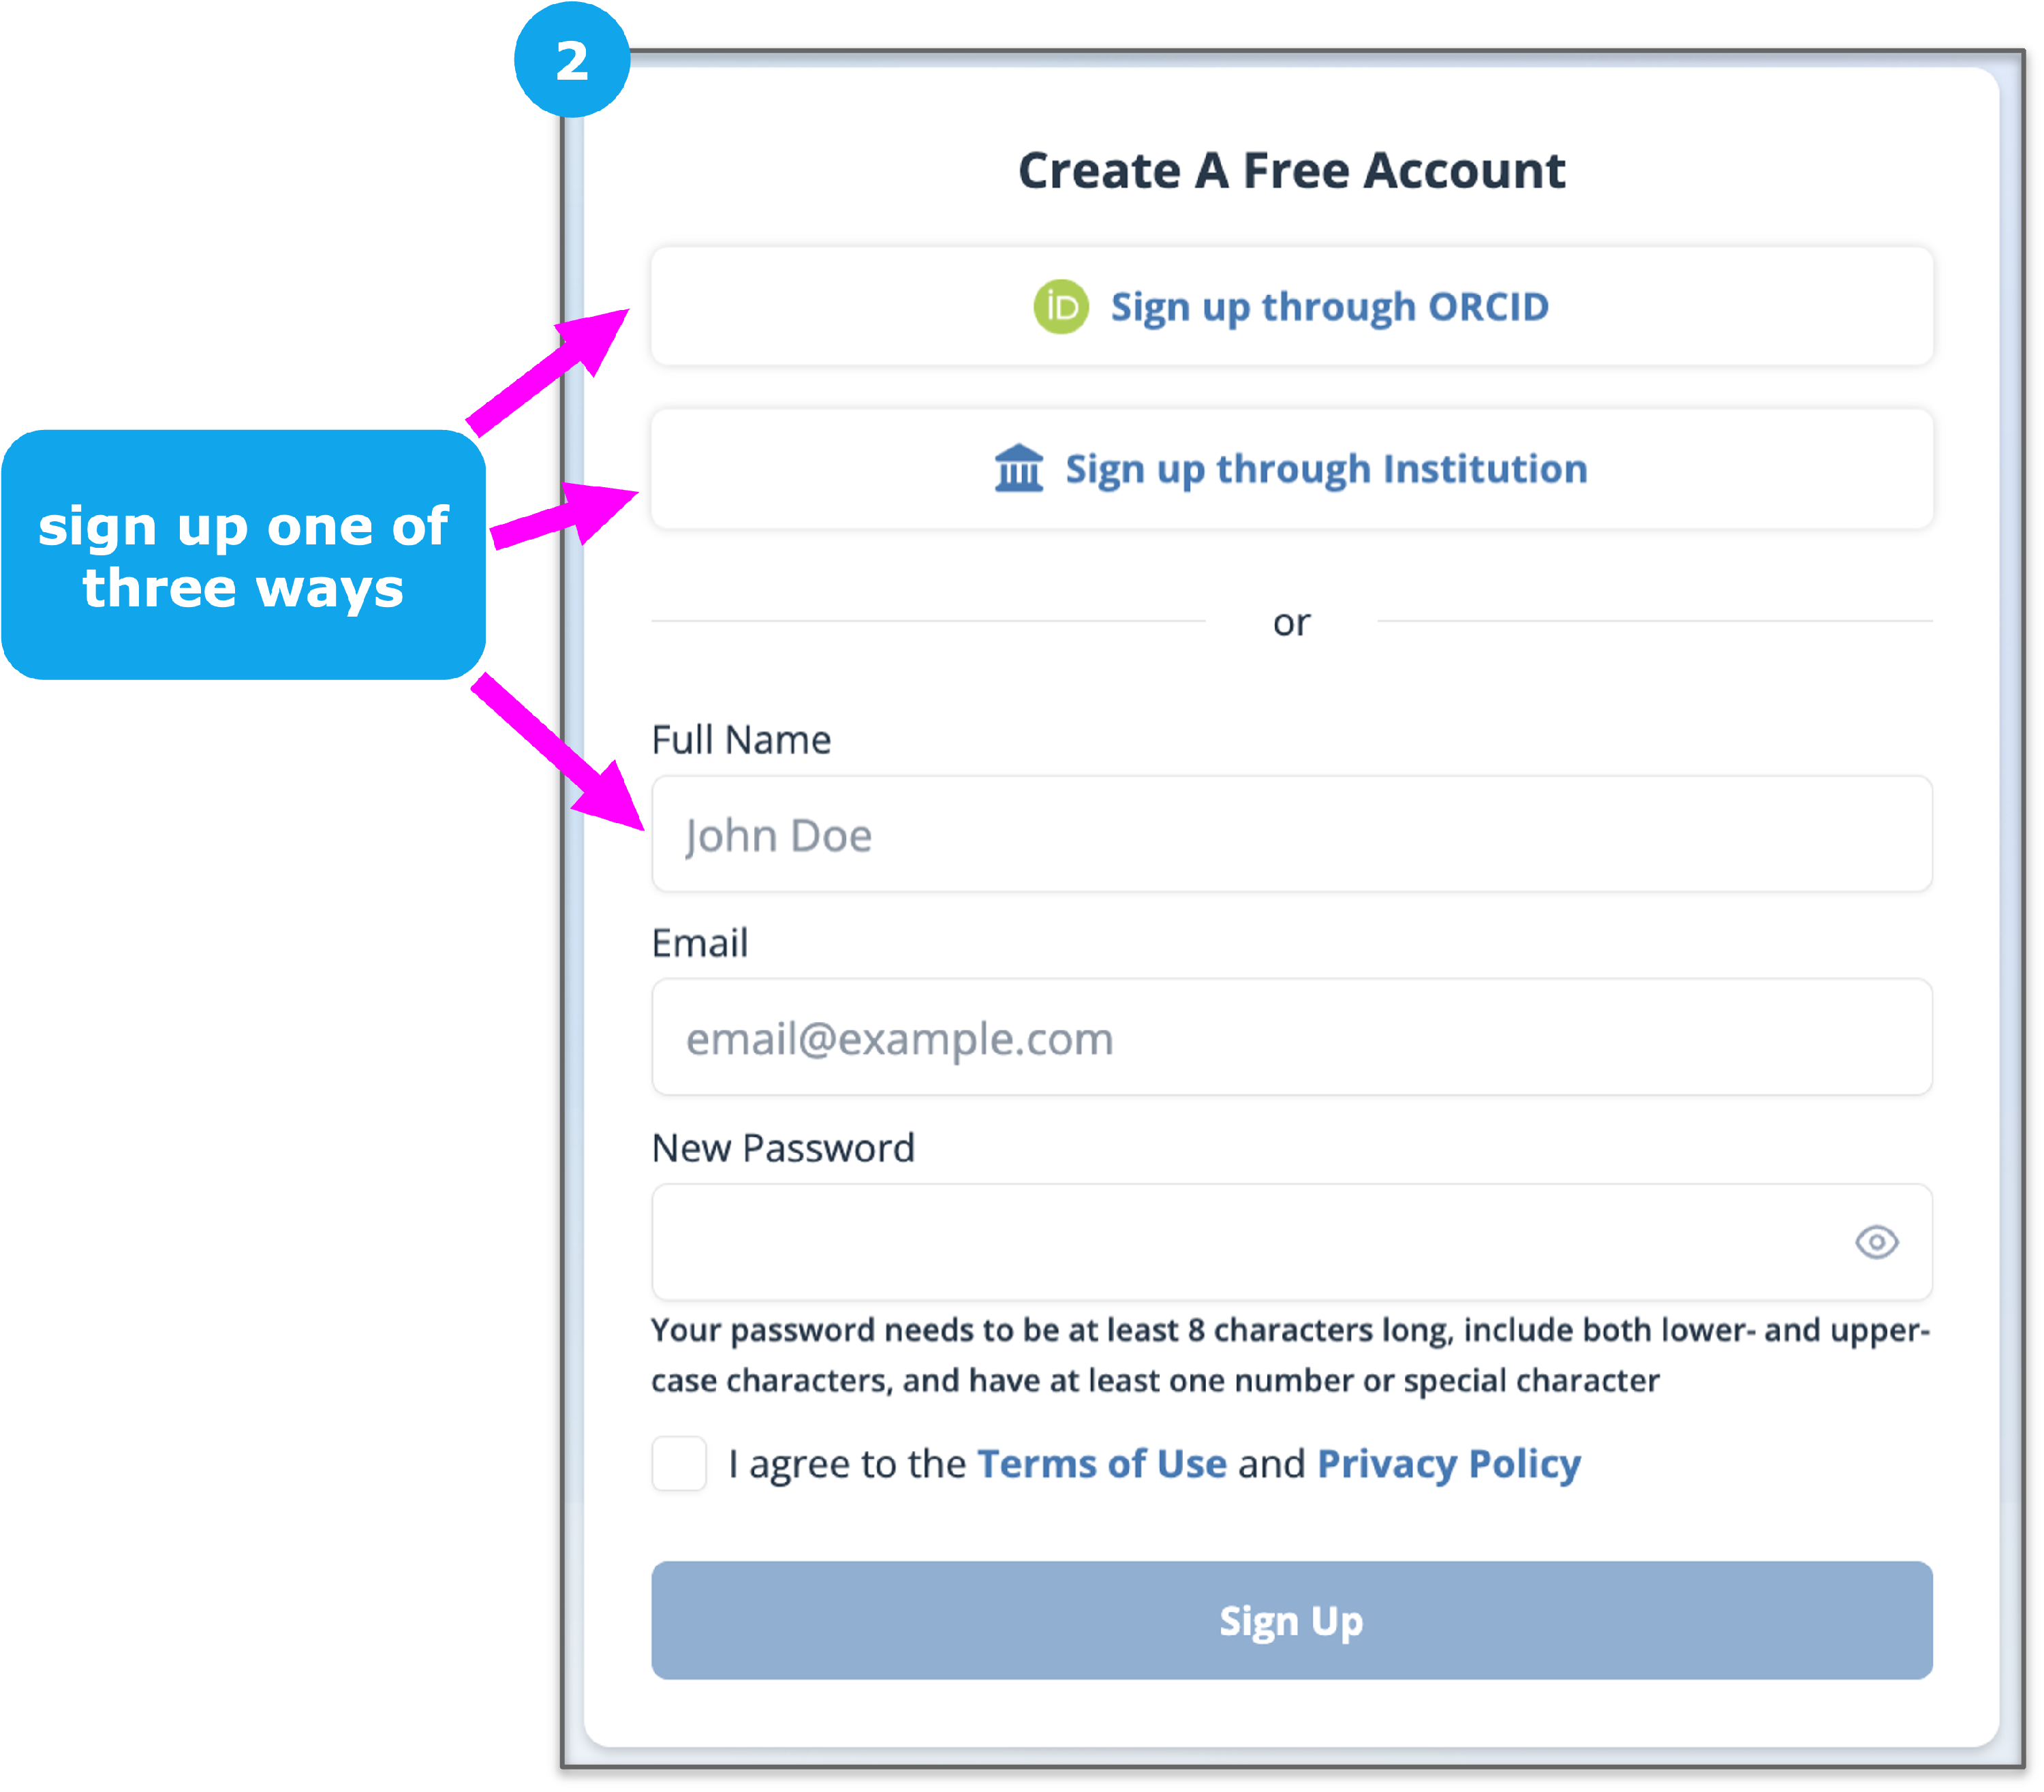
You can create an account using email, ORCID, or through your institution if you are affiliated with one of our Partner Institutions.
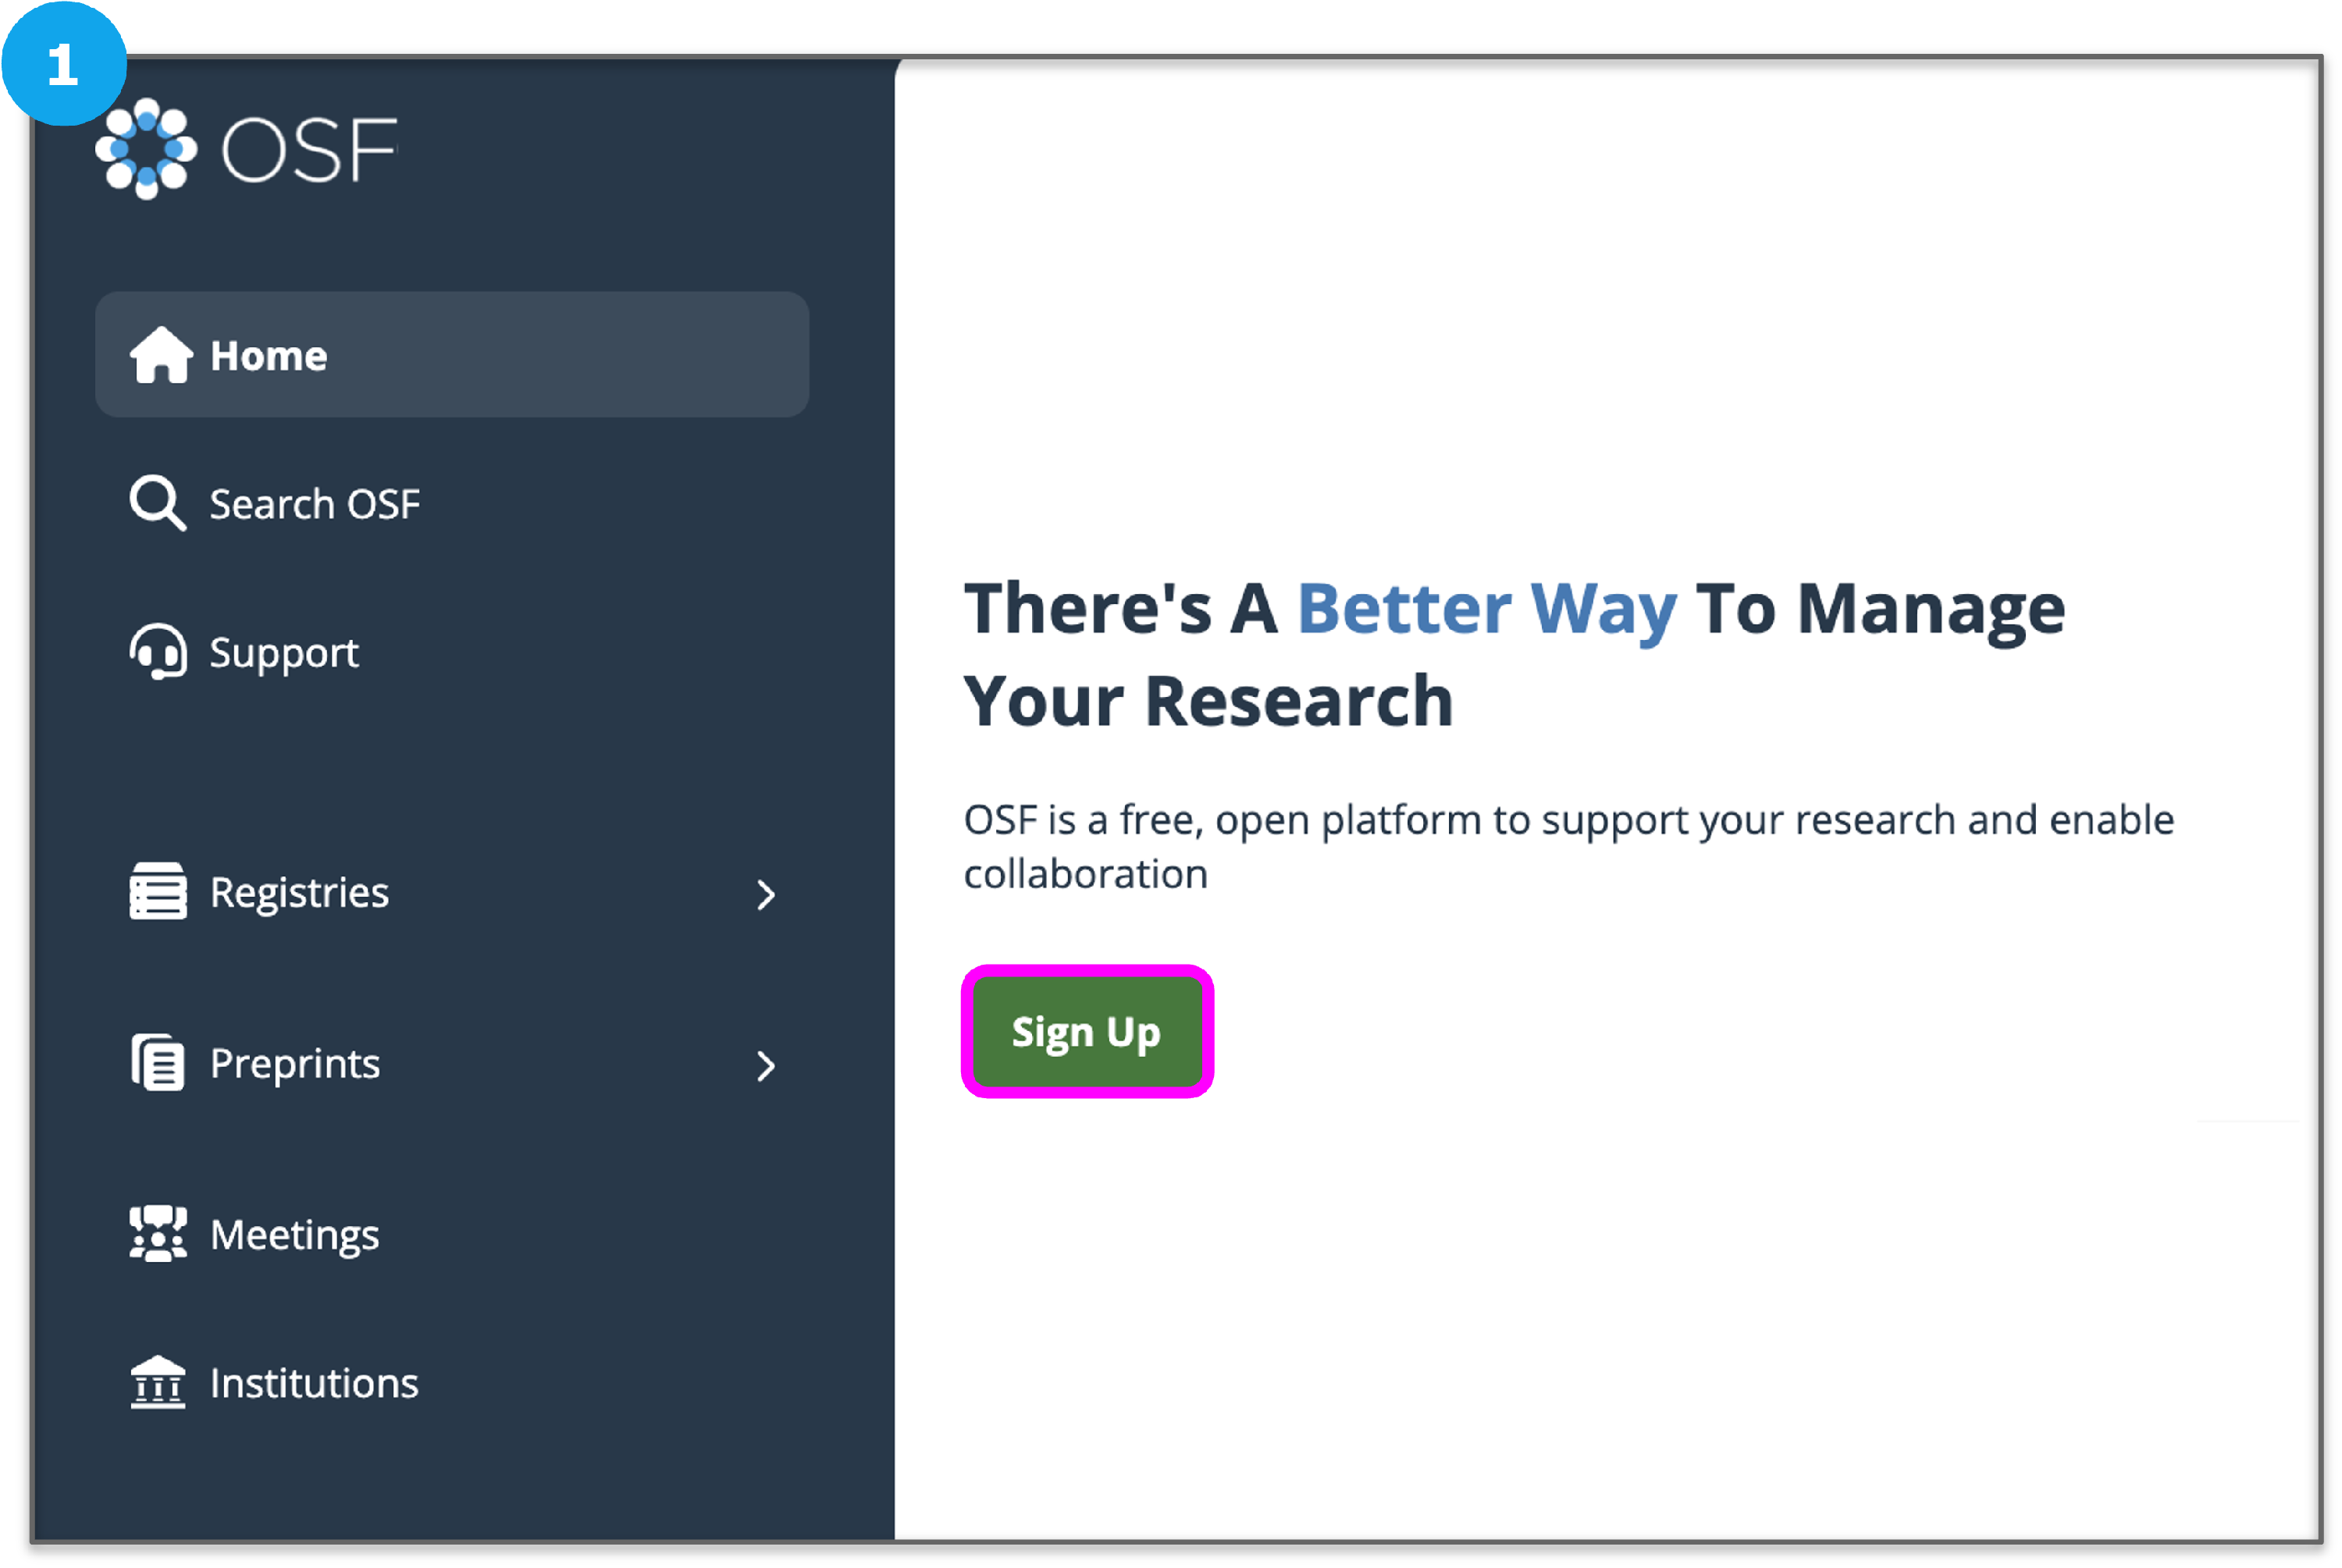
Go to the OSF homepage, then click the green Sign Up button to bring up account creation options.
Create an Account with Email
Fill out the required fields and click the Sign Up button. You will receive a confirmation email from the OSF at the email address you used to create your account. Click the link in the email to confirm your email address.
Create an Account with ORCID
Click the Sign up through ORCID button and follow the instructions. Sign in with ORCID
- Go to Sign up.
- Select Sign up through ORCID.
- This will take you to a login site using your ORCID credentials.
NOTE: if your email for ORCID does not match the email associated with your OSF account a new account may be created.

Create an Account Through your Institution
Click the Sign up through Institution button and follow the instructions, see the guide on Creating a New Account with Your Institution.
OSF Profile
Your OSF user profile will display education and employment along with links to various social profiles, such as your ORCID, github, LinkedIn account, etc. Additionally, all of your public content will be displayed in a searchable format on your user profile page, this includes all public projects, registrations, preprints and files.

Sign in to the OSF
You can sign in to the OSF using your username and password or institutional or ORCID credentials. You can explore the OSF without signing in; however, you will need to be signed in in order to use OSF products and manage your work.
Go to the OSF homepage, then click the blue Sign In button in the top right.
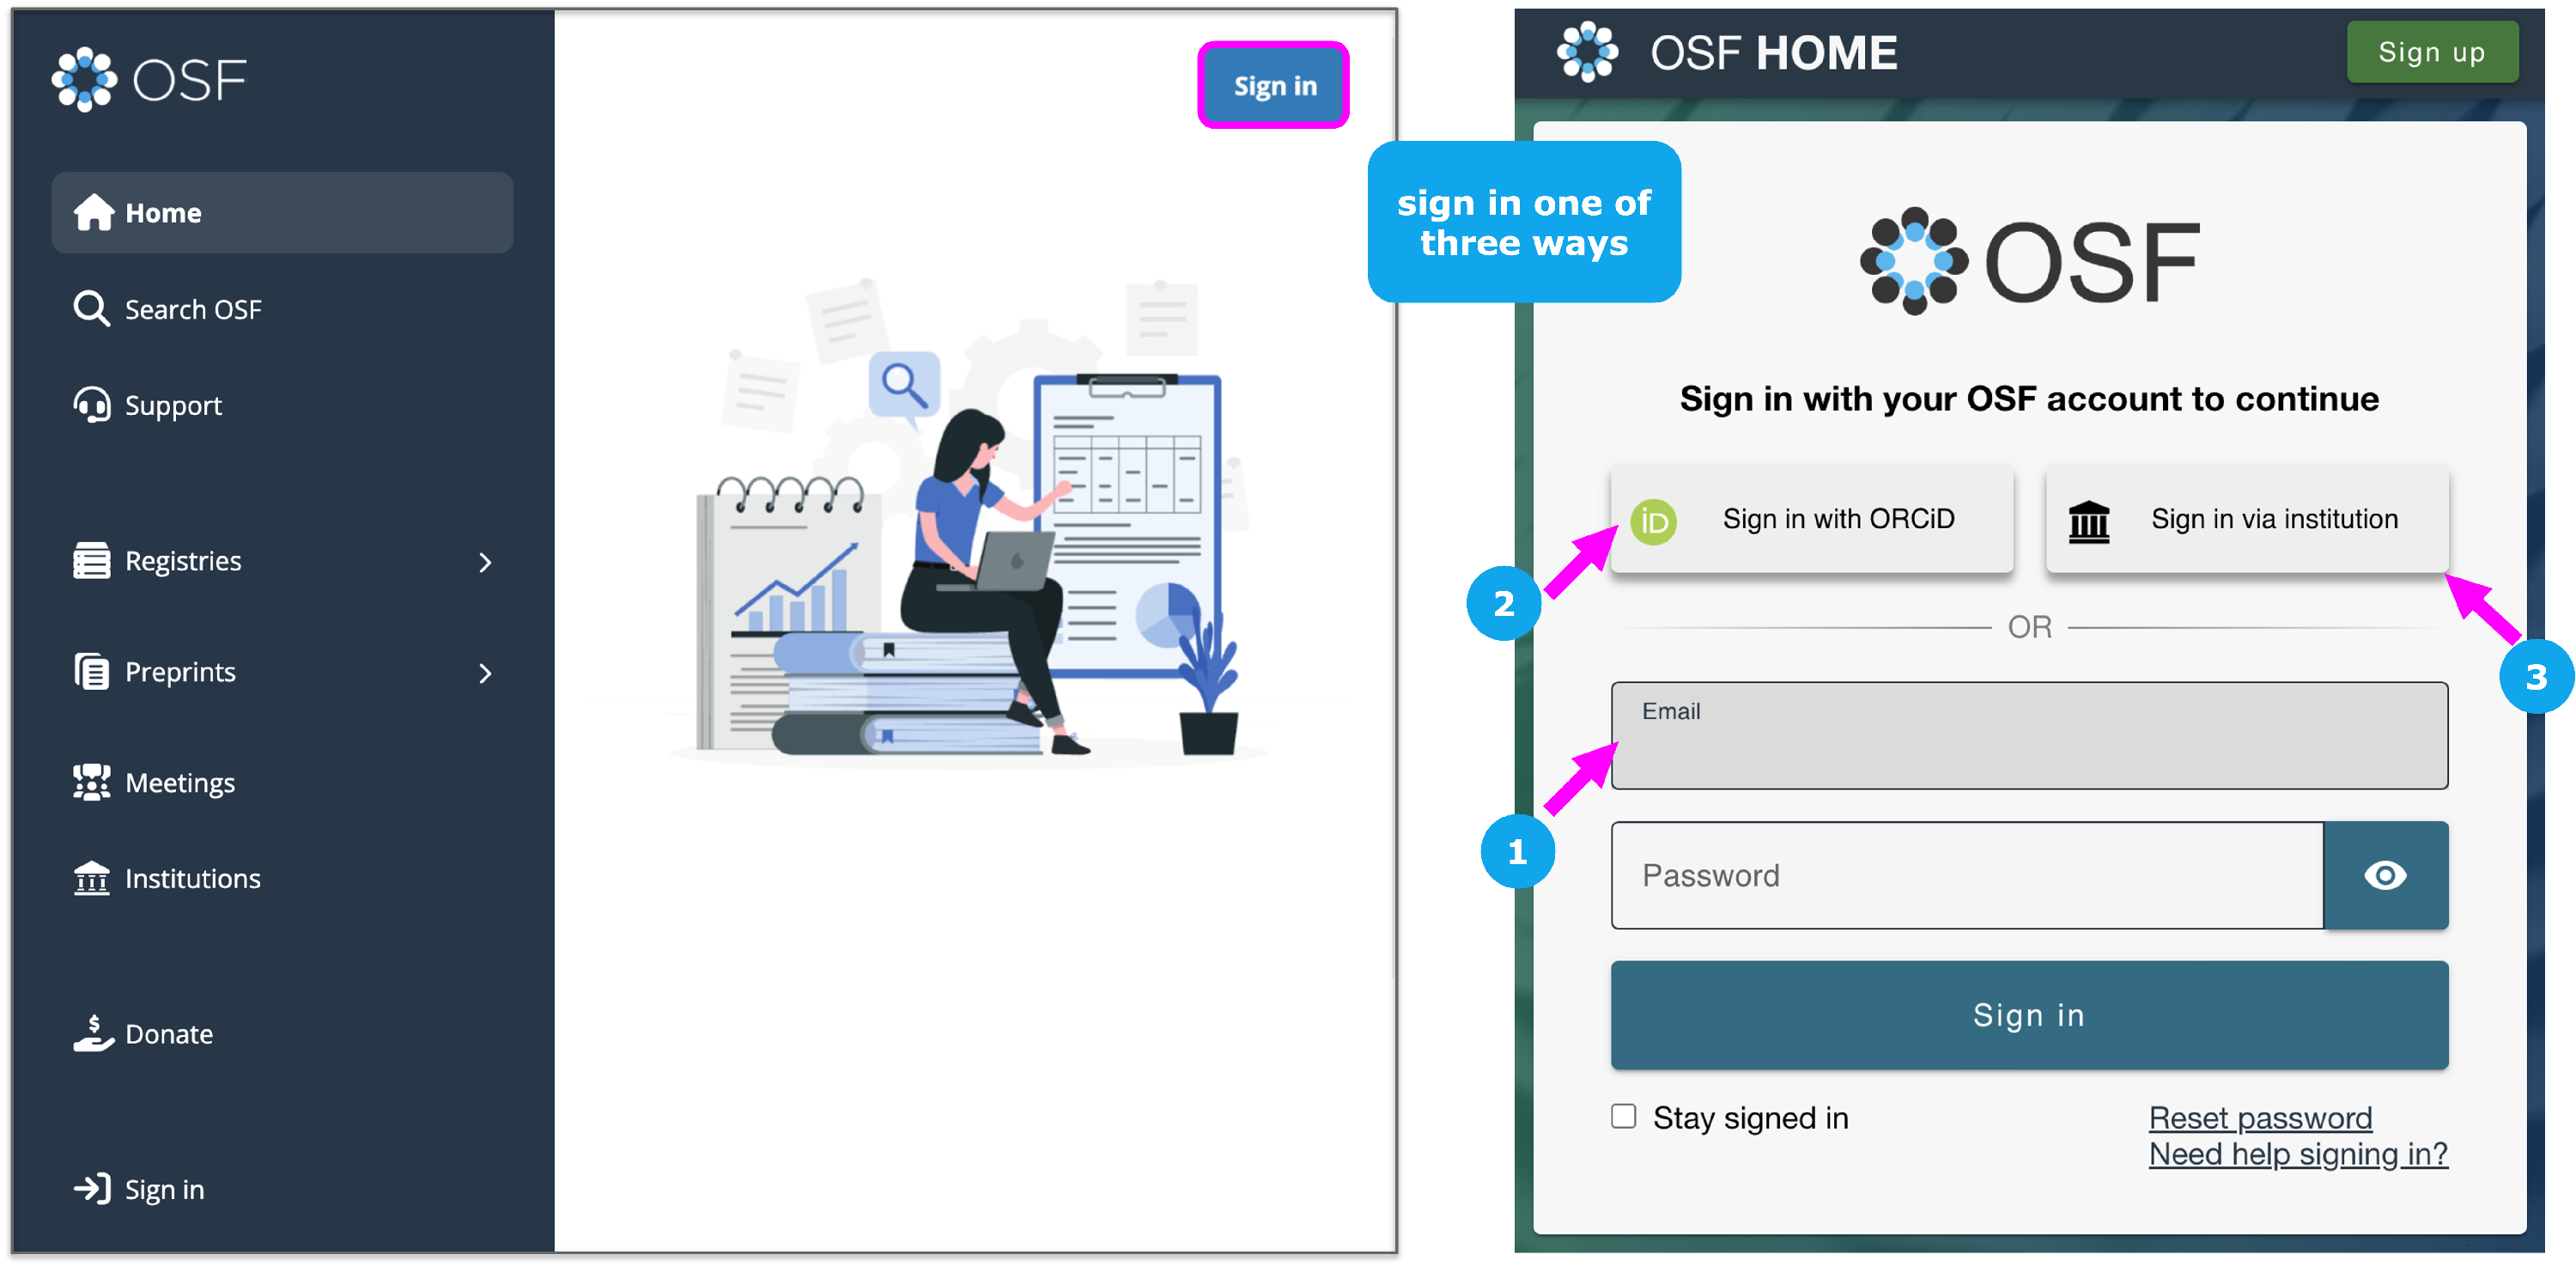
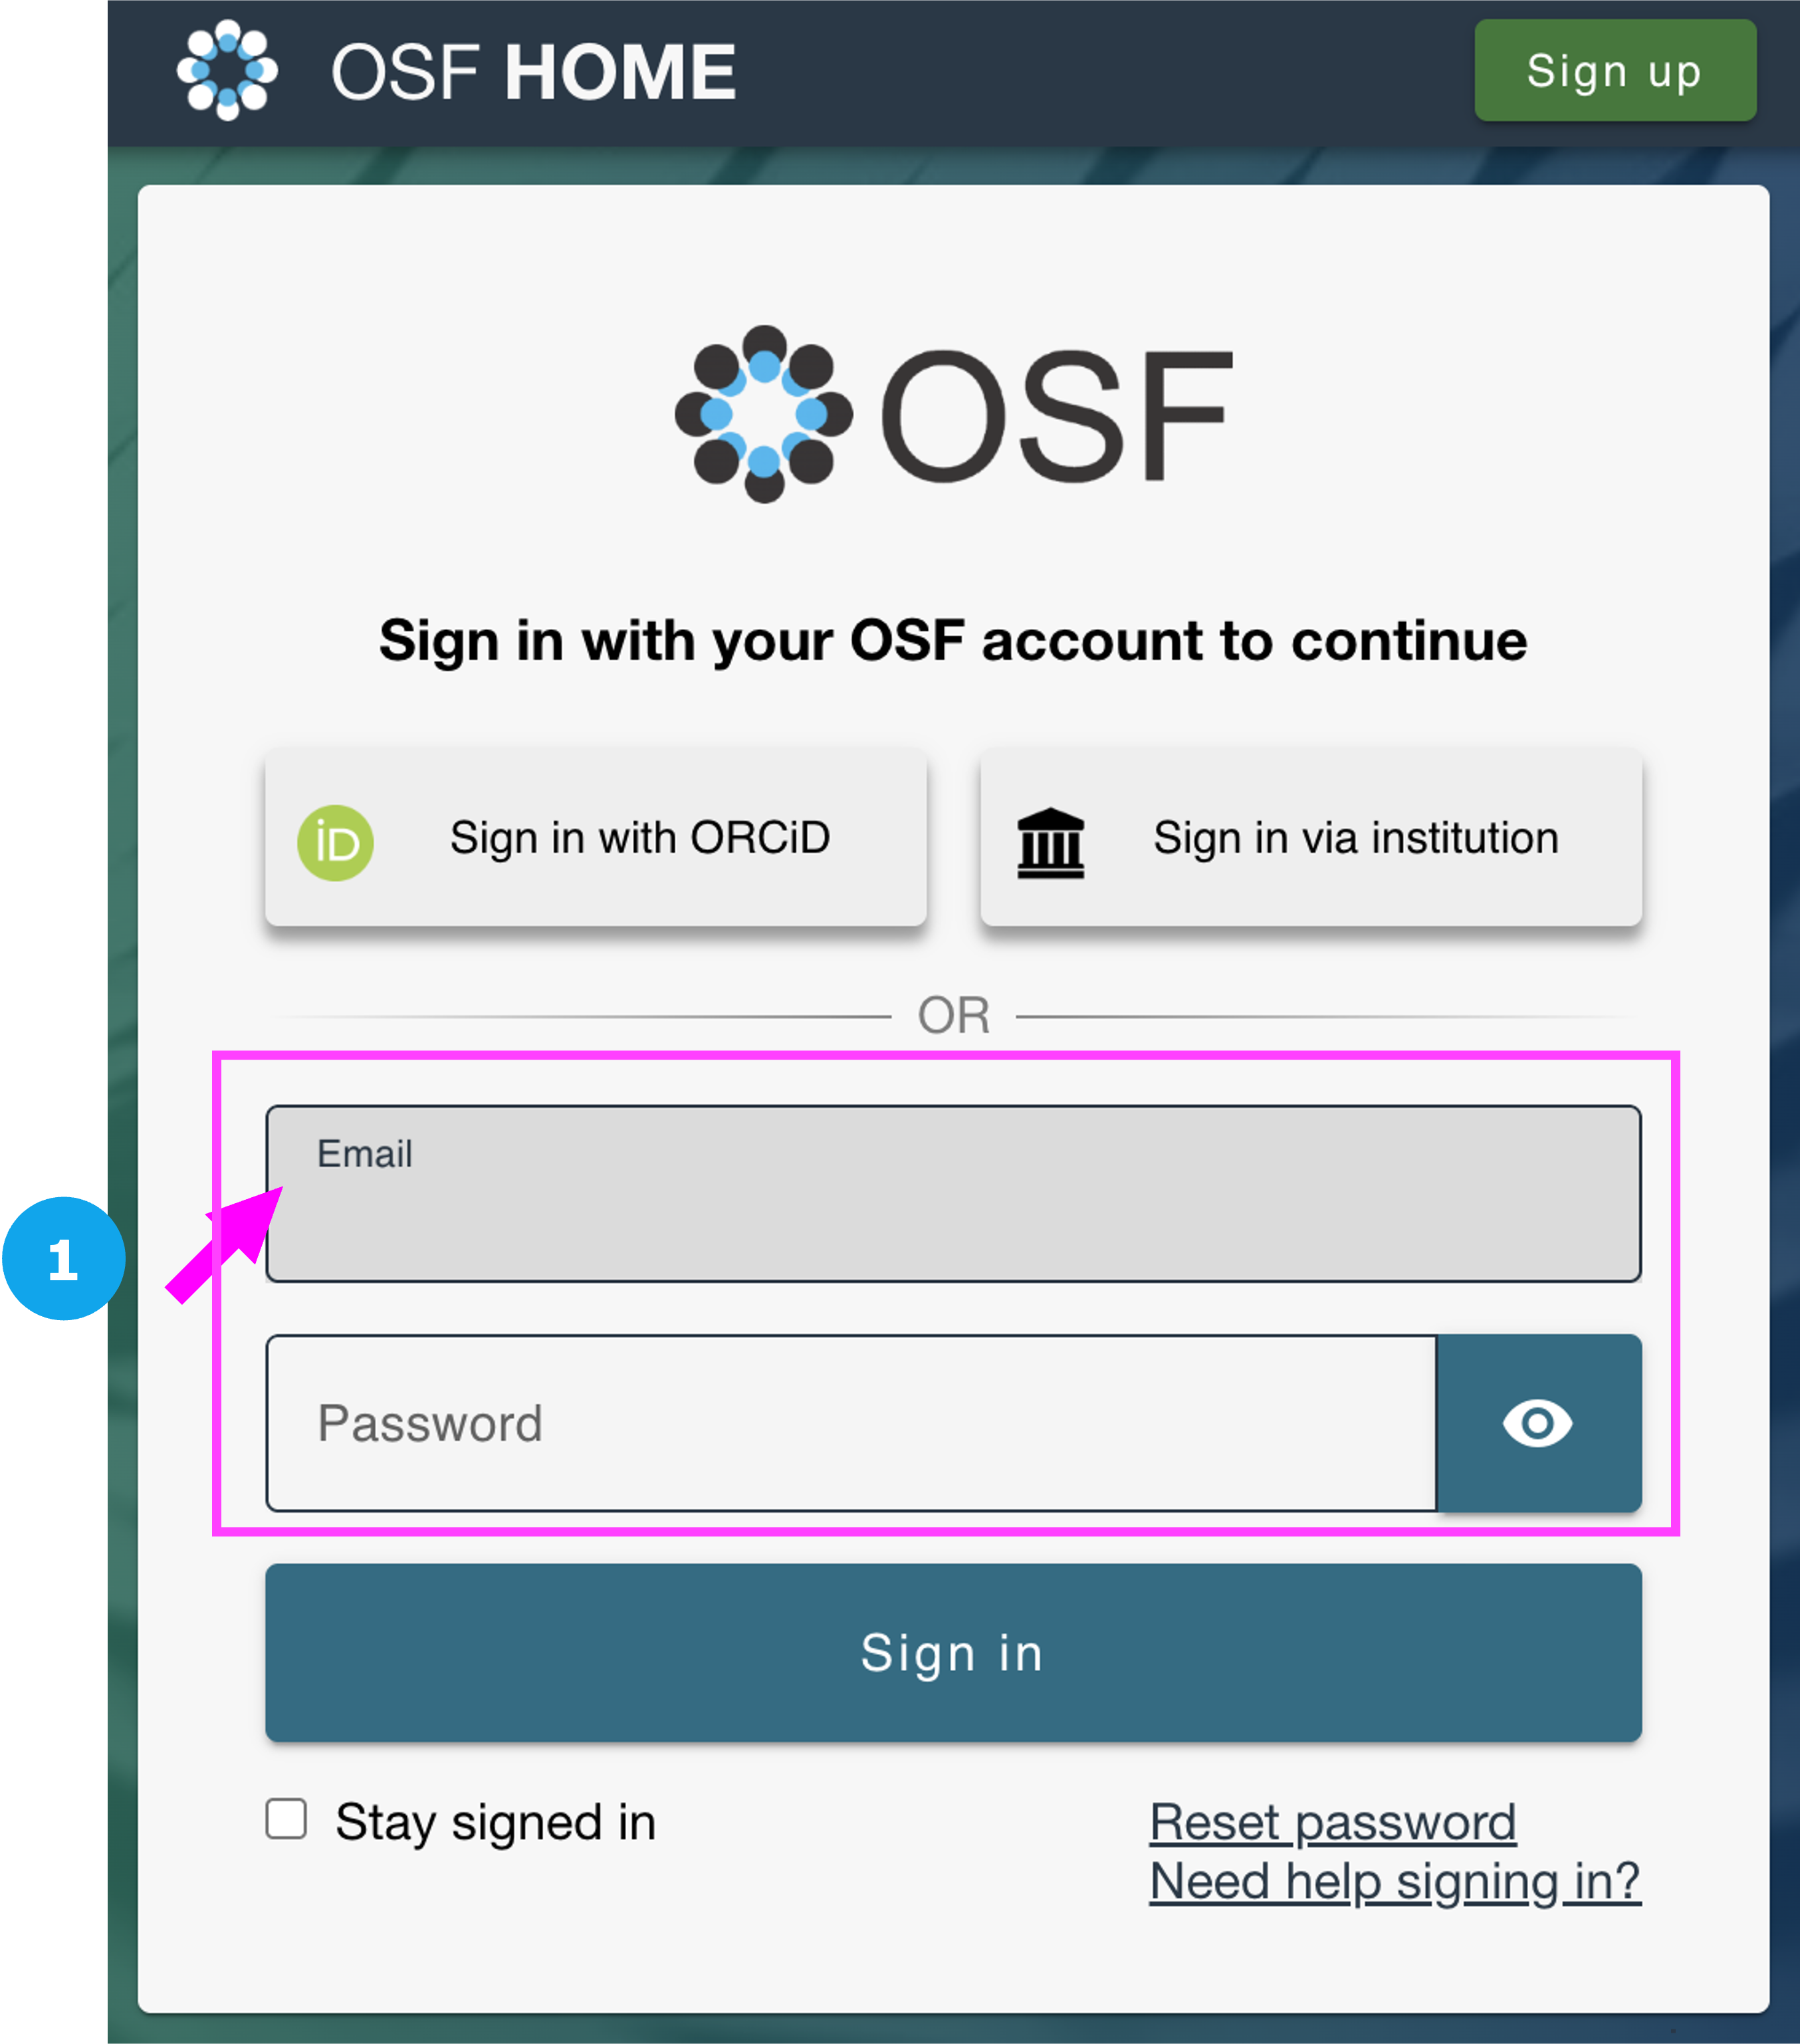
Sign in with Email
Enter the email and password you used to create your OSF account.
Sign in with ORCID
Please be aware of the following situations:
- When you sign in to the OSF with your ORCID and do not have an OSF account, a new OSF account will be created with your ORCID credentials.
- If you have an OSF account and you use the same email address for both your OSF and ORCID accounts, you can sign in to the OSF with your ORCID, and a second OSF account will not be created. In this case, when you sign in to OSF with your ORCID ID, your ORCID will automatically be added to your OSF account.
- If you have different emails on your OSF and ORCID accounts, then signing in to OSF through ORCID will create a second OSF account for you. If you find yourself in this situation, please see our Merge Your Accounts help guide for directions.
1) Click the Sign in with ORCID button to sign in to OSF with your ORCID credentials.
2) You will be taken to the "OAuth" page for ORCID.

3) Click the Authorize button to grant OSF access to your ORCID record. You will be logged in to your OSF account and taken to your Dashboard.

Sign in through your Institution
If your institution has partnered with OSF (i.e. they have an Institutional Landing Page), you can log in to OSF using your institutional credentials.
Click the Sign in via institution button.
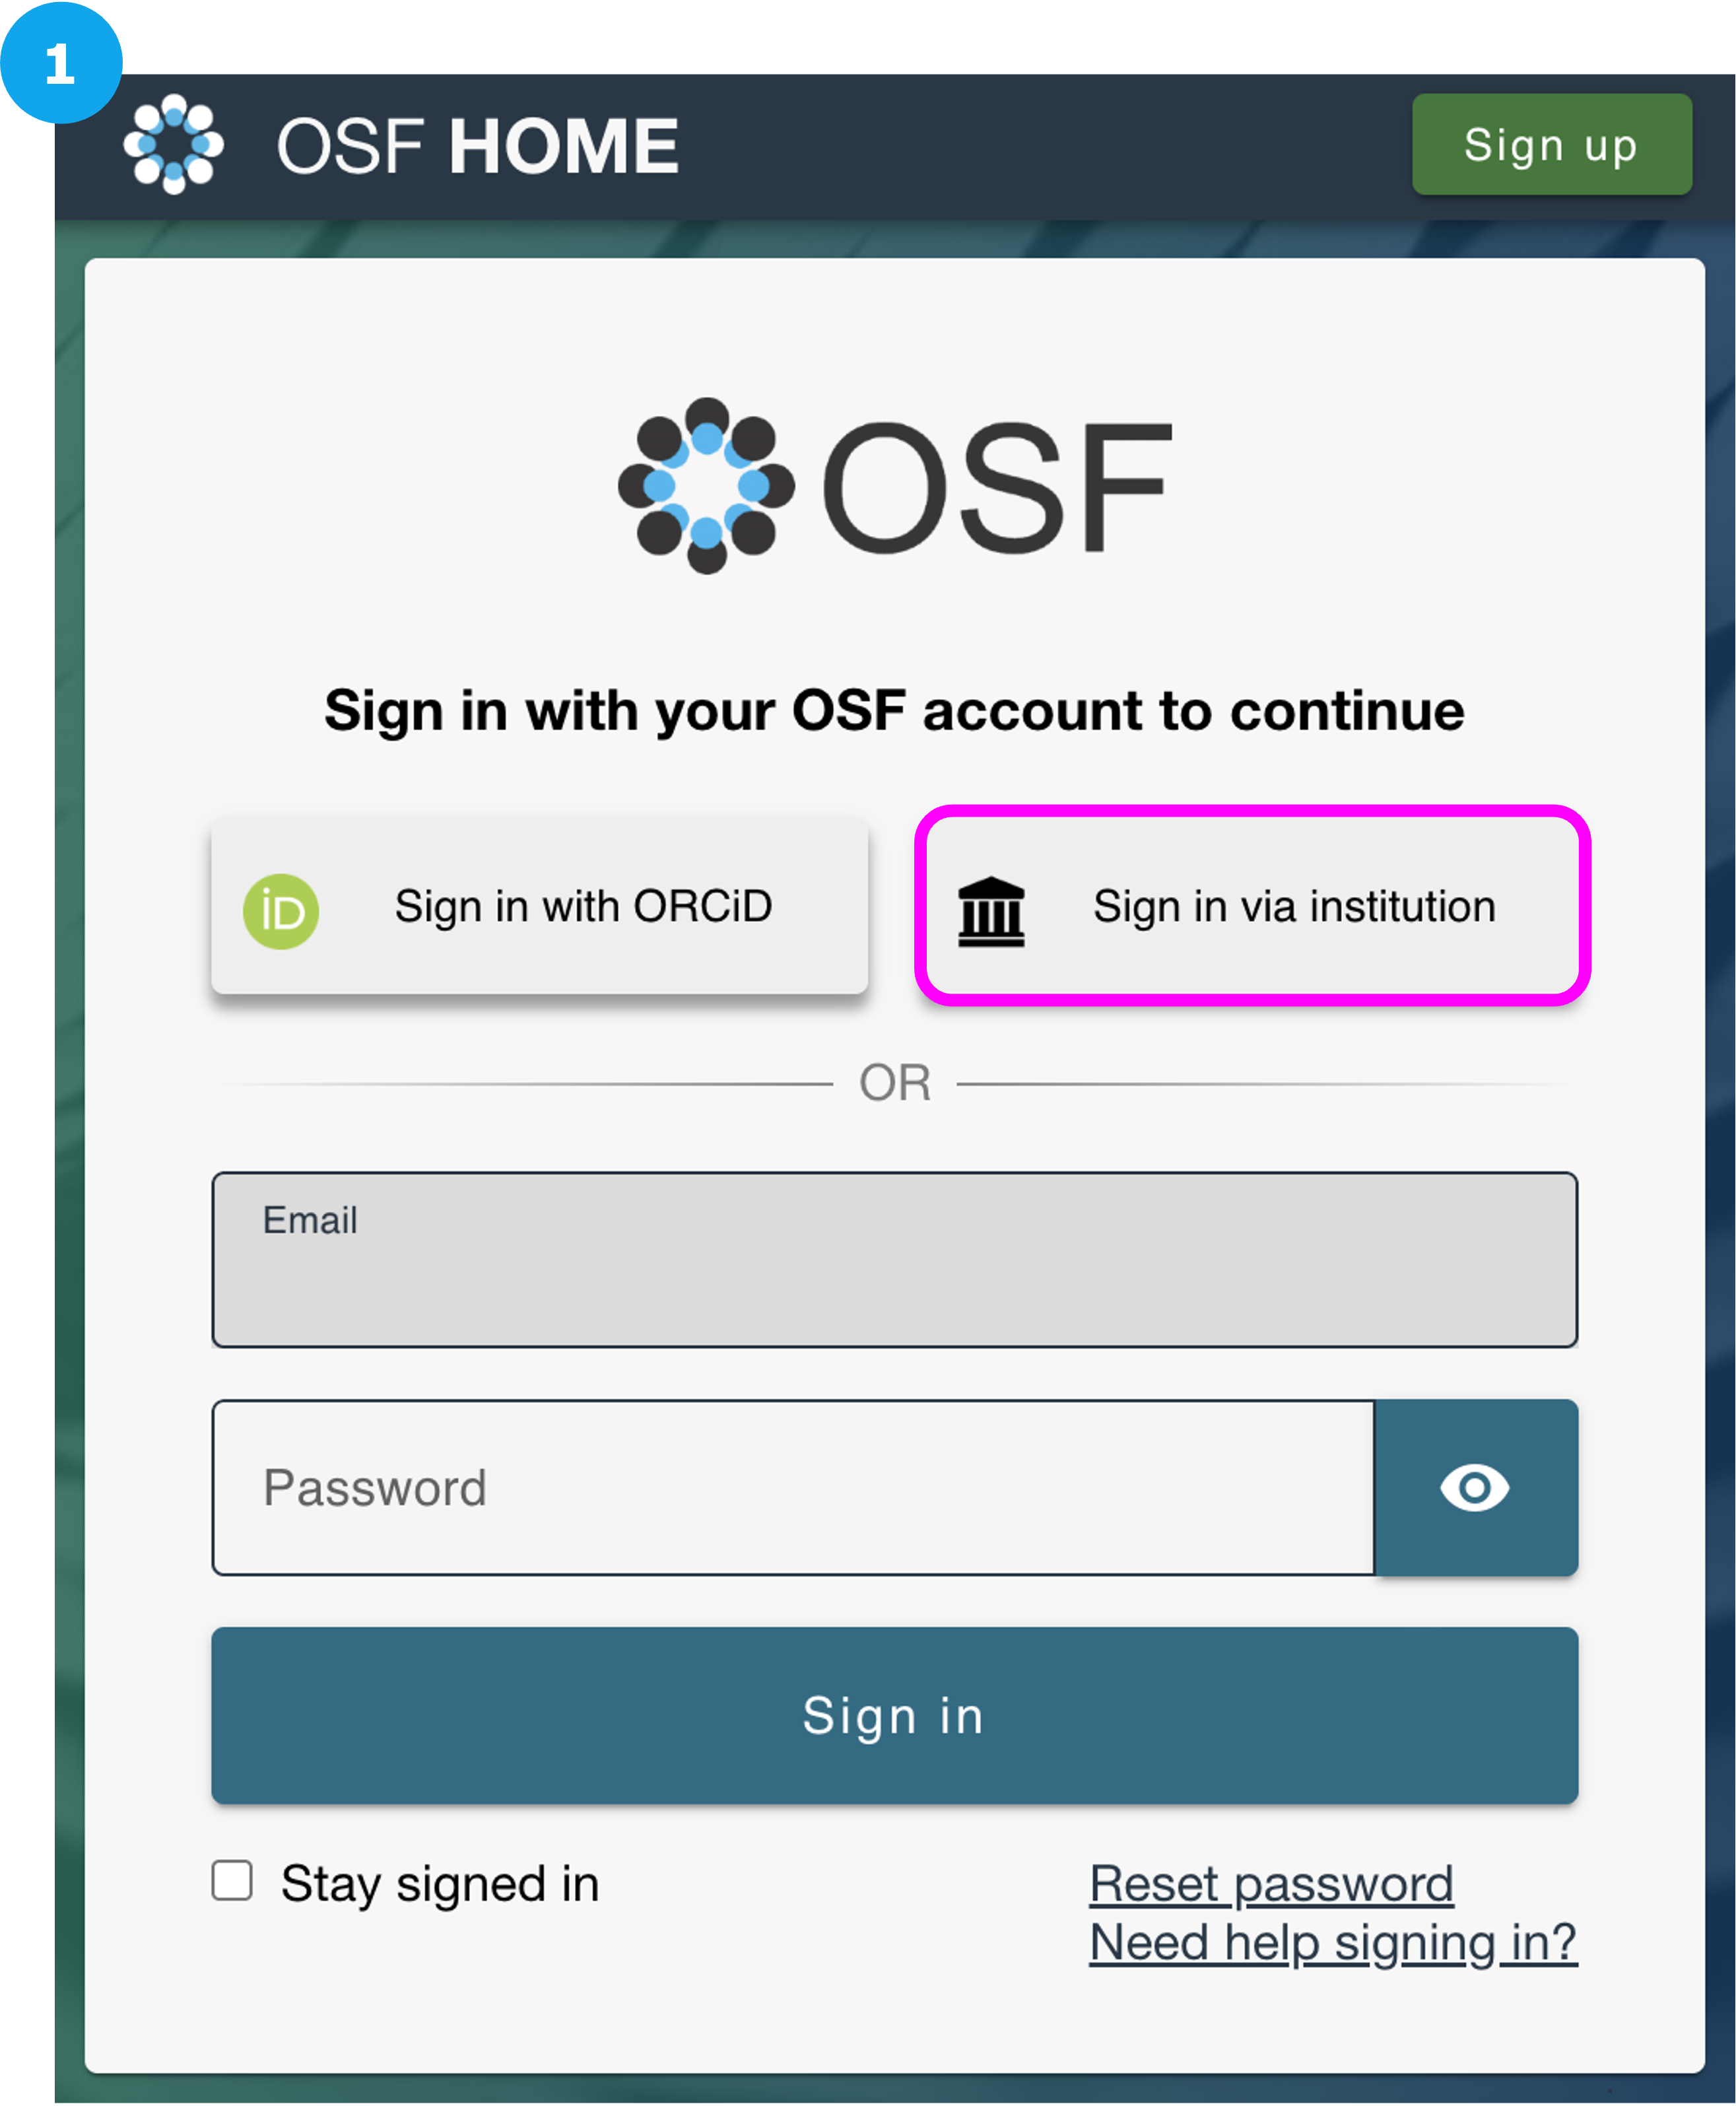
Choose your institution from the Select your institution dropdown, and then click Sign in.
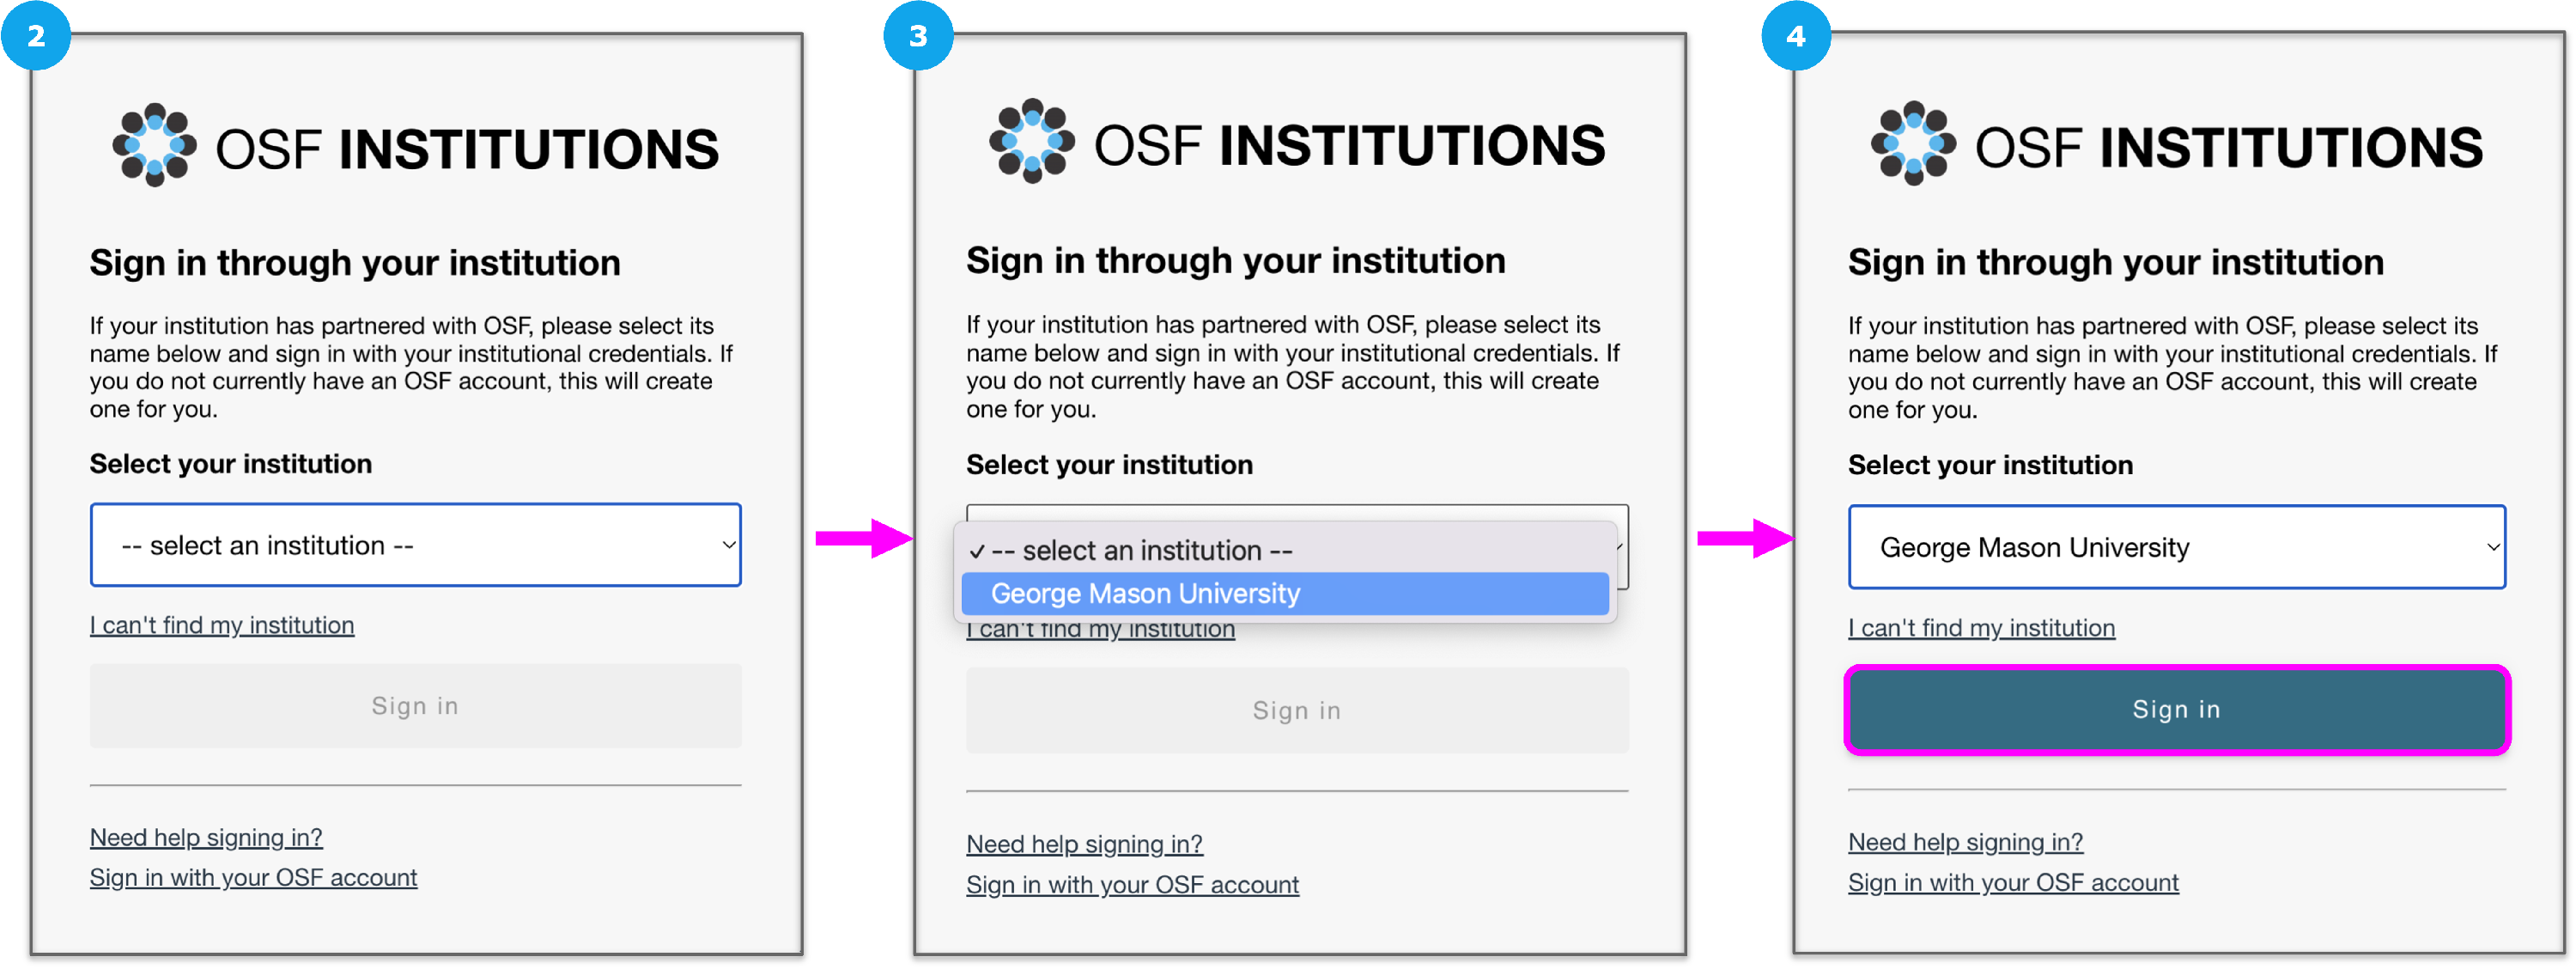
You will be directed to your institution's login page. Enter your institutional credentials, and then you will be returned to the OSF to complete sign in. Institutions have the option to set up Single Sign-on (SSO) for their users.
If your institution is not appearing as an option in the dropdown, see the guide Can’t Find My Institution
If you already have an OSF account under a different email, see the guide on Affiliating an Existing OSF Account With an Institution.
Claim an Unregistered Account
If you do not have an OSF account but are added to an OSF project, you will receive an email from the OSF notifying you that you have been added as a contributor to a project. If you wish to claim your account on OSF, you can do so by following this help guide.
- Open the email that you received from the OSF
- Click the link in the email to claim your OSF account
- You will be taken to the Set Password page on the OSF, where you can create the password for your account
- Enter your email address into the first field
- Enter and verify your password into the next two fields
- Confirm that you are not a robot
- Then, click Save
- Your OSF account will be created
- You will be taken directly to the project to which you were originally added as an unregistered contributor
Reset Your Password
If you forget your OSF password, don't worry - you can create a new one! Go to the OSF homepage, then click the blue Sign In button to bring up the OSF "Sign In" page. Click the Reset password link below the Sign In button.
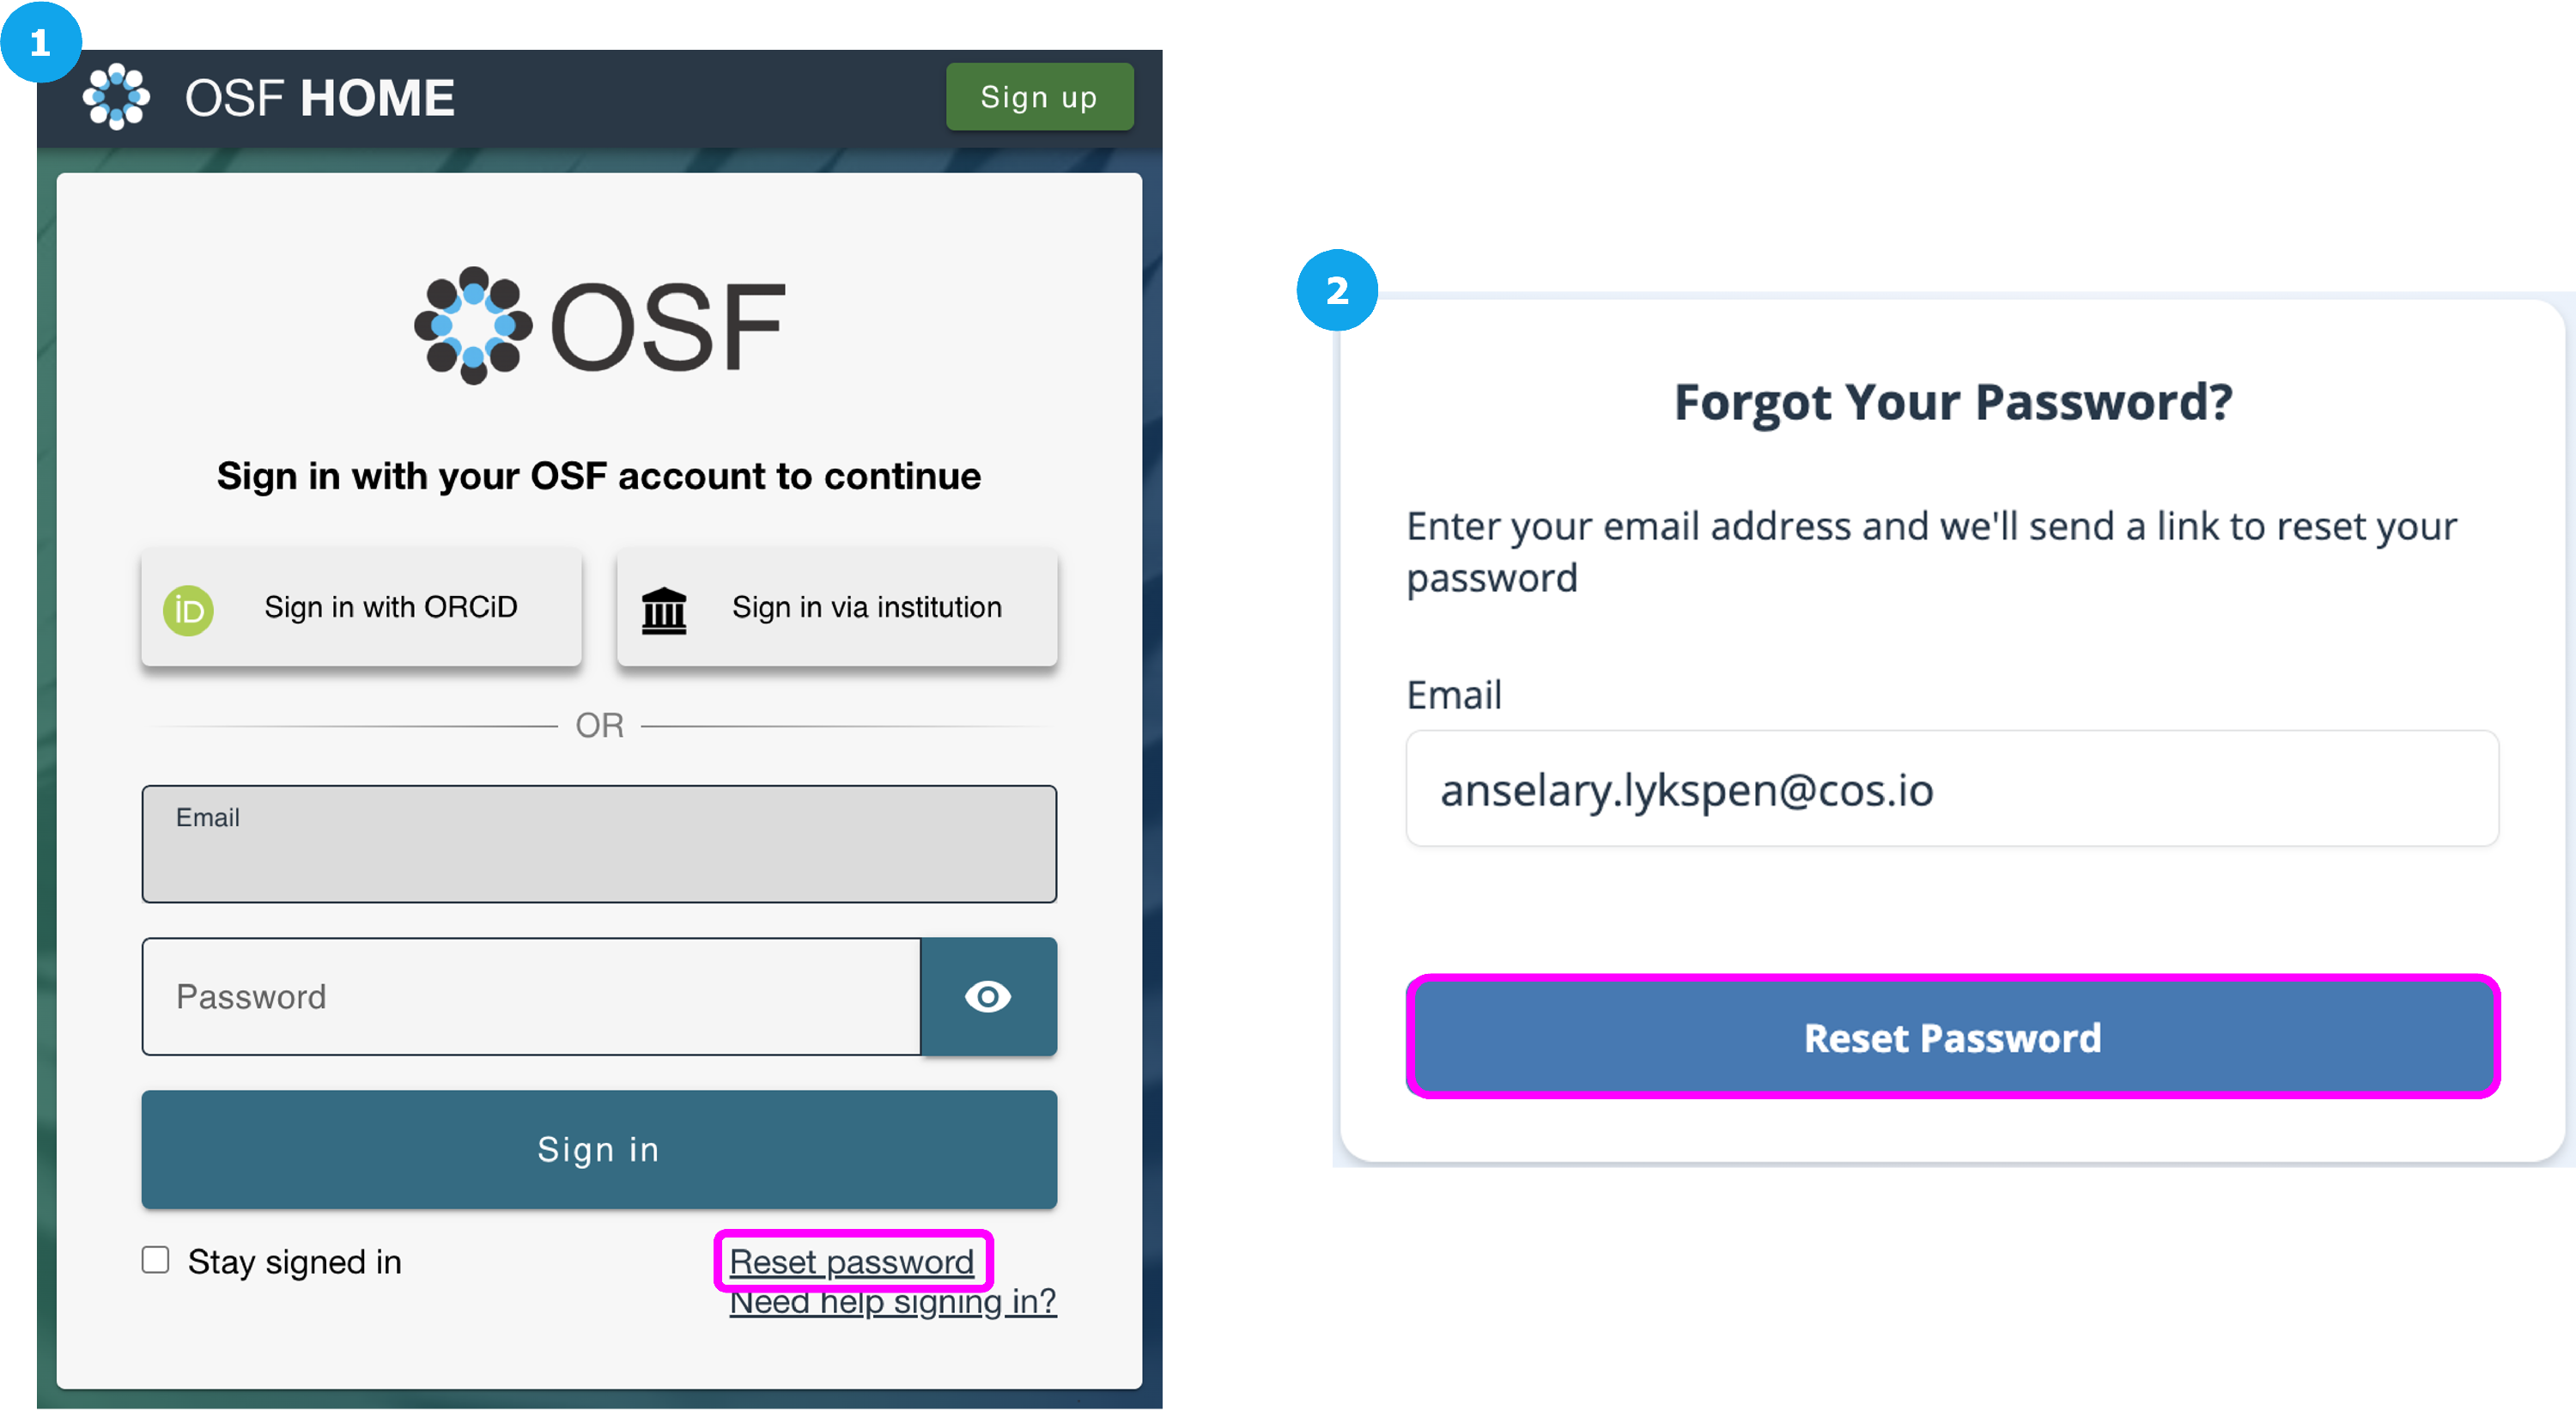
The "Password reset request" page will appear. Enter the email address you used to create your OSF account into the text box.
Check to make sure that you spell your email address correctly. If there are typos or missing characters in your email address or if you enter an email address that is not associated with your OSF account, you will not receive the email to reset your password.
When you're ready to submit your password reset request, click the Reset password button.
A green confirmation message will appear below. You will receive an email from the OSF that contains a link to reset your password. Click this link, and you will be taken to the "Reset Password" page.
Account Disabled or Spam Flagged
We investigate reported cases of OSF users being accidentally flagged or deactivated on a case-by-case basis. If you believe your account or material has been flagged as spam by mistake, please report it in the form below. Cases are reviewed within 48 to 72 hours. LINK to Form.
If you believe you have found spam on the OSF, please report these links to support@osf.io.
Edit Your Profile
Updating your profile only takes seconds and makes it easier for current and future collaborators to find you. You can input social media profiles, employment, and education information so other researchers can more easily discover, share, and collaborate with you.
Please note that this information is optional; you do not have to provide it.
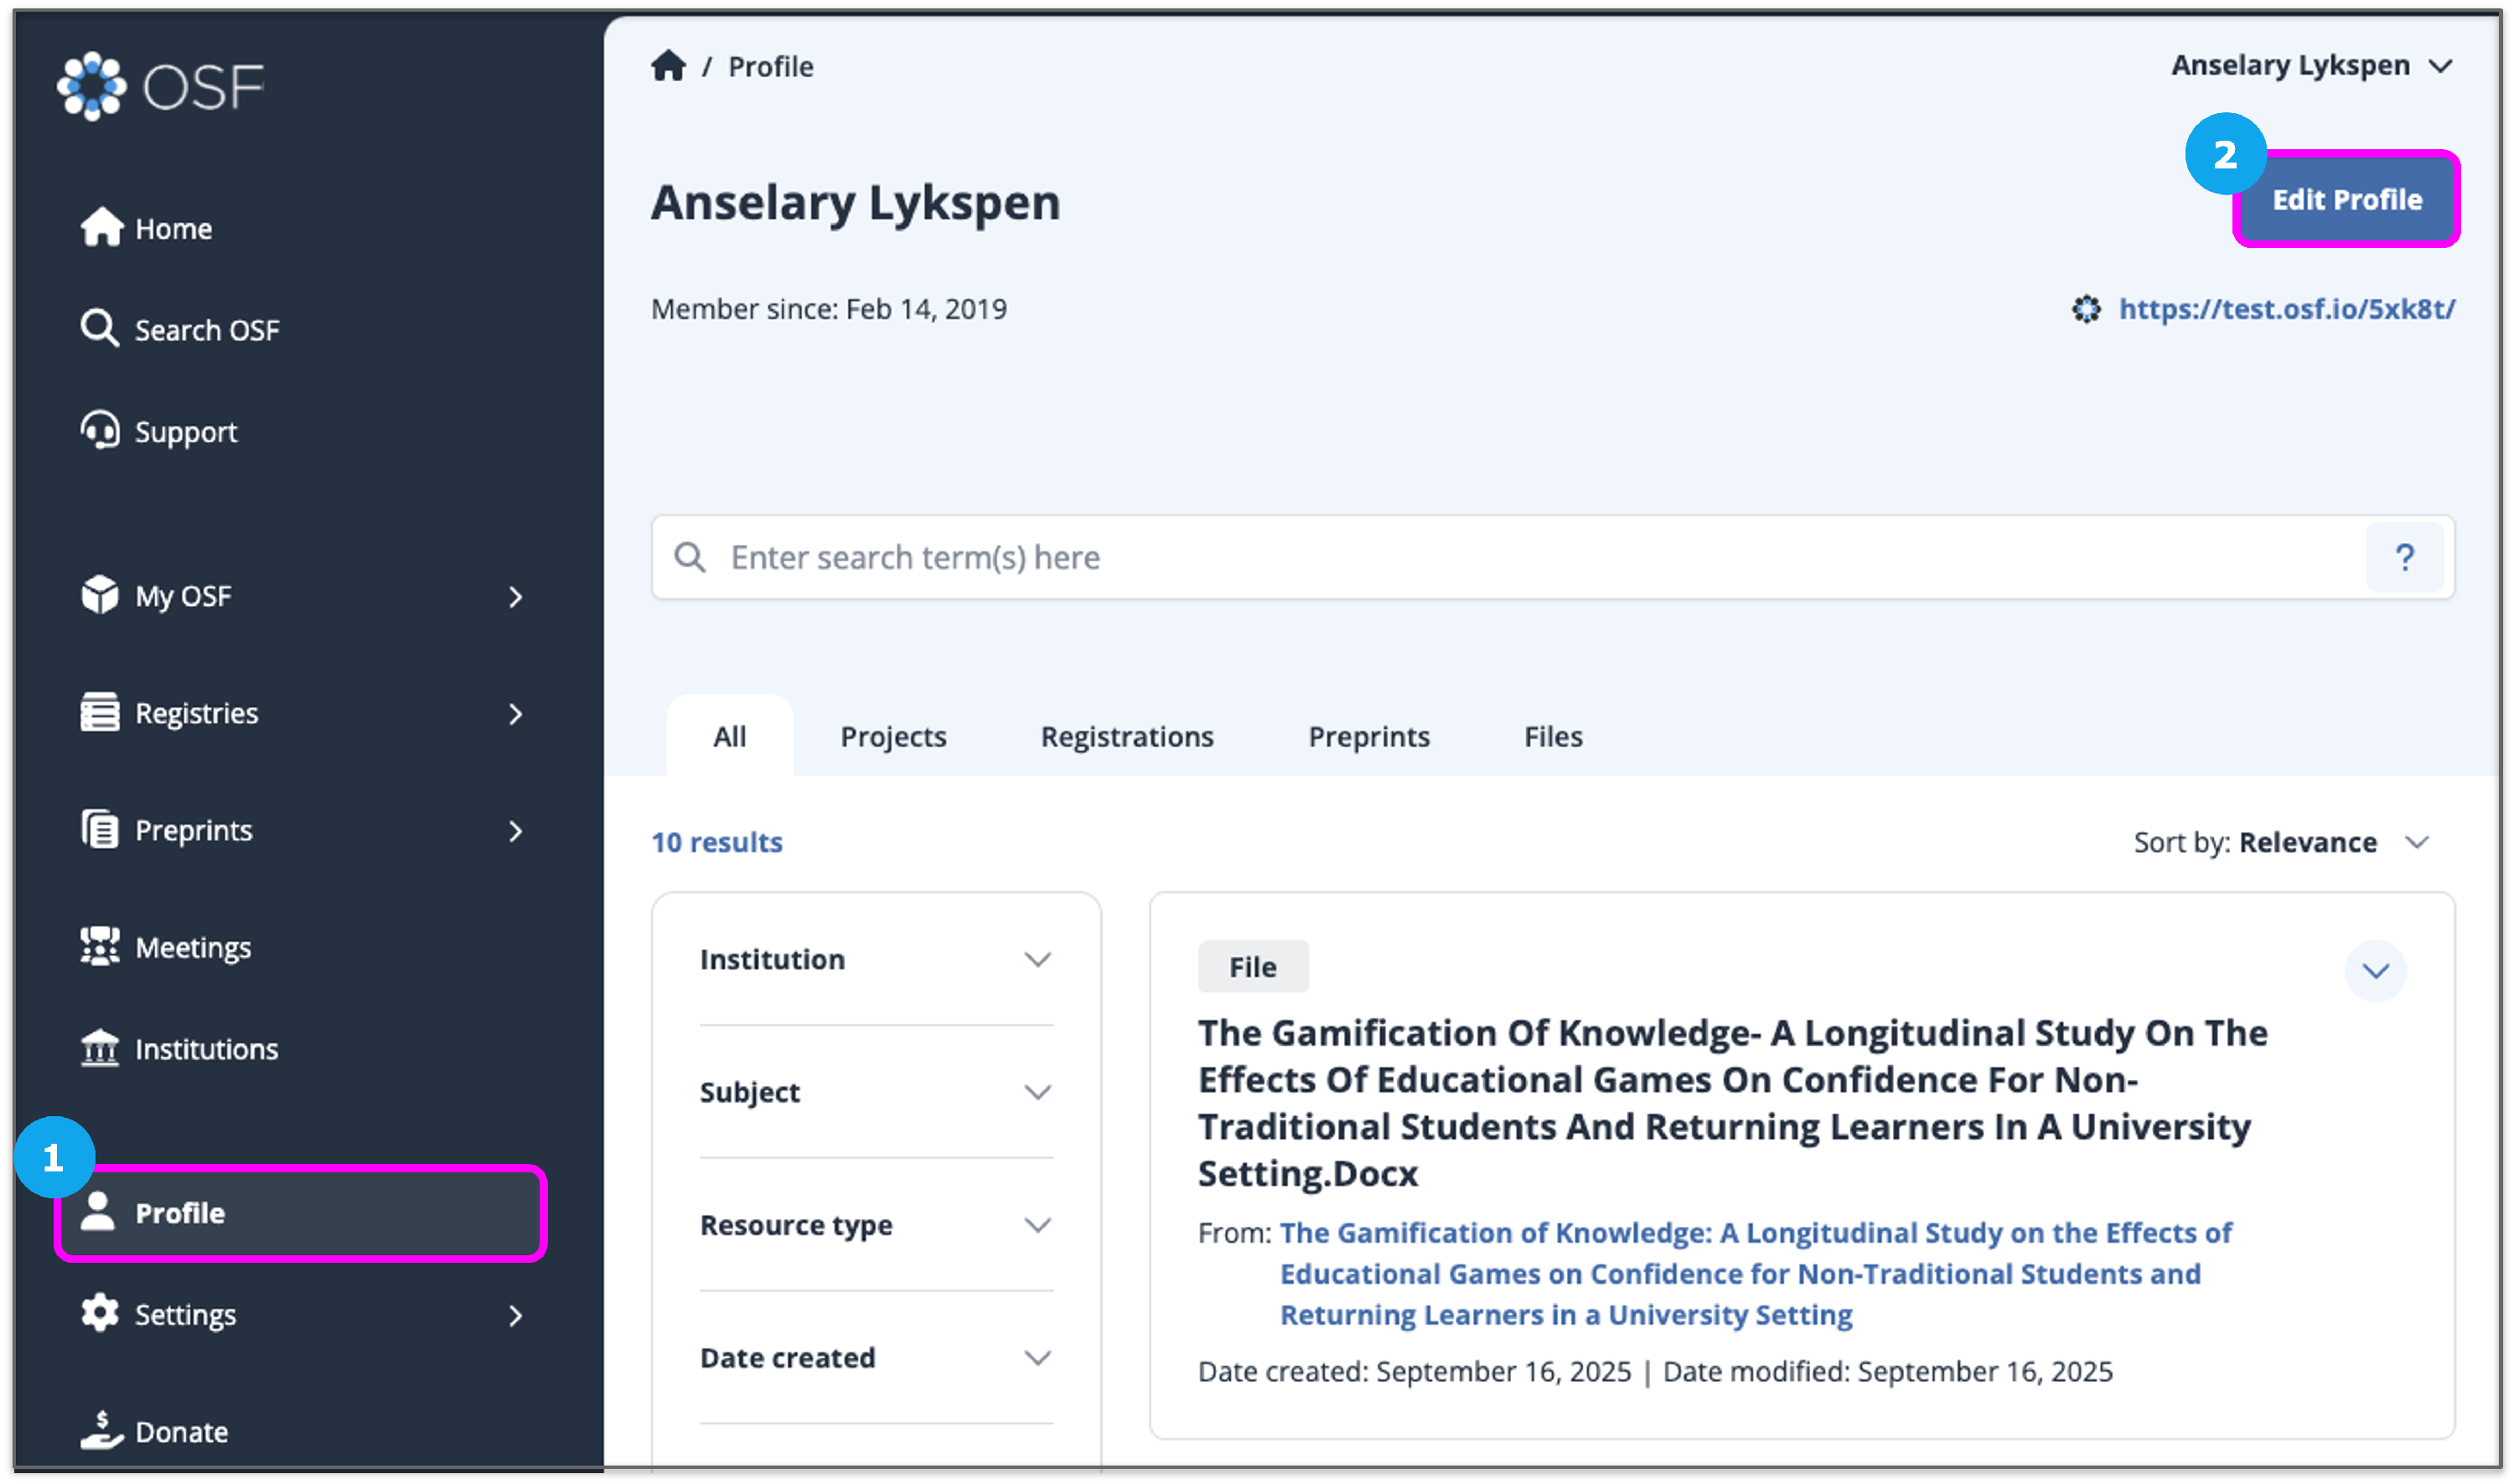
View your profile page
Sign in to the OSF. Click Profile from the left sidebar navigation.
Edit your profile
To edit your OSF profile, click the Edit Profile link in the top right of the page to bring up Profile Settings.
Edit your name
The Name tab is open automatically in the Profile Settings view. Enter your full name in the first field. This is the name that will appear on your profile, in user searches, and on projects' contributor lists.
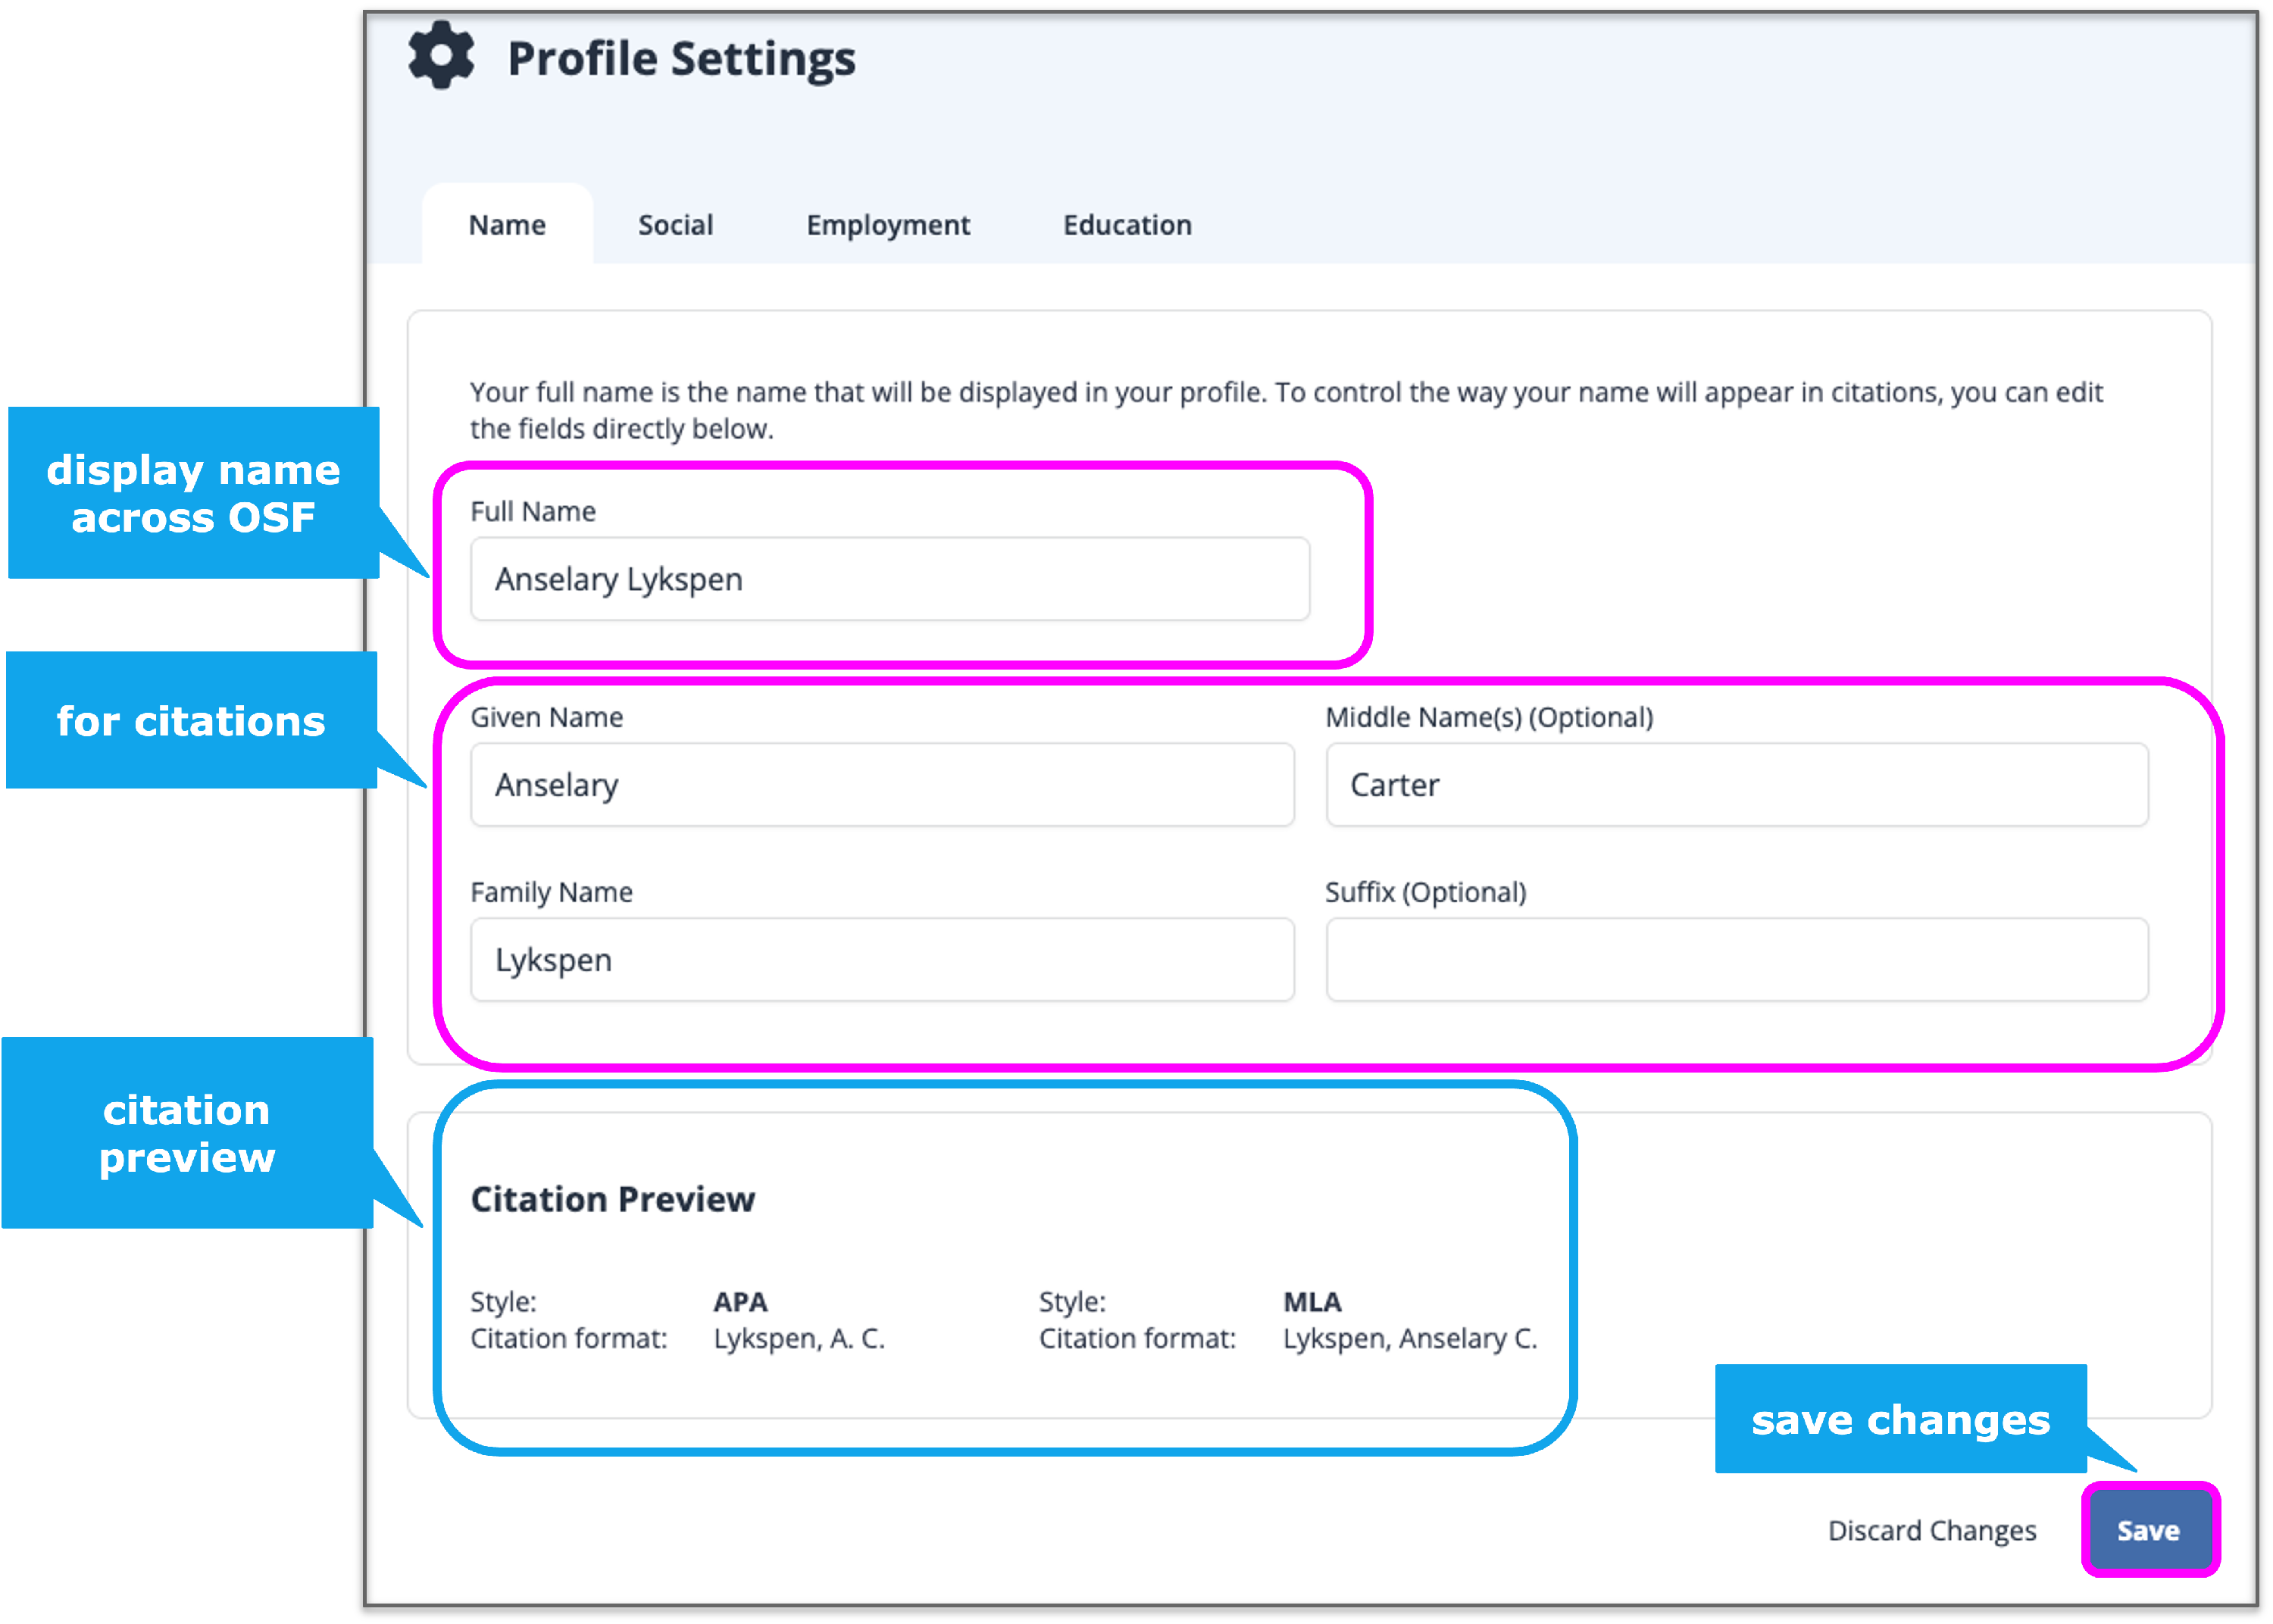
Click the Auto-fill button to automatically populate the name fields below - or fill them in manually. The second group of name fields is used in the pre-formatted citations that appear on "Project Overview" and "Component Overview" pages.
When you're finished filling out these fields, click Save to save your changes or Discard changes if you don't wish to update your name.
Provide your social information
Click the Social tab on the Profile Settings page. Add any links to professional and academic social media sites, and/or a personal website link.

When you're finished filling out these fields, click Save to save your changes or Discard changes if you don't wish to update or provide your social information.
Link an ORCID to your Profile
The only way to link an ORCID to your account is by authenticating with ORCID.
Please be aware of the following situations:
- The email associated with your ORCID will need to match the email associated with your OSF account.
- If you encounter any issues please reach out to support@osf.io
- You will be signed out of your OSF account during this process.
1) Navigate to your profile settings

2) On the Social tab in your profile settings, select the “Connect ORCID” button.

3) You will be taken to the "OAuth" page for ORCID, where you will sign in to ORCID.

4) Sign in with ORCID.

5) You will receive an email to confirm linking the ORCID.

Provide your employment information
Click the Employment tab on the Profile Settings page. By default, one employer is displayed, but you can add more by clicking the Add Position button. Include information such as department, title, start, and end date.

You can reorder employers by clicking and dragging them into the desired order.
When you're finished filling out these fields, click Save to save your changes or Discard changes if you don't wish to update or provide your employment information.
Provide your education information
Click the Education tab on the Profile Settings page. By default, one education entry is displayed, but you can add more by clicking the Add One More button. Include information such as department, degree, start and end date.

You can reorder education entries by clicking and dragging them into the desired order.
When you're finished filling out these fields, click Save to save your changes or Discard changes if you don't wish to update or provide your education information.
Configure Email and Notification Preferences
Configure and manage your email and notification preferences from your Notifications page. Receiving emails from the OSF provides you with reminders and workflow suggestions to help you manage your work and meet deadlines. Notifications on projects allow you to stay up-to-date on your project activity.
Notifications are sent instantly by default, and can be re-configured or turned off altogether.
Open your Notification settings
Sign in to the OSF. Click Settings from the left sidebar navigation, then click Notifications from the dropdown menu.
Configure email preferences
Select the OSF emails you want to receive from the options available:
- Open Science Framework General
- Open Science Framework Help
Both types of emails will be selected by default. To never receive these emails, deselect the checkboxes.
Then click Save.
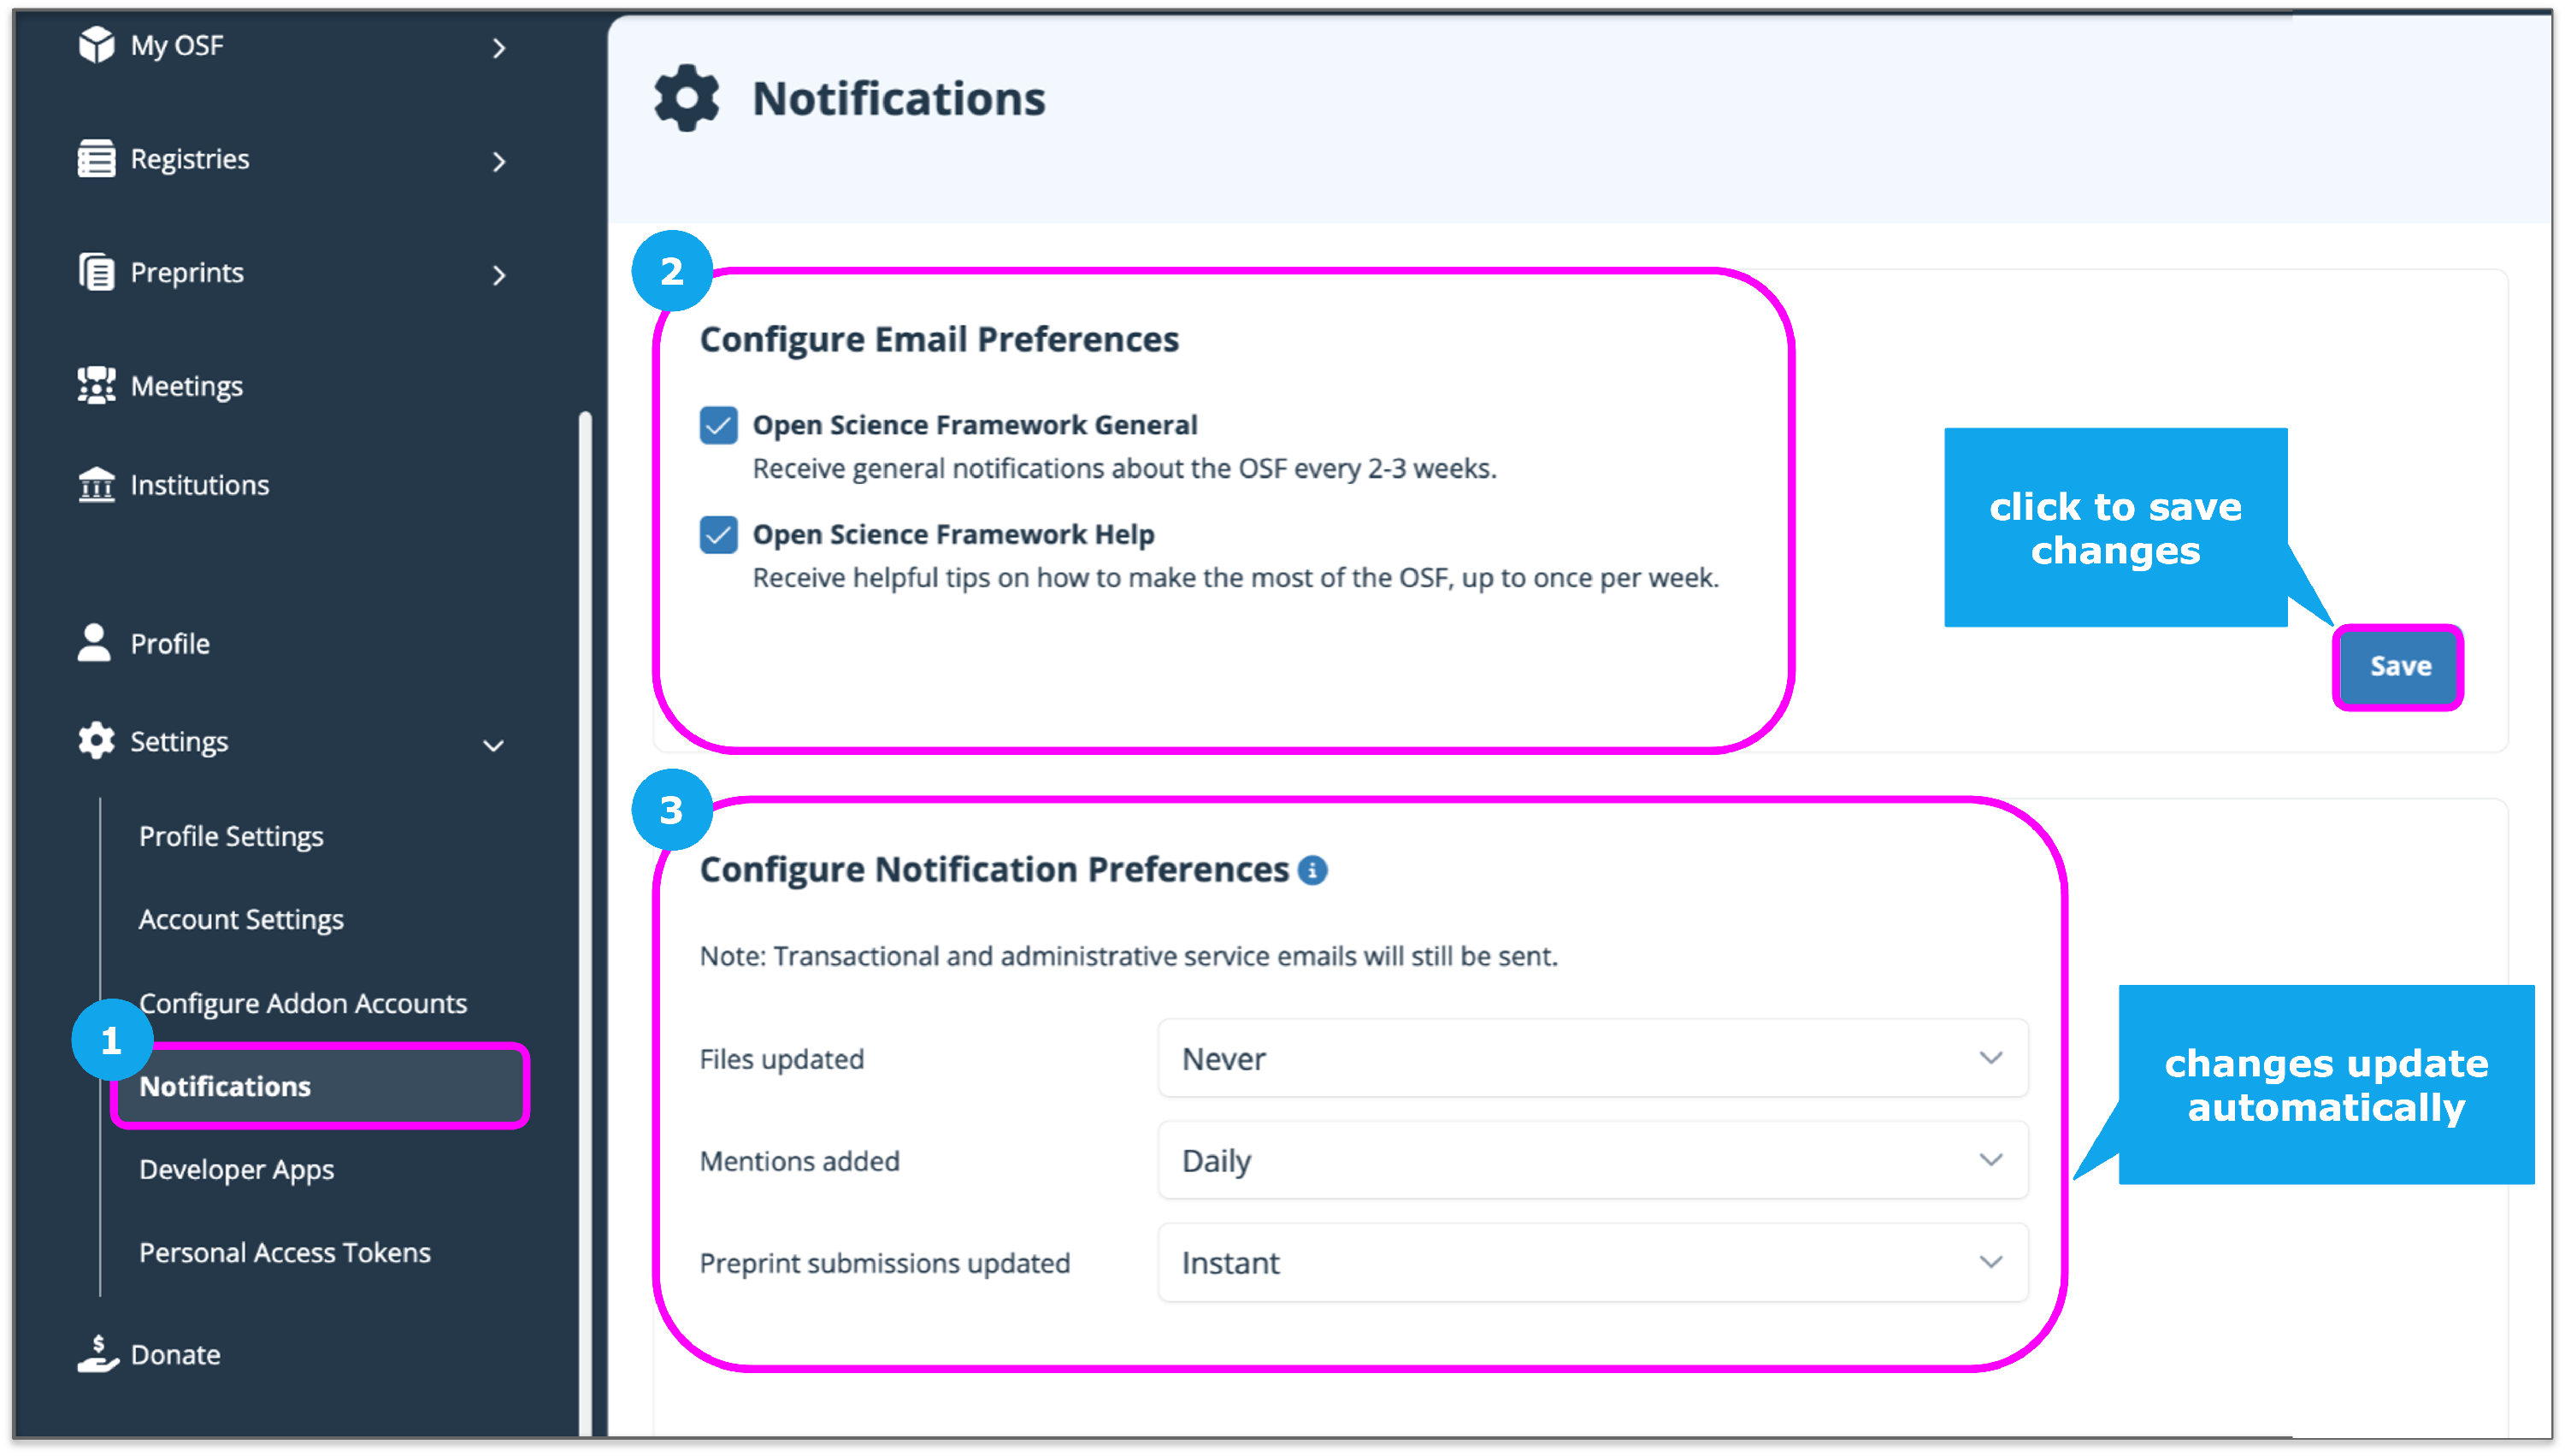
Configure global notification preferences for projects
The OSF sends email notifications for certain updates to your files and projects. The options are set to Instant by default. You can select from Instant, Daily, or Never.
These global preference updates will be applied to new projects going forward but will not apply to existing projects. Customized project notifications are managed from the project or component’s settings. See Configure Project Notifications for details.
Configure default global storage settings
You can configure your global storage to default to a specific storage location automatically.
These global storage settings will be applied to all OSF content you create.
- Go to your Account Settings.
- Select the storage location you would like to use as your default.
- Select Update.

Create a Personal Access Token
An OSF Personal Access Token (PAT) is an alternative to using your password for authenticating with the OSF for various tasks, such as interacting with the OSF API in scripts.
- Under Account settings select Personal Access Tokens.

- Enter a name for the token and select the permission level (scope).
- osf.full_read : View all information associated with this account, including for private projects.
- osf.full_write : View and edit all information associated with this account, including for private projects.
- osf.users.profile_read : Read your profile data
- osf.users.email_read : Read your primary email addres

- Once the token has been created you will only see it immediately after creation. Make sure you COPY the TOKEN.

Change Your Password
Do you want to update your password without going through the password-reset process? You can sign in to your OSF account and change your password from Account Settings.
Sign in to the OSF. Click Settings from the left sidebar navigation, then click Account Settings from the dropdown menu.

Scroll down to the Change Password section. Enter both your old and new passwords into the respective fields, then click the Update button.
Merge Your Accounts
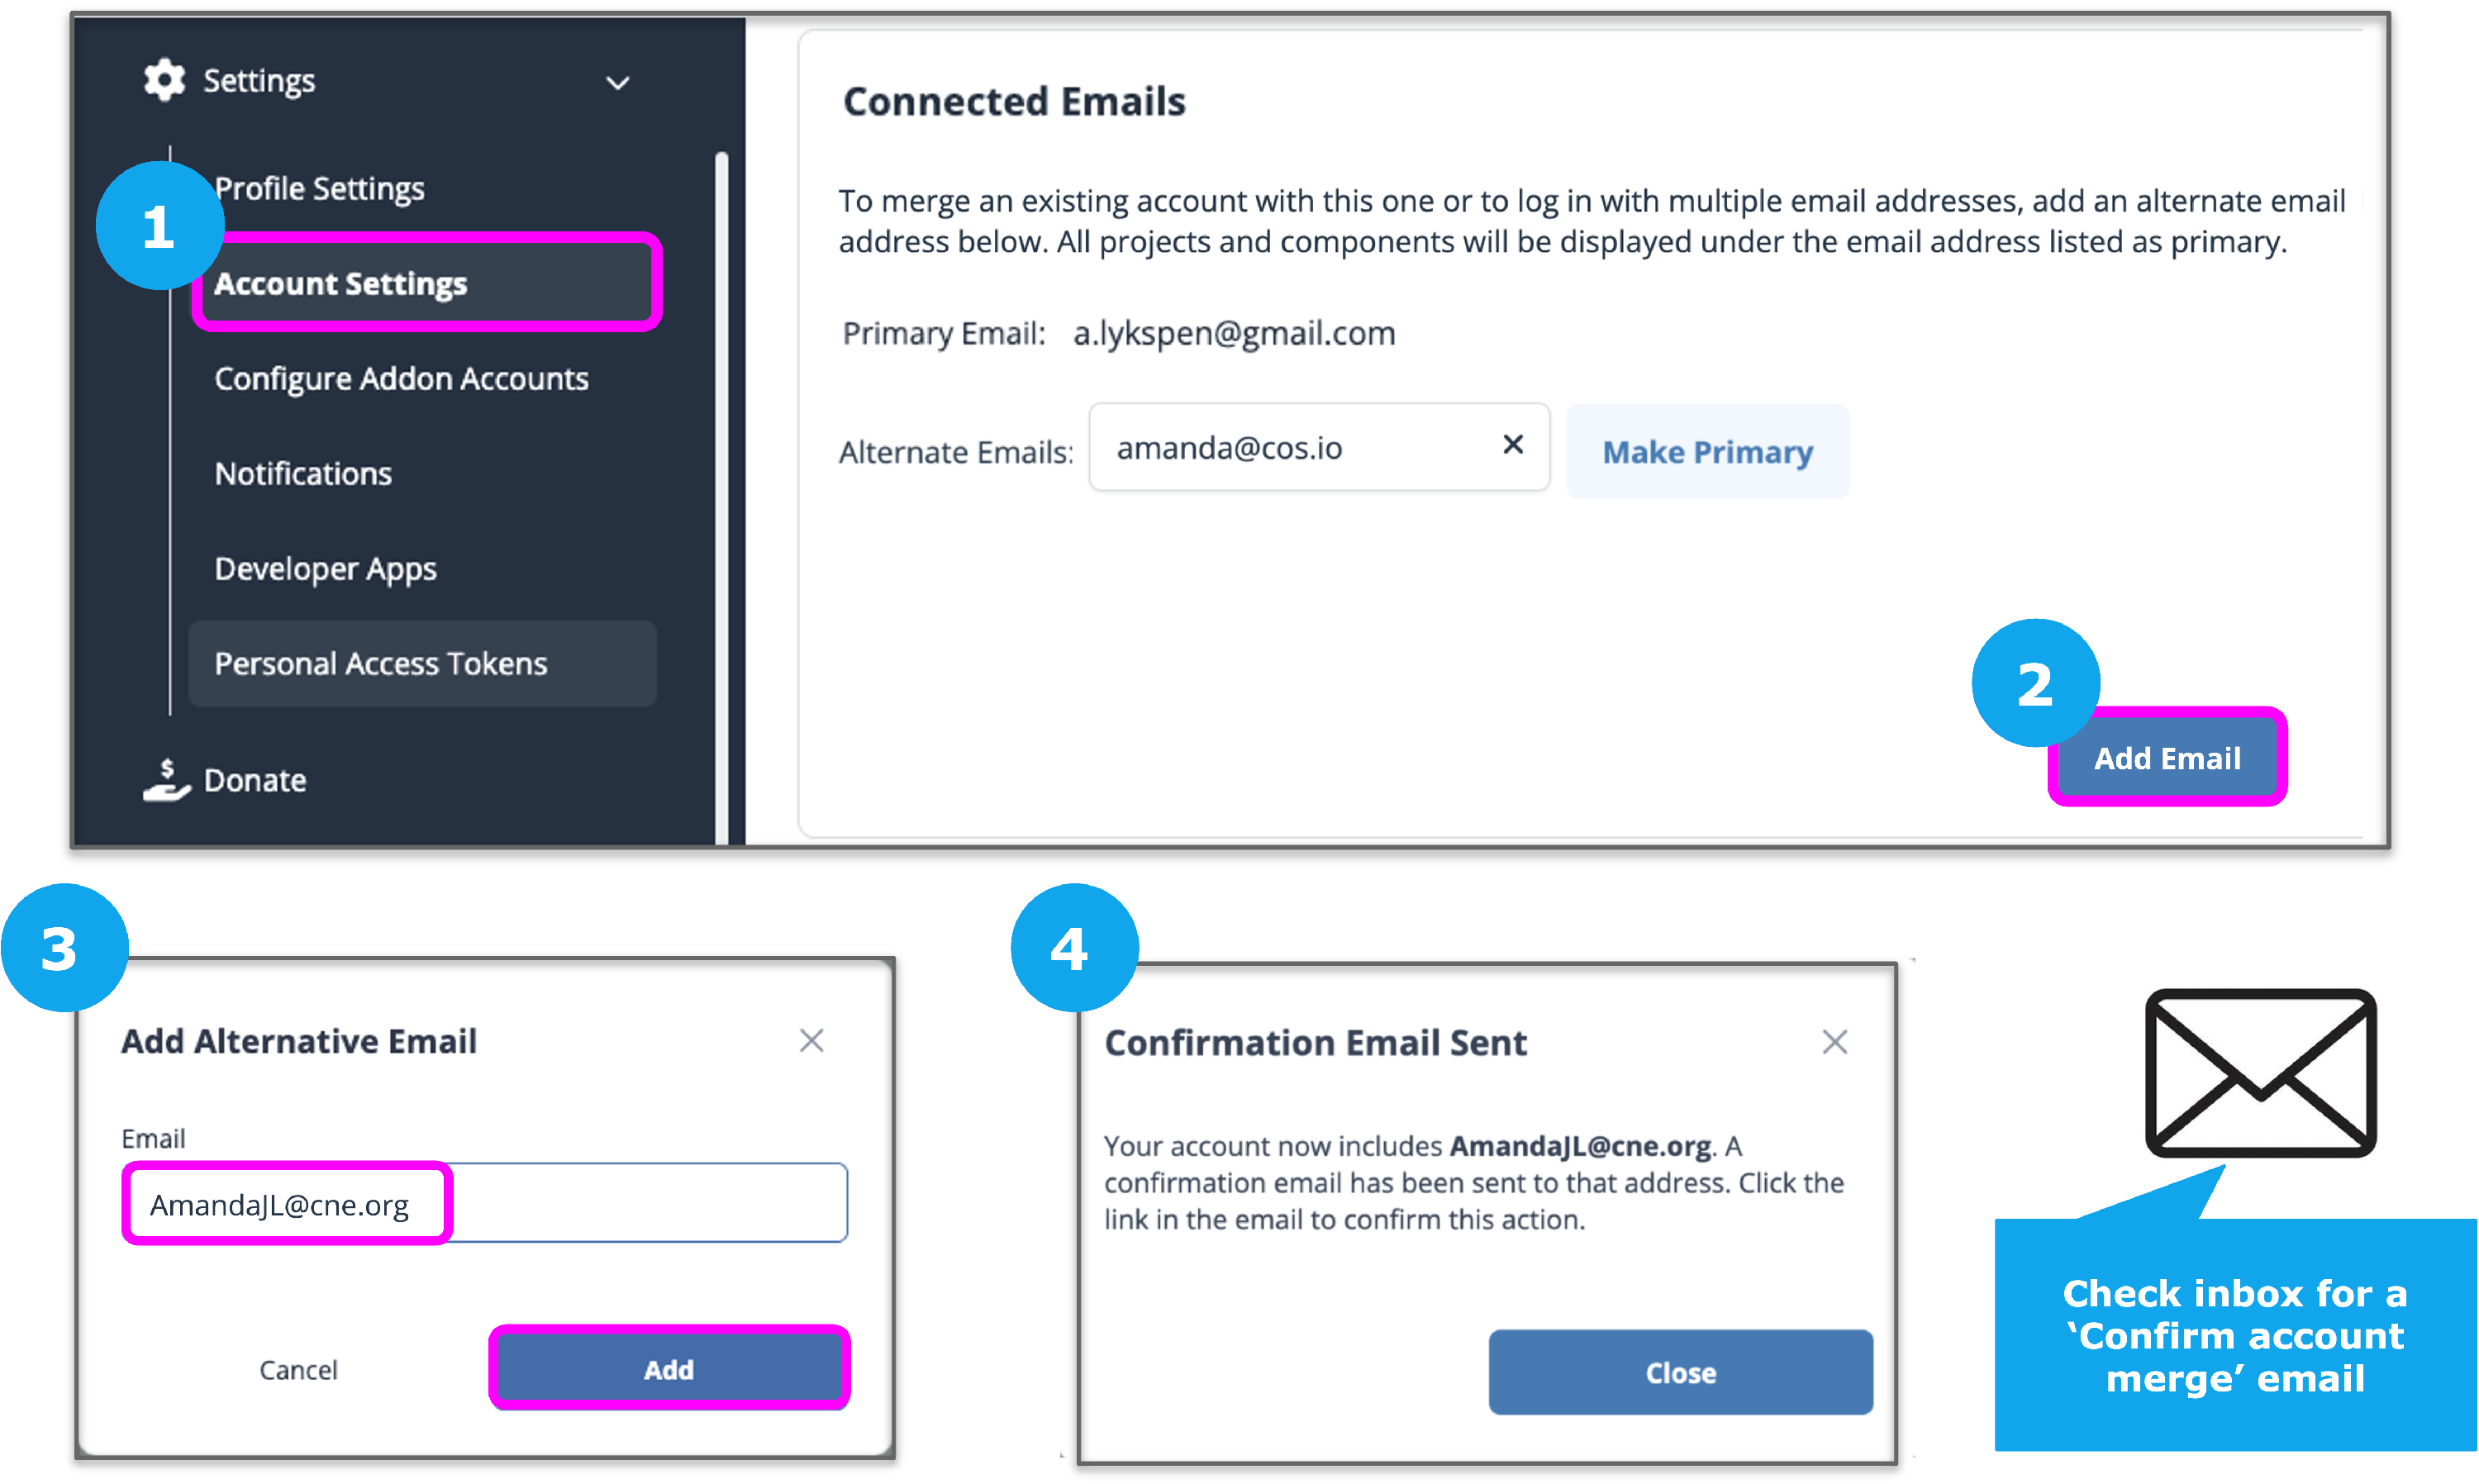
If you have two OSF accounts, you can merge them into one account. First, sign in to the OSF with the email address and password that are associated with your main OSF account. Then, click Settings from the left sidebar navigation, then click Account Settings from the dropdown menu.
Scroll to the Connected Emails section. Then, click the Add email button.
If you have two OSF accounts, enter the email address that is associated with your second OSF account (the account that you want to merge into your main account) into the Add Alternative Email dialog box. Click Add.
- You will receive an email from the OSF at the email address you entered above.
- Click the link in the email you receive to verify your email address.
- You will be taken to a page where you can sign in to the OSF.
- When you sign in to the OSF, enter your primary email address that is associated with your main OSF account (not the alternate email address that you're adding to or merging with your OSF account).
- Click the Sign in button.
After you sign in to the OSF, a modal will appear in which you will need to confirm that you want to merge your secondary account into the primary account. Click the Add email button to confirm the merge. The modal will close and your second OSF account will be merged into your primary OSF account.
Add a New Email Address to Your Account
You can add alternate email addresses in addition to your primary one that you can use to log in to your OSF account. For example, if you use a university email address, you may add an alternate email address if you anticipate losing access to your university one. You will only receive notifications and other OSF emails at your primary email address.
Add alternate email addresses to your account
Alternate email addresses allow you to sign in to the OSF under different emails (but with the same password that is associated with your OSF account). You can update any alternate email address to be your primary email.
Sign in to the OSF. Go to Settings on the left sidebar navigation, then click Account Settings from the dropdown menu.
Scroll to the Connected Emails section. Then, click the Add email button. Enter the email address you wish to add into the Add Alternative Email modal. Click Add.
A confirmation modal will appear with instructions.

- You will receive an email from the OSF at the email address you entered above.
- Click the link in the email you receive to verify your email address.
- You will be taken to a page where you can sign in to the OSF.
- When you sign in to the OSF, enter your primary email address that is associated with your main OSF account (not the alternate email address that you're adding to your OSF account).
- Click the Sign in button.
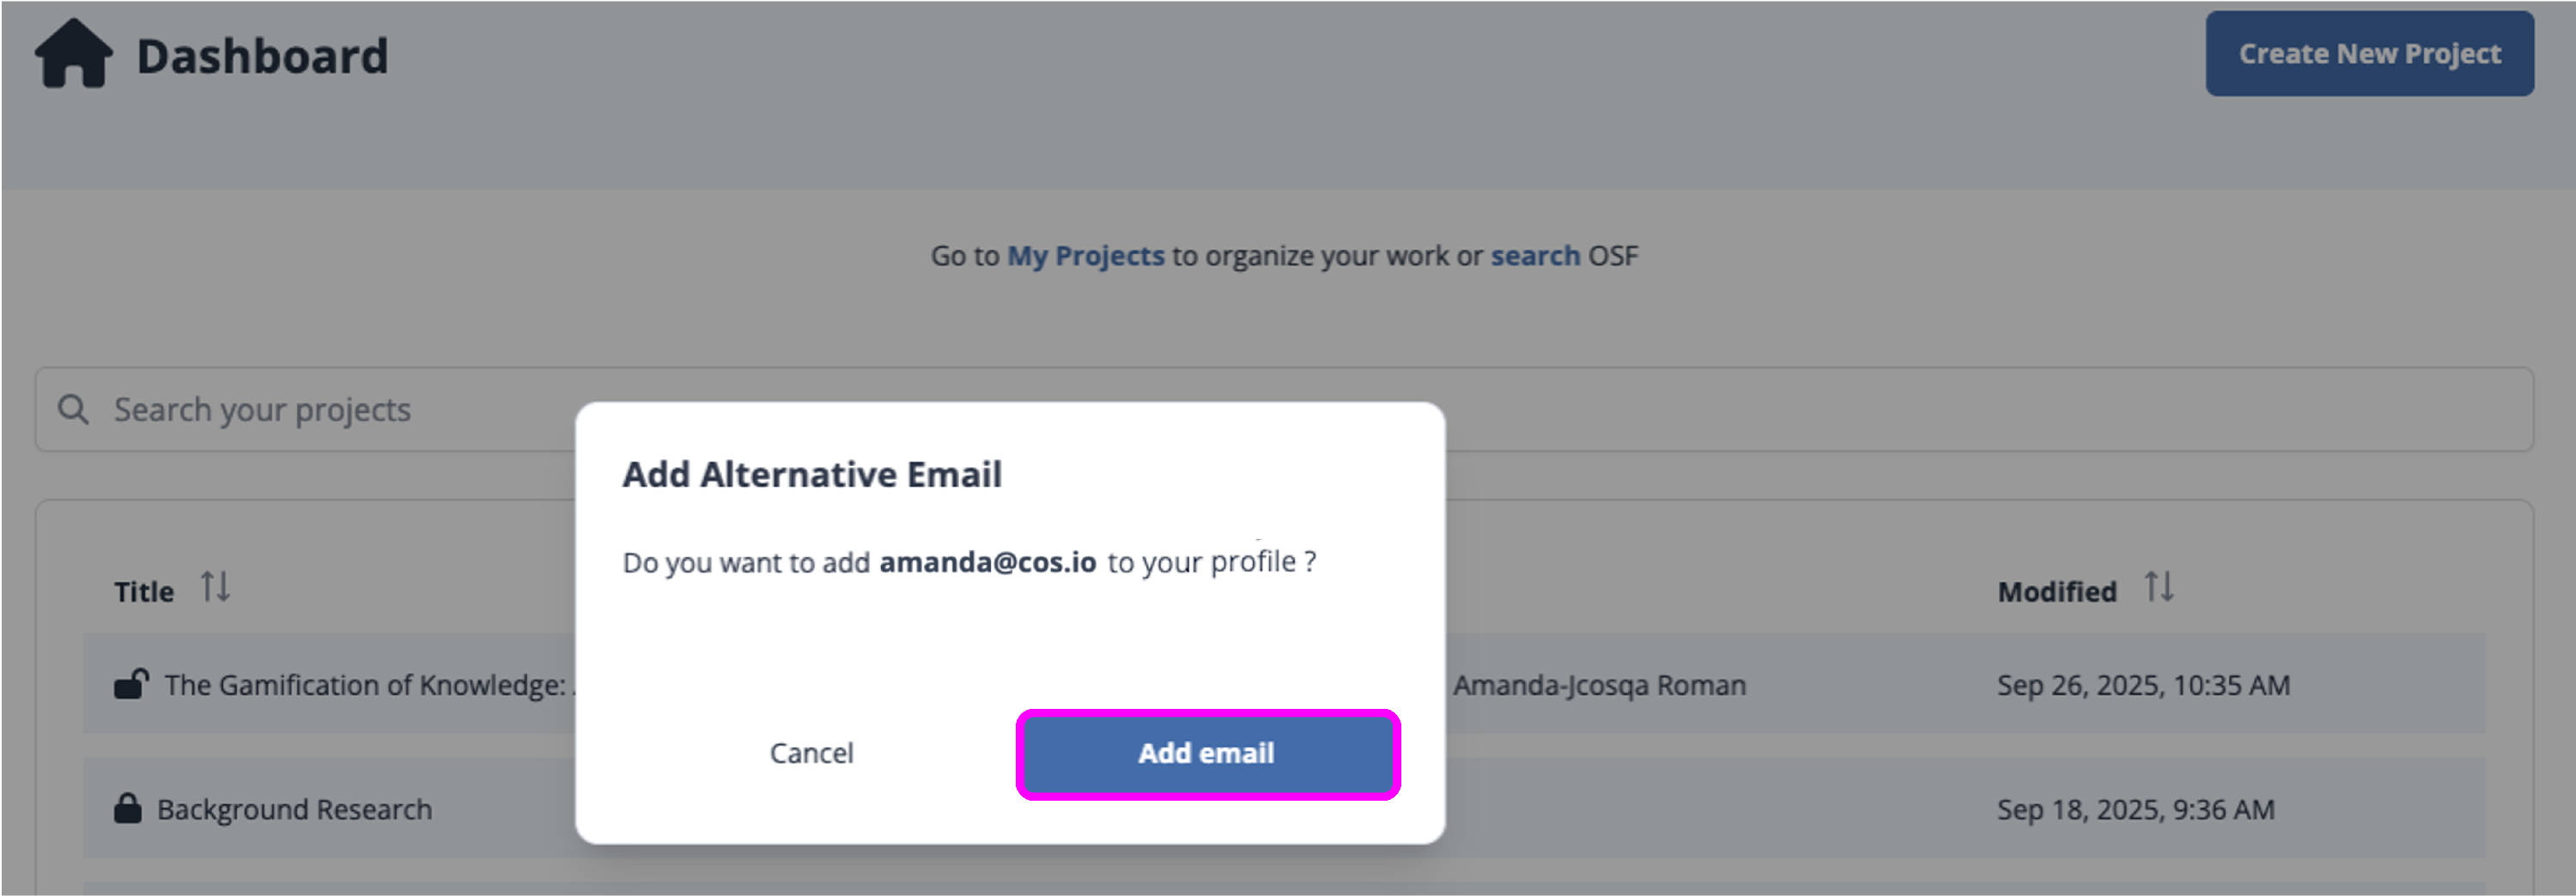
After you sign in to the OSF, a modal will appear in which you will need to confirm that you want to add the alternate email address to your OSF account.
Click the Add email button. The modal will close and your alternate email address will be added to your account.
Change the primary email address on your account
To change your primary email address, you will first need to add an alternate email address to your OSF account.
Sign in to the OSF. Go to Settings on the left sidebar navigation, then click Account Settings from the dropdown menu.
Scroll to the Connected Emails section. Then click the Make primary button to the right of the alternate email address.
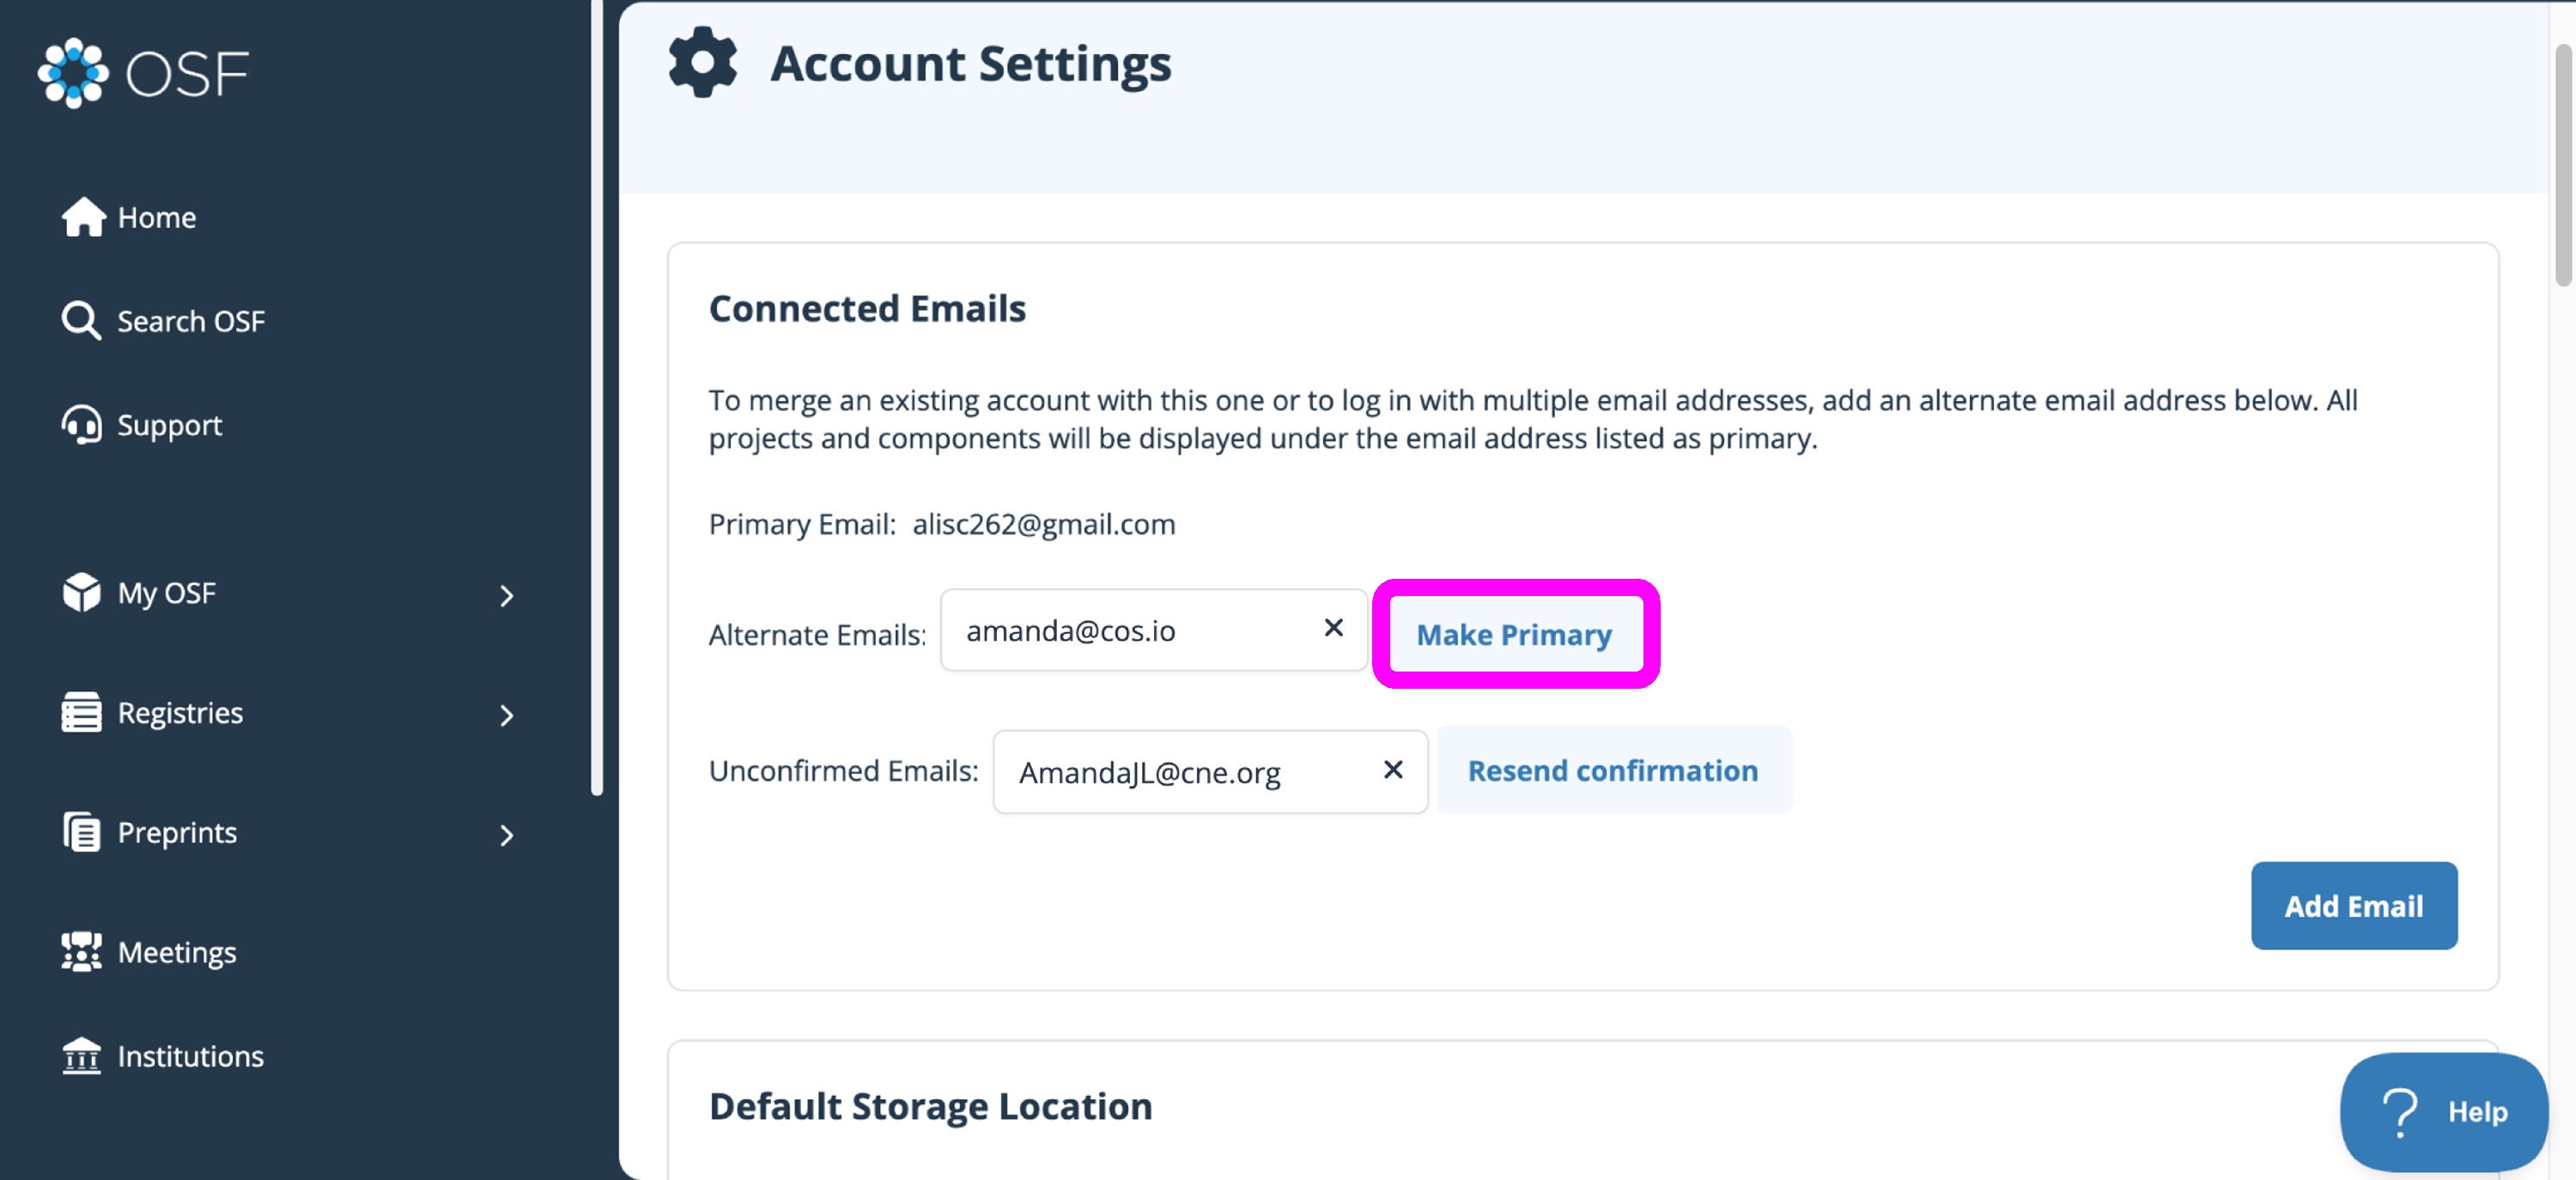
The alternate email address will be made your primary email on your OSF account. You can still use either email address to sign in to the OSF. You will receive OSF emails and notifications at your new primary email address.
Remove an alternate email address from your account
Only alternate email addresses can be removed from your account - the primary email address cannot be removed without first assigning a new primary email.
To remove an alternate email address from your OSF account, click the X to the right of the email you desire to remove.

Click the red Delete button on the confirmation modal.
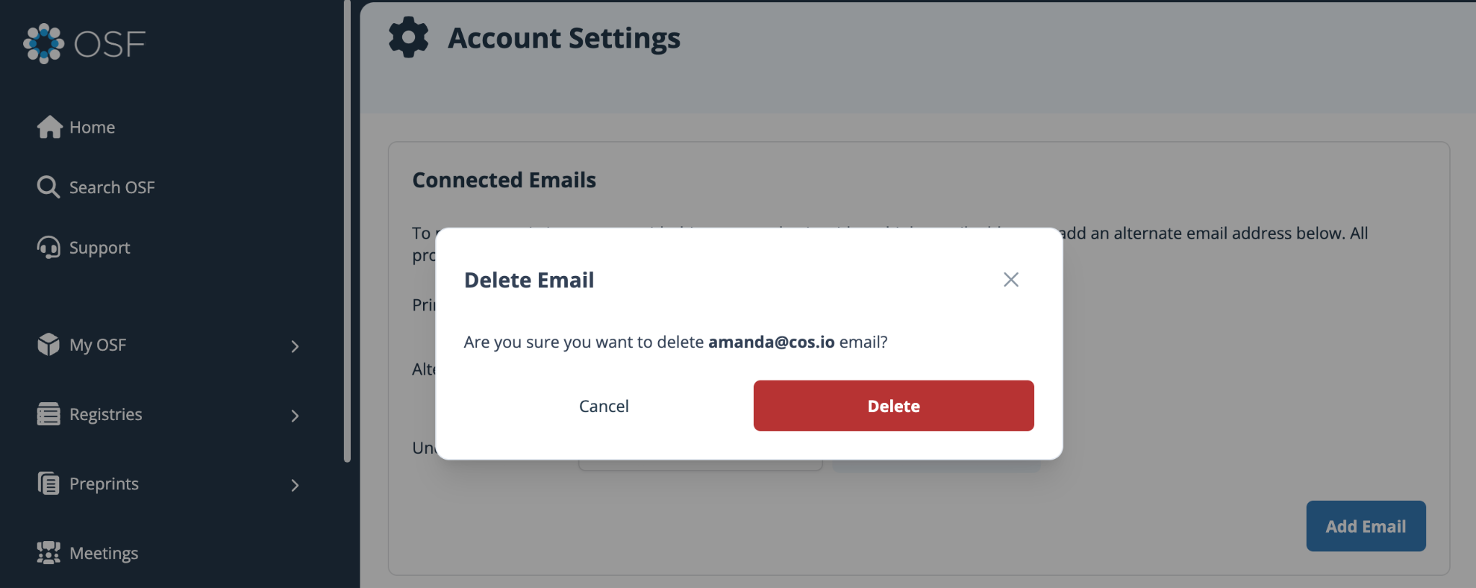
The alternate email address will be removed from your OSF account.
Enable or Disable Two-Factor Authentication
You can enable two-factor authentication for your OSF account to make your OSF sign-in process more secure. When you sign in to the OSF with two-factor authentication, you will need to enter a verification passcode from your mobile phone.
Enable two-factor authentication
- Sign in to the OSF. Go to Settings on the left sidebar navigation, then click Account Settings from the dropdown menu.
- Scroll to the Two-Factor Authentication section. Click Configure.
- A modal that explains important information about setting up your two-factor authentication will appear.
- Read this information, and then click the Configure button.
- Instructions on what to do next will appear in the Two-Factor Authentication section.
- You will need to download a mobile app for two-factor authentication in order to receive the passcode to access your OSF account. Google Authenticator is a common app that you can use.


After you have downloaded the two-factor authentication app on your phone, you can either scan the QR code or you can enter the security key provided. If you choose to enter the security key, your account name is OSF:[account_email], e.g. OSF:john@doe.com.
- To receive this passcode, open the authenticator app on your phone, and the passcode will automatically appear.
- Then, return to the Settings > Account Settings > Two-Factor Authentication section on the OSF and enter that same passcode into the textbox below the QR code.
- To finish setting up two-factor authentication for your OSF account, click Enable.
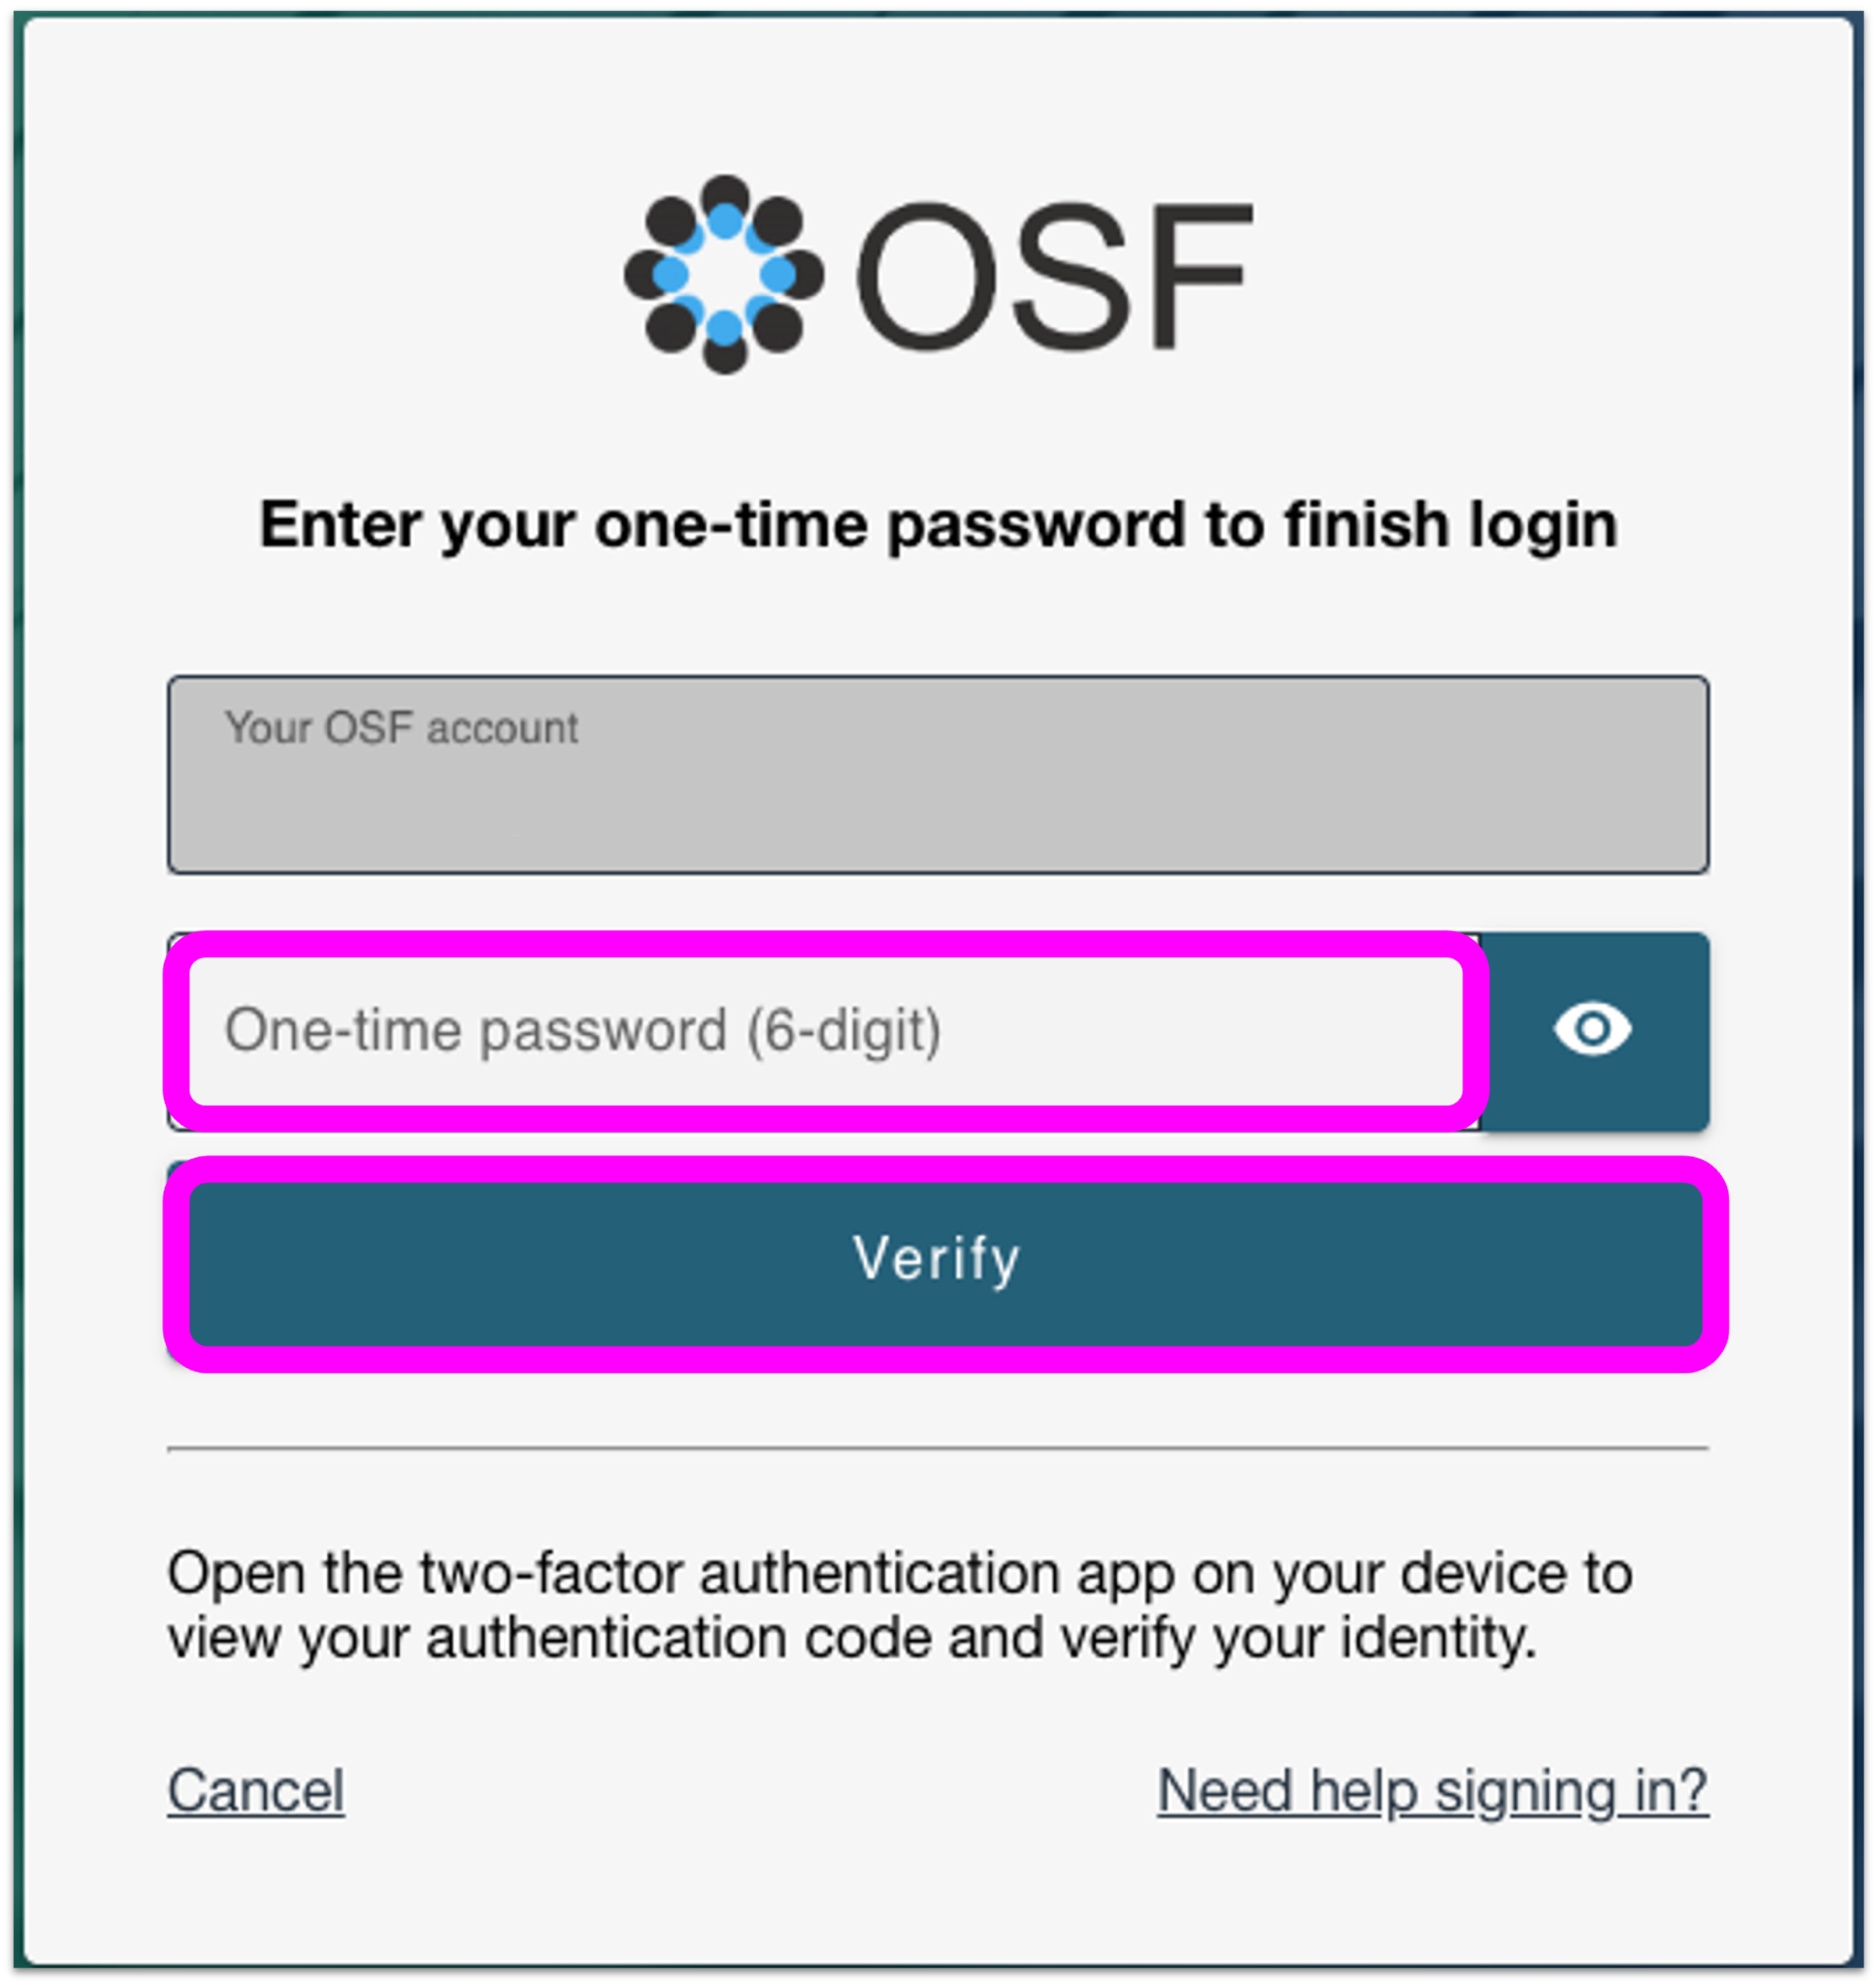
- The next time you sign in to the OSF, you will be asked to enter your two-factor authentication passcode.
- Open the two-factor authentication app on your mobile phone, then enter the passcode provided in the app into the textbox on the OSF.
- Then, click Verify.
Disable two-factor authentication
To disable two-factor authentication on your OSF account, go to your user Settings page as you did to enable two-factor authentication.
- Sign in to the OSF. Go to Settings on the left sidebar navigation, then click Account Settings from the dropdown menu.
- Scroll to the Two-Factor Authentication section. Click Disable.
- A modal will appear, asking you to confirm that you want to disable your two-factor authentication.
- Click Disable and two-factor authentication will be removed from your account.

Connecting to OSF via Single Sign-On (SSO)
This article provides general information about the Center for Open Science’s Shibboleth-based Single Sign-On (SSO) integration for organizations who have become Institutional Members. Learn more about OSF Institutions membership at OSF Institutions.
What is Single Sign-On?
In general, Single Sign-On, or SSO, allows users authenticated with one trusted system (e.g., university network) to also authenticate using those same “home” credentials with another trusted network (e.g., OSF service). In the case of the second authentication, users are not asked to log in again, but instead the authenticated credentials are shared between systems.
Who can use Single Sign-On with OSF?
Any organization that has implemented a SAML 2.0 Identity Provider (IdP) and is an OSF Institutional member can offer SSO to OSF accounts.
A few notes:
- Current OSF users who have already set up accounts with a different login, will be able to retain those credentials and choose to login with personal or institutional credentials.
- Users’ authentication to the OSF service using SSO cannot also use the “Forgot Password” link on the OSF website to remind them of their credentials, as their user credentials are specific to and managed by their organization.
Technical Implementation
InCommon Research & Scholarship Institutions
COS is a Research & Scholarship Entity Category (R&S) Service Provider (SP) registered by the InCommon Federation.
- Entity ID: https://accounts.osf.io/shibboleth
- Requested Attributes: eduPersonPrincipalName (SAML2), mail (SAML2), and displayName (SAML2)
Full technical details can be found Here.
Please note that only COS's production SP is registered by InCommon. If you want to connect to COS's test/staging SP, the SP metadata as mention in Other Institutions (below) is Here.
Other Institutions
COS offers a Service Provider (SP) based on SAML 2.0 (the protocol) and Shibboleth 2.0 (the implementation). To implement and test SSO for your institution:
- Ensure that your IT administrators have loaded COS's SP metadata into your IdP
- Production: Https://Accounts.Osf.Io/Shibboleth.Sso/Metadata
- Test and/or staging: Https://Accounts.Test.Osf.Io/Shibboleth.Sso/Metadata
- Ensure that your IT administrators are releasing the three required pieces of information listed below, and inform COS of the attributes you use for each of them:
- Unique identifier for the user (e.g., eppn )
- User's institutional email (e.g., mail )
- User's full name (e.g., displayName or a pair of givenName and sn )
For All Institutions
Inform COS of the user you would like to test with; your COS contact will ensure your account is ready to go and will send you a link to test the SSO configuration setup for your institution.
Alternative SSO Options
COS strongly recommends using this Shibboleth-based SSO when connecting to the OSF. However, if this is not available at your institution, please inform COS of alternative SSO options you have. We may support them in the future.
One alternative currently supported is CAS-based SSO. Please refer to Connecting To The Open Science Framework (OSF) Via CAS-Based Single Sign-On (SSO) for technical details.
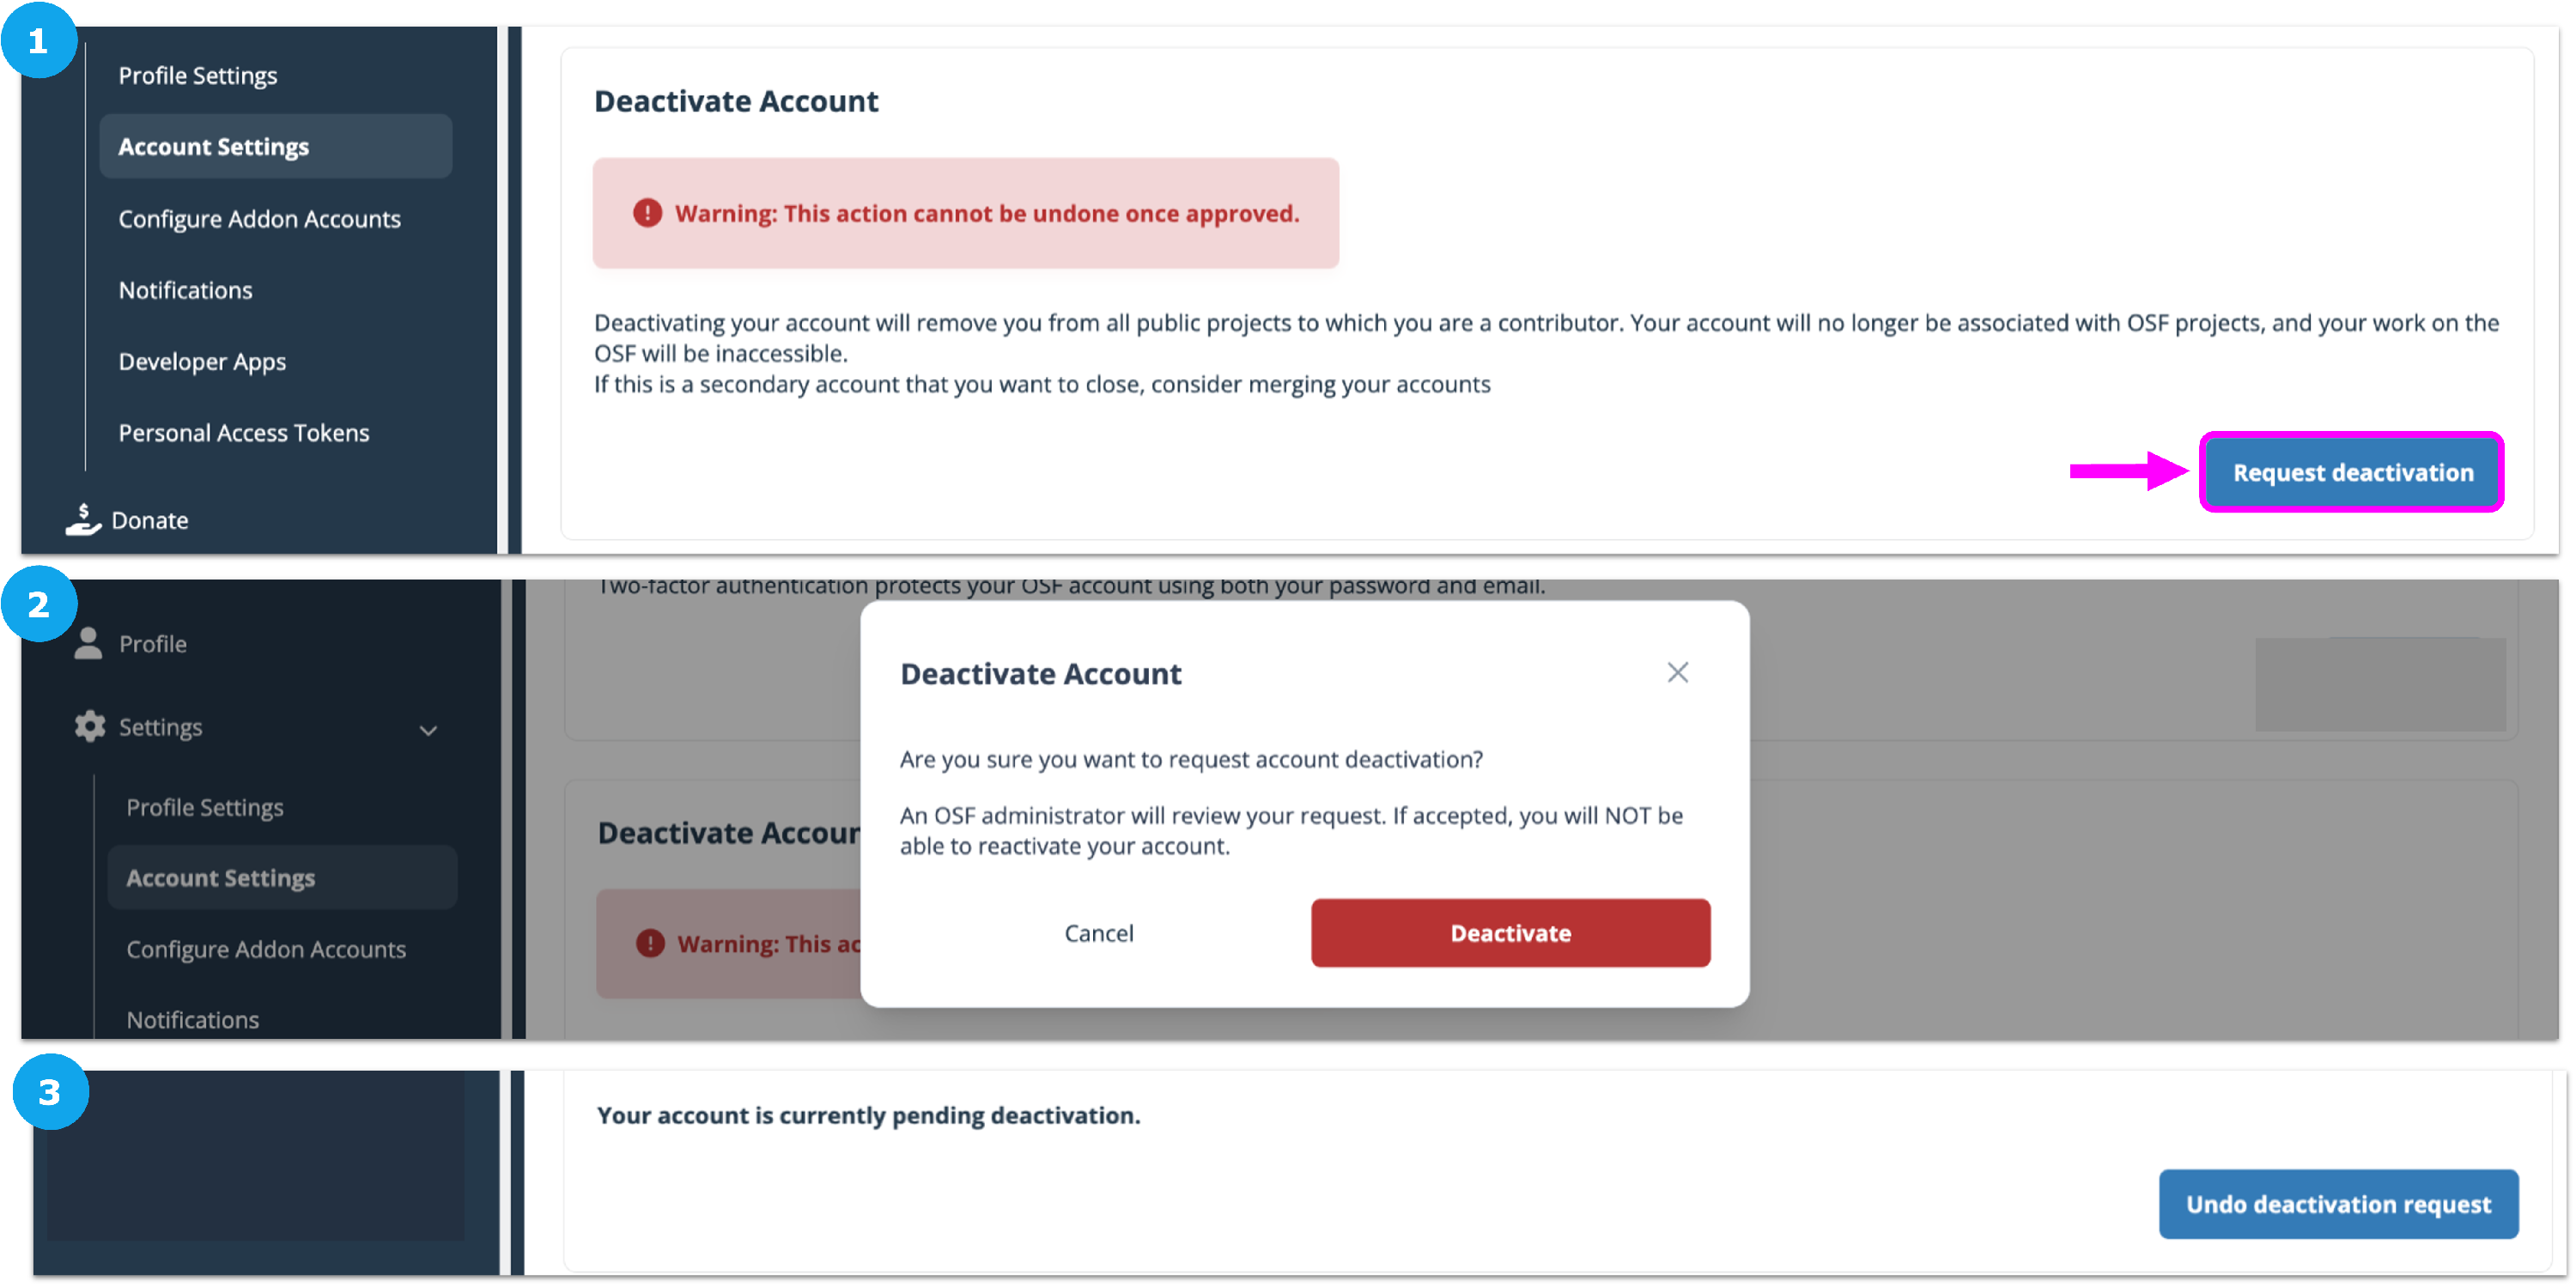
Deactivate Your Account
If you want to close your OSF account, log in to your account and request an account deactivation. OSF Support will reach out to you to confirm your request and deactivate your account.
- Sign in to OSF. Go to Settings on the left sidebar navigation, then click Account Settings from the dropdown menu.
- Scroll to the Deactivate Account section. Click the Request Deactivation button.
- A confirmation modal will appear to ensure you want to complete this action. Click the Deactivate button, or Cancel if you do not wish to deactivate your account.
- OSF Support will receive your request and will reach out to confirm your account deactivation.
- If you want to cancel your request, you can click the Undo deactivation request button.
FAQs
Account and Security FAQ’s
Account
My name is incorrect on my profile, preprint, registration or OSF project. How can I fix it?
On preprints, registrations, or OSF projects your name on the by-line or citations is controlled by the information on your OSF profile. To read about how you can edit your profile information, see this section.
My account has been deactivated or flagged as spam, What do I do?
We investigate reported cases of OSF users being accidentally flagged or deactivated on a case-by-case basis. If you have an account or material that has been flagged as spam or deactivated please report your case here. Cases are reviewed within 48 to 72 hours. To report a case of OSF users being accidentally flagged or deactivated please fill out the form in this section.
I'm trying to verify my account but am not receiving the email. What should I do?
Try checking your spam and quarantine folders to see if the email was sent there. If you still don't find it, please submit a request to user support, and we will help you. Contact our support team using the support center beacon found on the bottom right side of any OSF support page, or by emailing support@osf.io :
My email address has changed. How do I change my login email?
From your " Account Settings"
page, you can add additional email addresses to your account, and select which of these is your primary email address. Any of these emails can be used to log in to OSF.
I have multiple OSF accounts. How do I merge them into one account?
Log in to the account you wish to keep and navigate to your " Account Settings" . There, enter the email address associated with your other OSF account. You will receive a confirmation link via email. Clicking the link will merge the projects and components into one account. For more information see our help guide on Merging Your Account . If you no longer have access to the account you need to merge contact our support team using the support center beacon found on the bottom right side of any OSF support page, or by emailing support@osf.io :
How do I deactivate my OSF account?
From your " Account Settings"
page, you can request a deactivation of your OSF account. A member of the OSF team will review your request and respond to confirm deactivation. Here is a help guide to help you Deactivate Your Account
Broken or lost phone?
If you are unable to login to the OSF to deactivate two-factor you will need to contact OSF Support by emailing support@osf.io. Because we take user account security very seriously, we will first need to verify your identity. The easiest way for us to do this is to have you send a photo or scan of a picture ID (school IDs or driver's licenses are great, and please black out any sensitive information, like your ID number or birthday).
Security
What types of data does OSF collect?
OSF may collect various data that you share upon registering and in using OSF and its suite of products. Please see section 7 of our Privacy Policy for this information.
Can I have my data deleted?
You’re always welcome to deactivate or delete your account. To deactivate your account see this section on Deactivating your Account, If you’d like to delete your account and personal data, please contact our support team using the support center beacon found on the bottom right side of any OSF support page or by emailing support@osf.io :
What steps has OSF taken to comply with GDPR?
The OSF has taken several steps to comply with GDPR, including revising our Terms Of Use and Privacy Policy, ensuring GDPR compliance of third-party vendors, executing Data Processing Addendums with third-party vendors, and reviewing policies and procedures for deleting user data. Read our Blog Post for more detail.
Can I opt out of having my data collected?
You’re always welcome to deactivate or delete your account. You should be aware that information that you've shared with others or that others have copied may remain visible after you have closed your account or deleted the information from your own profile. In addition, you may not be able to access, correct, or eliminate any information about you that other users have copied or exported out of the website because this information is not under our organization's control. Your public profile may be displayed in search engine results.
How can I export my data?
You can export your project files in .zip format, one for each storage provider. You can also access all the content of your projects via the OSF's open API
What if I cannot consent to the updated terms and privacy policy?
If you cannot consent to the updated Terms and Privacy Policy, you may export your data and close your account at any time.
What if I don't want to make anything available publicly in the OSF?
The OSF is designed to support both private and public workflows. You can keep projects, or individual components of projects, private so that only your project collaborators have access to them. Registrations can be made private (embargoed) for up to 4 years. After that time the registration will be made public. Preprints are made publicly available upon acceptance by one of our Community-run Preprint Servers.
How do I report a potential security issue?
If you would like to report a security issue, please contact our support team for instructions on how to report the security issue. Do not include details of the issue in that email. You can contact our support team using the support center beacon found on the bottom right side of any OSF support page:
Is the OSF HIPAA compliant?
The OSF is not HIPAA compliant. If you use a HIPAA-compliant storage provider that is available as an OSF add-on, we recommend using that service connected to your OSF project to meet your HIPAA requirements. Please refer to your institutional policies regarding specific security requirements for your research.
I found content on OSF that I believe infringes on my copyright. What should I do?
The Center for Open Science acts in accordance with the Digital Millennium Copyright Act (17 USC § 512). Refer to Section 20, “PROCEDURE FOR MAKING CLAIMS OF COPYRIGHT INFRINGEMENT”, of the Terms Of Use for more information. Please report the infringement to the support team using the support center beacon found on the bottom right side of any OSF support page:
Where can I check if OSF experiences downtime, or is “temporarily broken”?
If you experience problems using the OSF or connecting to one of the third-party storage add-ons, you can check our Status Page for updates on how our services are operating.
Backup and Preservation
How does OSF store and backup files that I upload to the site?
For OSF Storage, files are stored in multiple locations and on multiple media types on Google Cloud. We keep three types of hashes (MD5, SHA-1, SHA-256) for files. We keep parity archive files to recover from up to 5% bit error.
The OSF database is backed up via streaming replication 24 hours a day, and incremental restore points are made twice daily. Further, the OSF database is maintained in encrypted snapshots for an additional 60 days. Database backups are verified monthly.
Operational data (e.g., config files) for other OSF services are backed up in primary cloud file storage for 60 days.
Application Logs are stored for 90 days at minimum, and Audit Logs are stored for 365 days at minimum. Maximum log retention is indefinite.
What if you run out of funding? What happens to my data?
COS established a $400,000 preservation fund for hosted data in the event that COS had to curtail or close its offices. If activated, the preservation fund will preserve and maintain read access to hosted data. This fund is sufficient for 20+ years of read access hosting at present costs. COS will incorporate growth of the preservation fund as part of its funding model as data storage scales. Registrations on the OSF are preserved though our external partner Internet Archive For information about OSF backups and technical preservation details, see the OSF Backup And Preservation Policy.
How secure is my information?
Security is extremely important to the OSF. When you sign up and create a password, your password is not recorded. Instead, we store a Bcrypt Hash of your password, which is a computation on your password that cannot be reversed but is the same every time it is computed from your password. This provides extra security. No one but you can know your password. When you click "Forgot your password," OSF sends you a password reset link. For more information see our Security And Privacy help guides.
Is data stored on OSF Storage encrypted? What are my options?
Transfer of data to OSF storage is encrypted with TLS and is encrypted at rest with Google-managed Encryption Keys. If you would like your data to be encrypted at rest with your own self generated key, you can encrypt it before uploading to OSF Storage.
If I delete a file or project, can I get them back?
Unfortunately, no. When a user deletes a file or project from OSF, access to this content is removed for all users.
This Article Is Licensed Under CCO For Maximum Reuse.