Add-ons & API Home Page
This Article Is Licensed Under CCO For Maximum Reuse.
The following is a Table of Contents that links directly to specific sections within the guide.
- Overview
- Connect Add-ons from your User Profile Settings
- Disconnect or Edit Add-on Configuration
- Storage Add-ons
- Citation Add-ons
- Linked Services
- API Integration
Overview:
Add-ons are trusted third-party software that is compatible with the OSF. These add-ons are highly popular with users as the add-ons are often programs users are already personally using. You can review the add-on types we offer and the capabilities of OSF’s open API below:
- Storage Add-ons: Storage applications are a great way to store material on the OSF and even get around some OSF Storage caps. The OSF is compatible with a number of common storage add-ons.
- Citation Add-ons: Citation software is an excellent way to collect and manage references within a research study. The OSF is compatible with Mendeley and Zotero.
- API Integration: The OSF hosts an Open Application Programming Interface (API). With this API you can access users, projects, components, logs, and files from the Open Science Framework. The Open Science Framework (OSF) is a free, open-source service maintained by the Center for Open Science.
Connect Add-ons from your OSF User Profile Settings
All add-on integrations can be connected from your OSF profile settings page and then configured specifically for any project you wish to connect them to. From the left sidebar navigation, locate the Settings menu (cog icon). Expand the menu and select Configure add-on & link service accounts.
To view all available add-ons, use the dropdown at the top of the list to reveal Additional Storage, Citation Manager, or Linked Services types of OSF compatible add-ons.

Disconnect or Edit Add-on Configuration
Disconnect or Configure from a Project
Open your project, go to the Add-ons management section using the left sidebar navigation. Select the Connected Add-ons tab to display your connected add-ons, and click the Configure button under the add-on you wish to edit.
The pencil icon brings up options to select a different folder or fileset (if supported by the add-on).
To completely remove the add-on connection from the project, click the red delete icon.
Disable or Reconnect from OSF Settings
From the left sidebar navigation, locate the Settings menu (cog icon). Expand the menu and select Configure add-on & link service accounts. Select the Connected Add-ons tab to display your connected add-ons.
Disable
The red Disable button completely removes the add-on connection from your settings. For any projects this add-on was connected to, the add-on becomes non-functional and selected folders or filesets will no longer load or display. See Disconnect from a Project for instructions to cleanly remove add-on connections from individual projects.
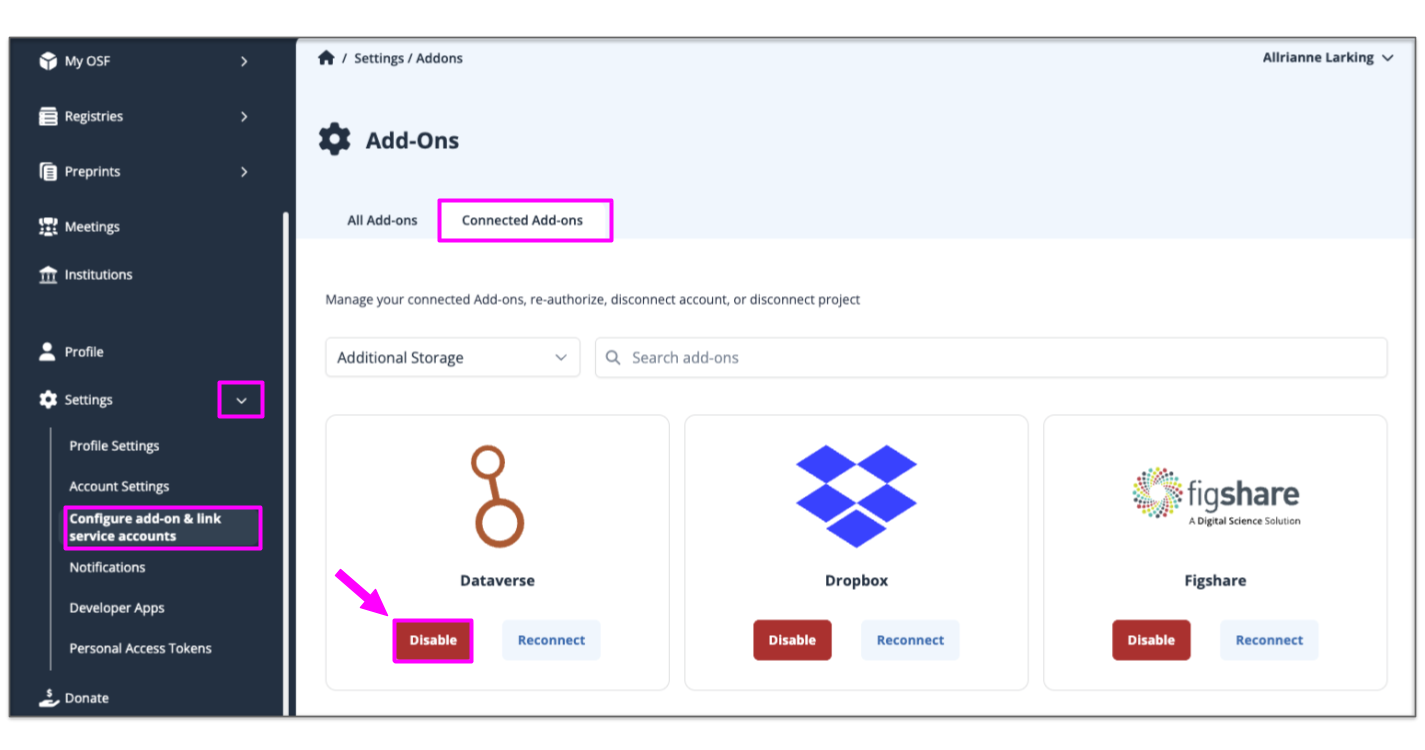

- Select the add-on you wish to disable.
- Confirm disable. NOTE: All projects that are configured with this add-on will be disconnected.
Reconnect & Reauthorize
To reauthorize an add-on (in the case where your add-on password has changed or authorization has otherwise expired) click Reconnect and follow the steps to reauthorize. If you used an API Key or Access Token to authorize, you may need to create a new one from that add-on site.

Storage Add-ons
Add and display materials on your project using tools your organization/team is already using. Storage Add-ons are a great solution if your files require significant storage space or if you have a significant number of files, as space used by a connected Storage Add-on does not count towards OSF Storage usage caps.
Amazon S3
Connect Amazon S3 to a Project
Choose an Amazon S3 bucket to connect to your project. Additional buckets can be linked individually to different components within the same project.
The connection between AmazonS3 and OSF is two-way, meaning you can add and update files from either application and your changes are synced.
When you create an Amazon S3 bucket, you can choose its physical location in the world. You might do this to minimize latency or meet funder requirements about where your data can be stored.
The Amazon S3 add-on allows you to connect external content to OSF. This connection does not store or back up this content on OSF. To back up your content to OSF Storage, consider Registering Your Project.
Enable Amazon S3 in your project
Open your project, then click Add-ons in the left sidebar navigation. Select Additional Storage from the drop down menu. Click the Connect button under Amazon S3.

Review the terms in the confirmation modal, and click the Confirm button to enable Amazon S3 on your project.
Configure Amazon S3
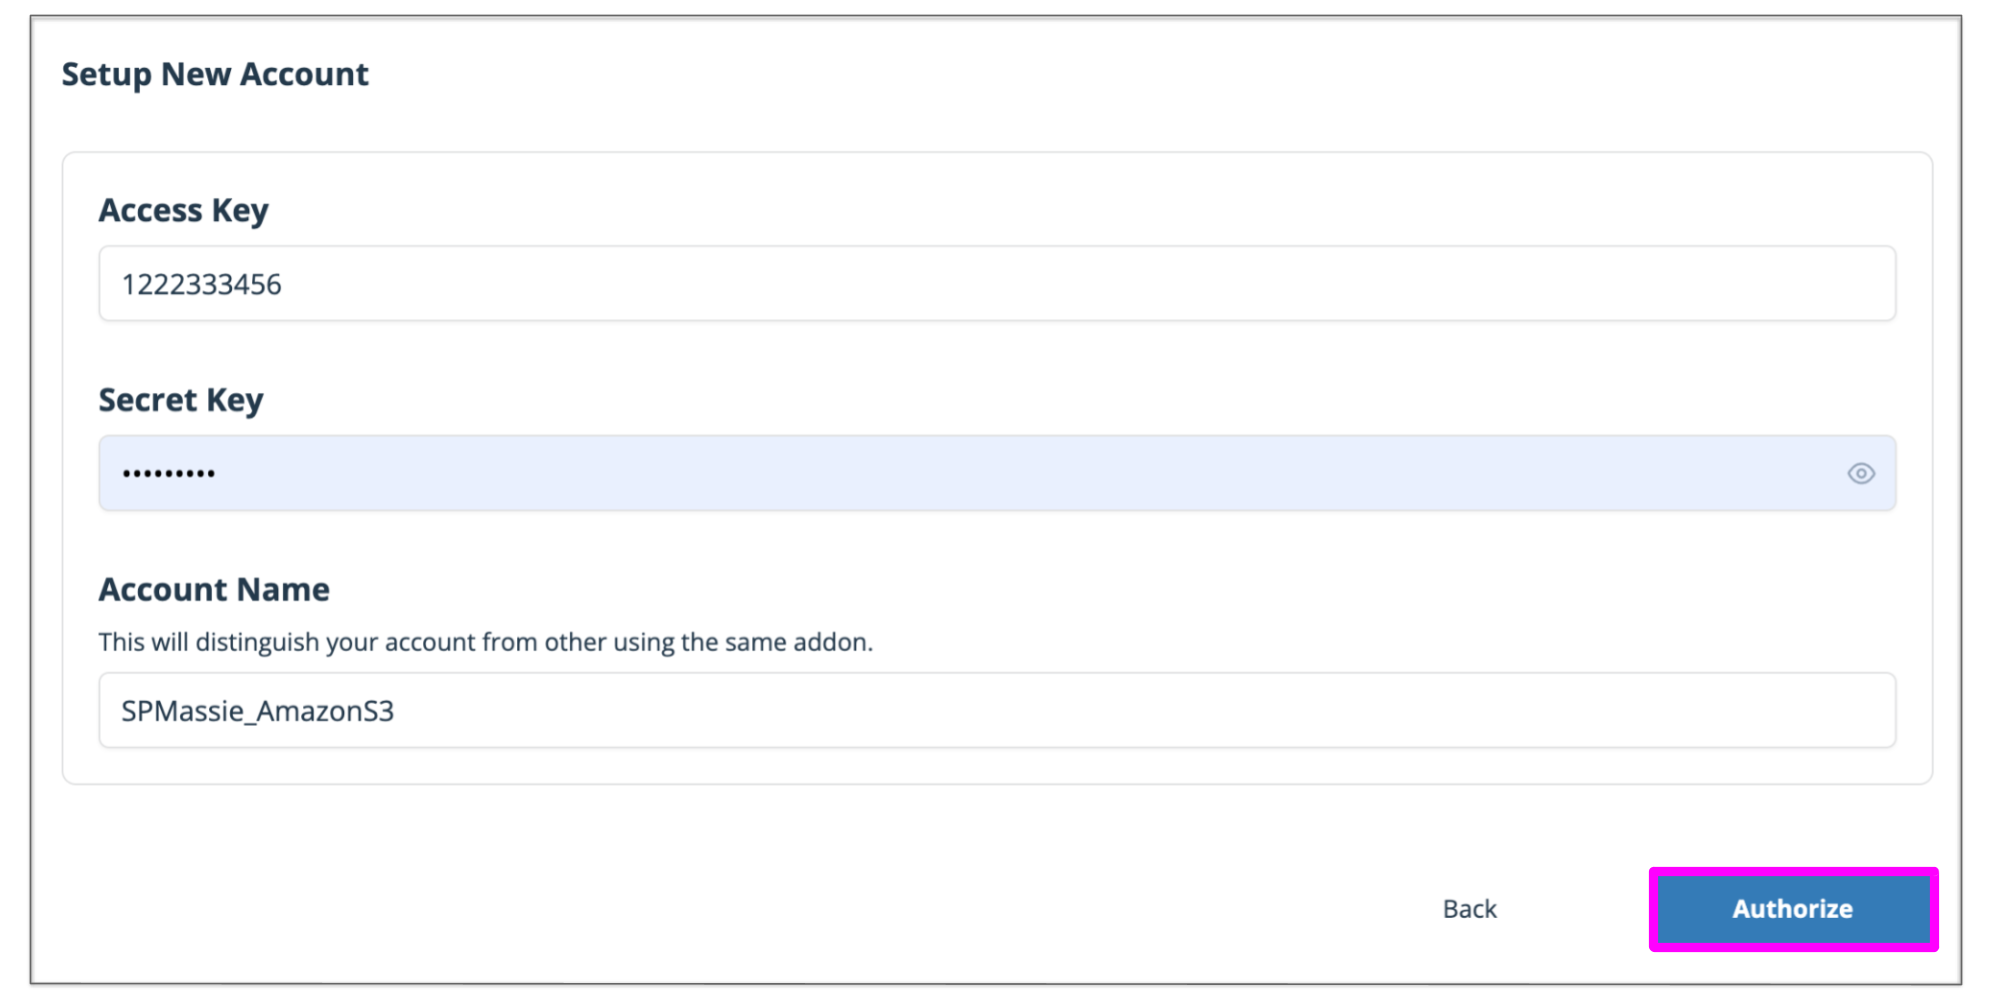
You will be prompted to provide Amazon S3 Access Key and Secret Key. Log in to Amazon S3, and Generate Access And Secret Keys, then enter them in the designated input fields.
Because other contributors can connect their add-on accounts to a shared project, you'll be prompted to provide a unique name for your account.
Choose a clear name like "AmazonS3_YourName" to distinguish your connection from other collaborators'. When you are finished naming, click Authorize and then click Connect.
Select what bucket you would like to import by clicking a corresponding bubble and clicking the Save button.
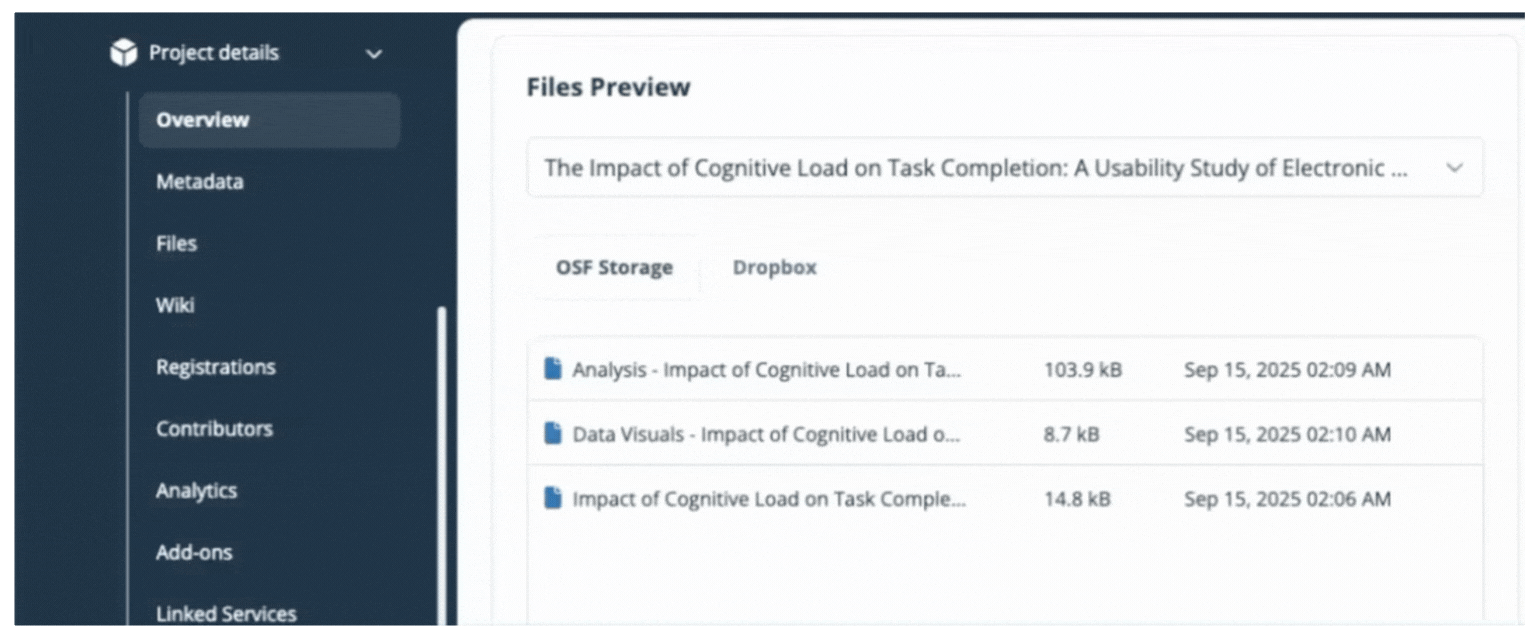
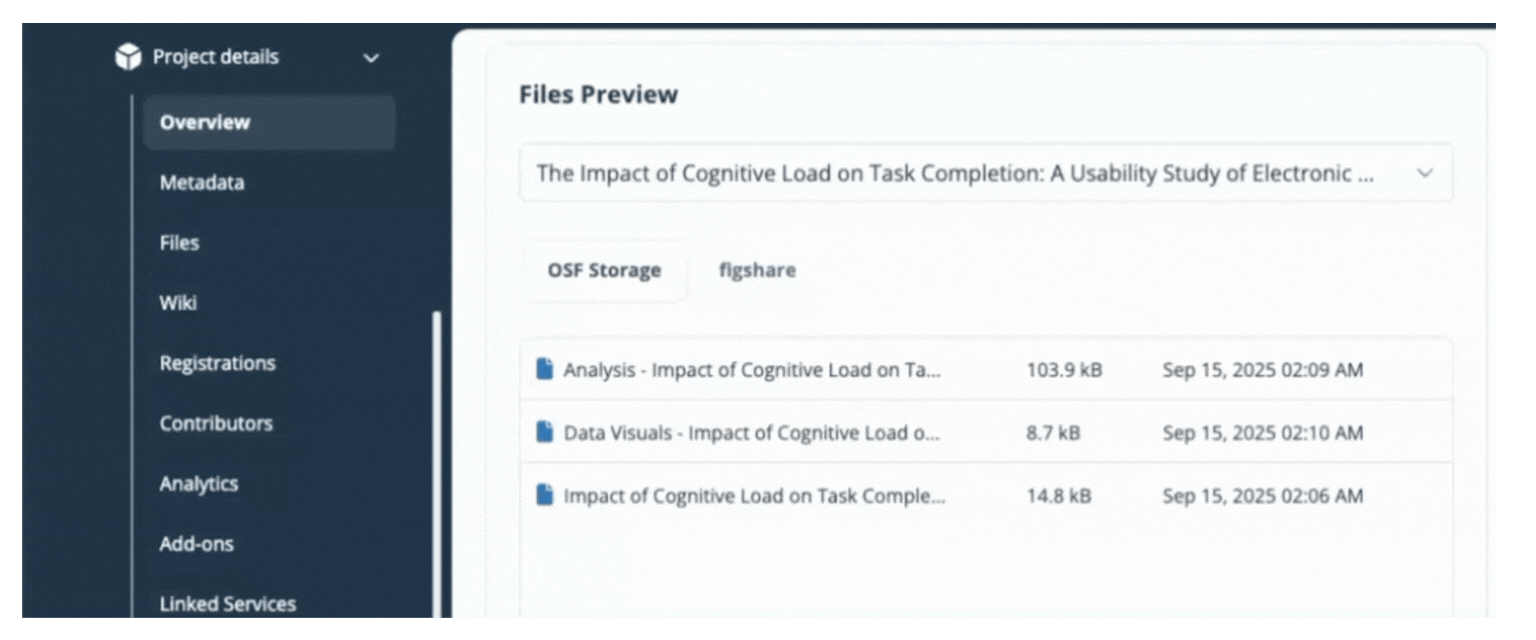
You have now connected your add-on library to your OSF project and will be returned to the add-on selection page. View your connected add-on folder from the Files section of your project.

Bitbucket
Connect Bitbucket to a Project
Bitbucket is a web-based Git and Mercurial repository that allows you and your team members to store code. You can connect one Bitbucket repository to your OSF project. Additional repositories can be linked individually to different components within the same project.
The connection between Bitbucket and OSF is read-only, meaning files added to your Bitbucket repository will be accessible - but not editable - via OSF.
The Bitbucket add-on allows you to connect external content to OSF. This connection does not store or back up this content on OSF. To back up your content to OSF Storage, consider Registering Your Project.
Enable Bitbucket in your project
Open your project, then click Add-ons in the left sidebar navigation. Select Additional Storage from the drop down menu. Click the Connect button under Bitbucket

Review the terms in the confirmation modal, and click the Confirm button to enable Bitbucket on your project.
Setting up a new Bitbucket Account
Because other contributors can connect their add-on accounts to a shared project, you'll be prompted to provide a unique name for your account.
Choose a clear name like "Bitbucket_YourName" to distinguish your connection from other collaborators'. When you are finished naming click Authorize.
Authorization of Access to Add-on
After clicking Authorize, a new window tab will appear to allow you to sign in on the selected add-on. Log in with your username and password used on that add-on site, not your OSF account.
The add-on will then ask you if you would like to confirm the connection of your add-on account to your OSF account. In this case, click Grant access.
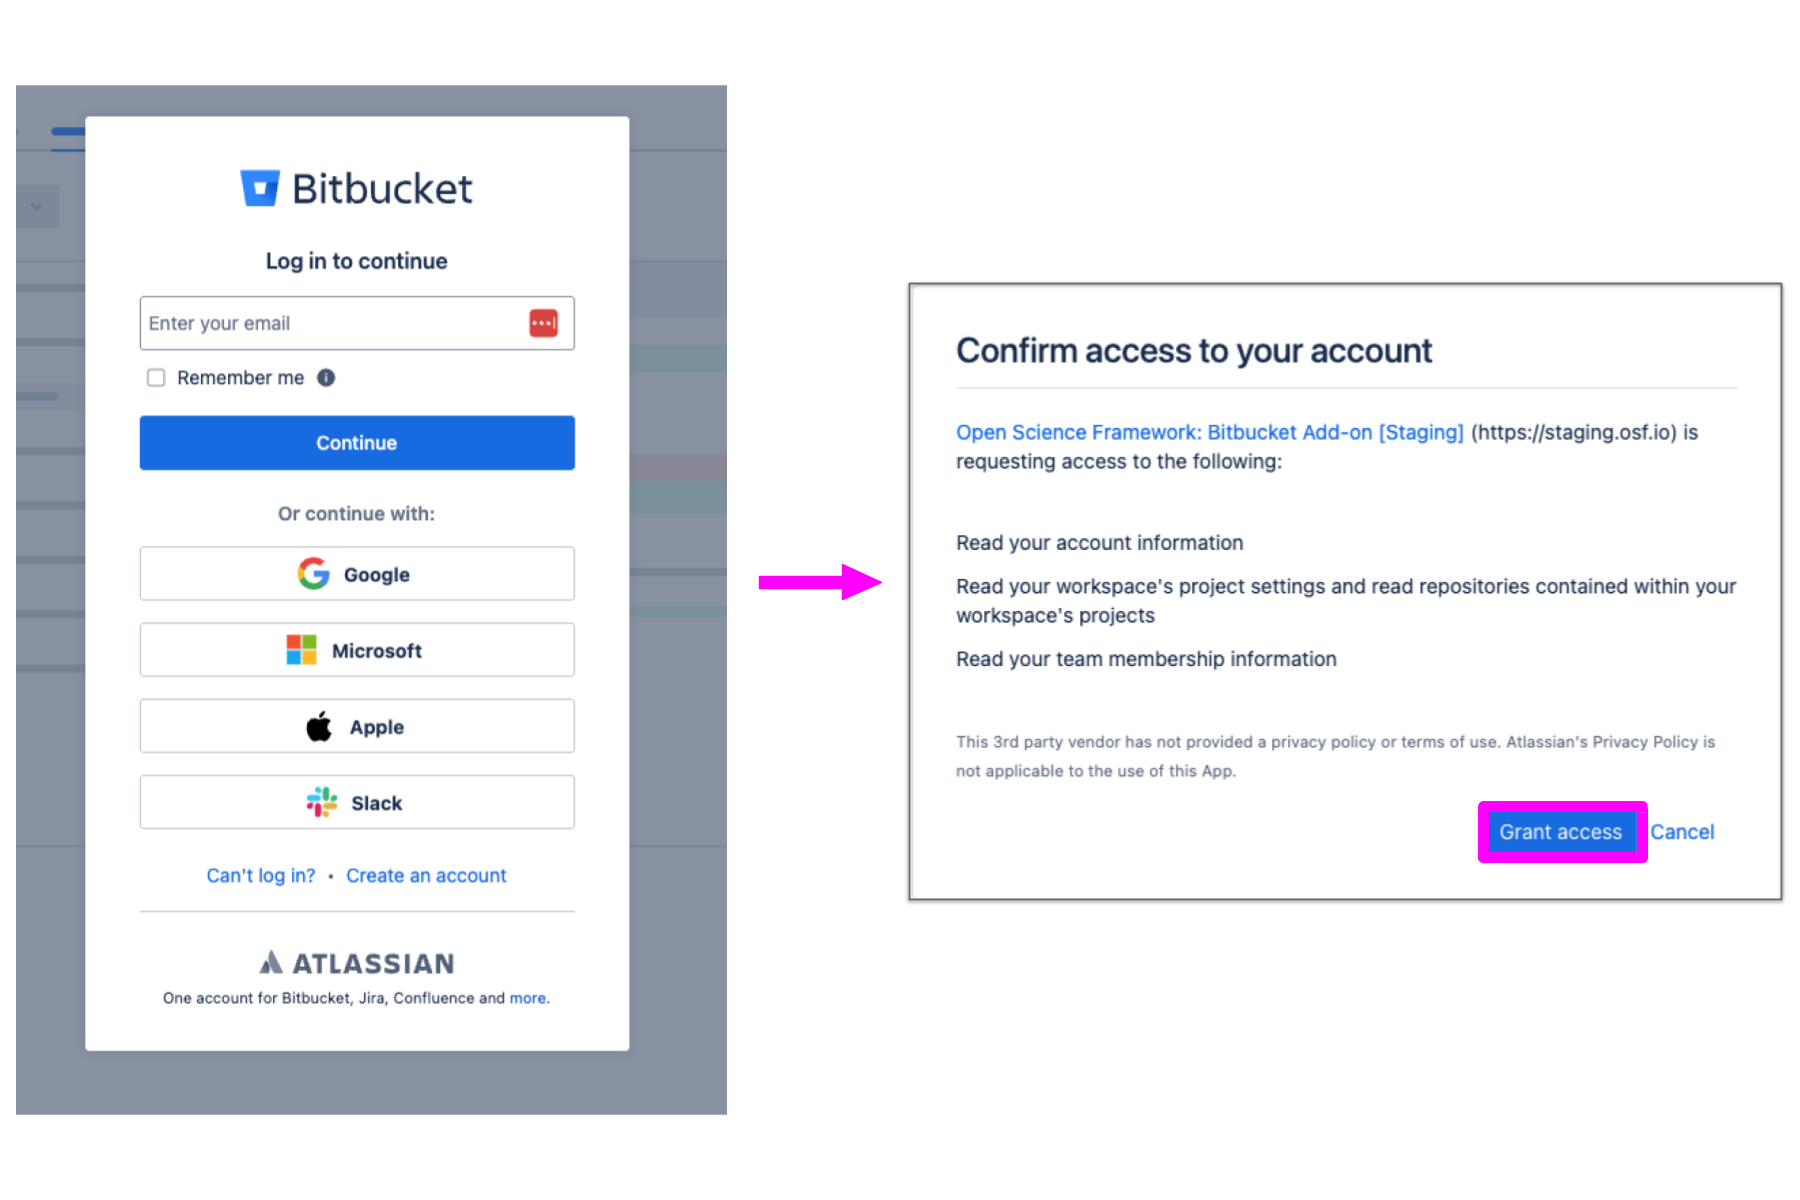
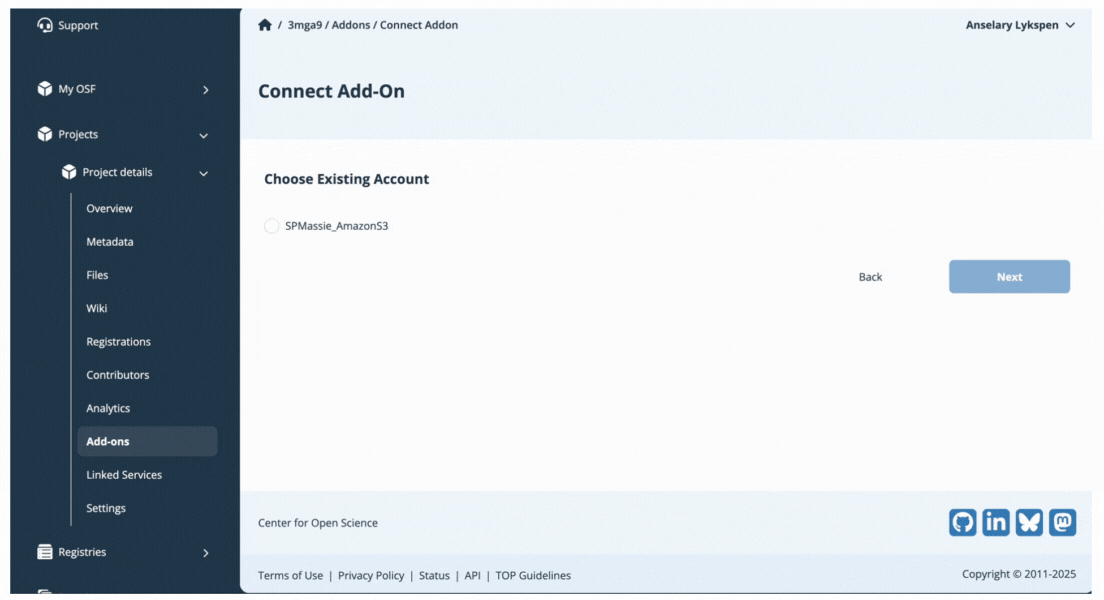
You will then be returned to your OSF project, where you can select the add-on account you would like to connect to your OSF project. Click the small circle next to the account name, and then click Authorize. Confirm the connection of the account by clicking Confirm.
Configure Bitbucket
Select which folders you would like to connect by clicking the files link or using the select bubble for specific files. Then click Save.

You have now connected your add-on library to your OSF project and will be returned to the add-on selection page. View your connected add-on folder from the Files section of your project.

Box
Connect Box to a Project
You can connect one Box folder or an entire Box account to your OSF project or component. Additional Box folders can be linked individually to different components within the same project.
The connection between Box and OSF is two-way, meaning you can add and update files from either application and your changes are synced.
The Box add-on allows you to connect external content to OSF. This connection does not store or back up this content on OSF. To back up your content to OSF Storage, consider Registering Your Project.
Enable Box in your project
Open your project, then click Add-ons in the left sidebar navigation. Select Additional Storage from the drop down menu. Click the Connect button under Box.

Review the terms in the confirmation modal, and click the Confirm button to enable Box on your project.
Setting up a new Box Account
Because other contributors can connect their add-on accounts to a shared project, you'll be prompted to provide a unique name for your account.
Choose a clear name like "Box_YourName" to distinguish your connection from other collaborators'. When you are finished naming click Authorize.
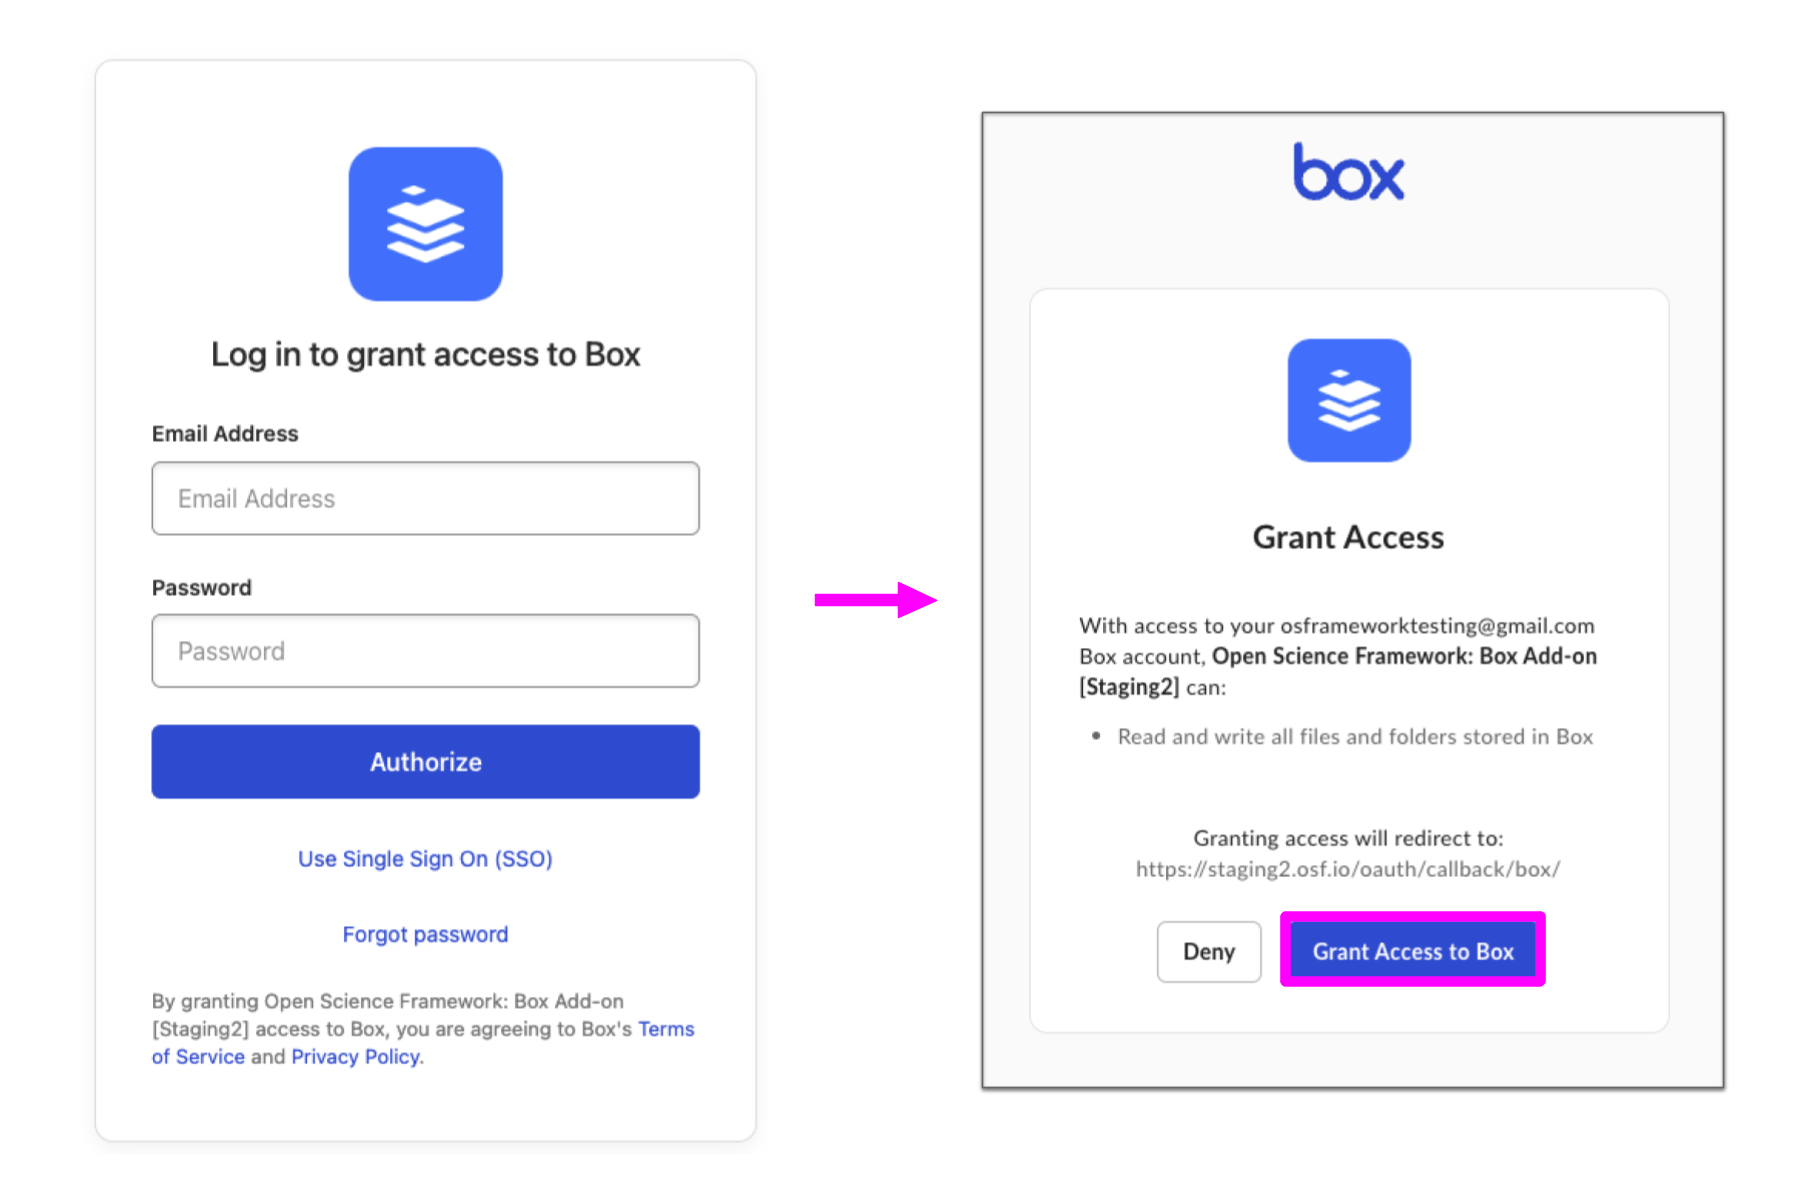
Authorization of Access to Add-on
After clicking Authorize, a new window tab will appear to allow you to sign in on the selected add-on. Log in with your username and password used on that add-on site, not your OSF account.
The add-on will then ask you if you would like to confirm the connection of your add-on account to your OSF Account. In this case, click Grant access.
Configure Box
You will then be returned to your OSF project, where you can configure the Box access. Select the folder (in this case, All Files) you would like to connect to the project and then click Save.
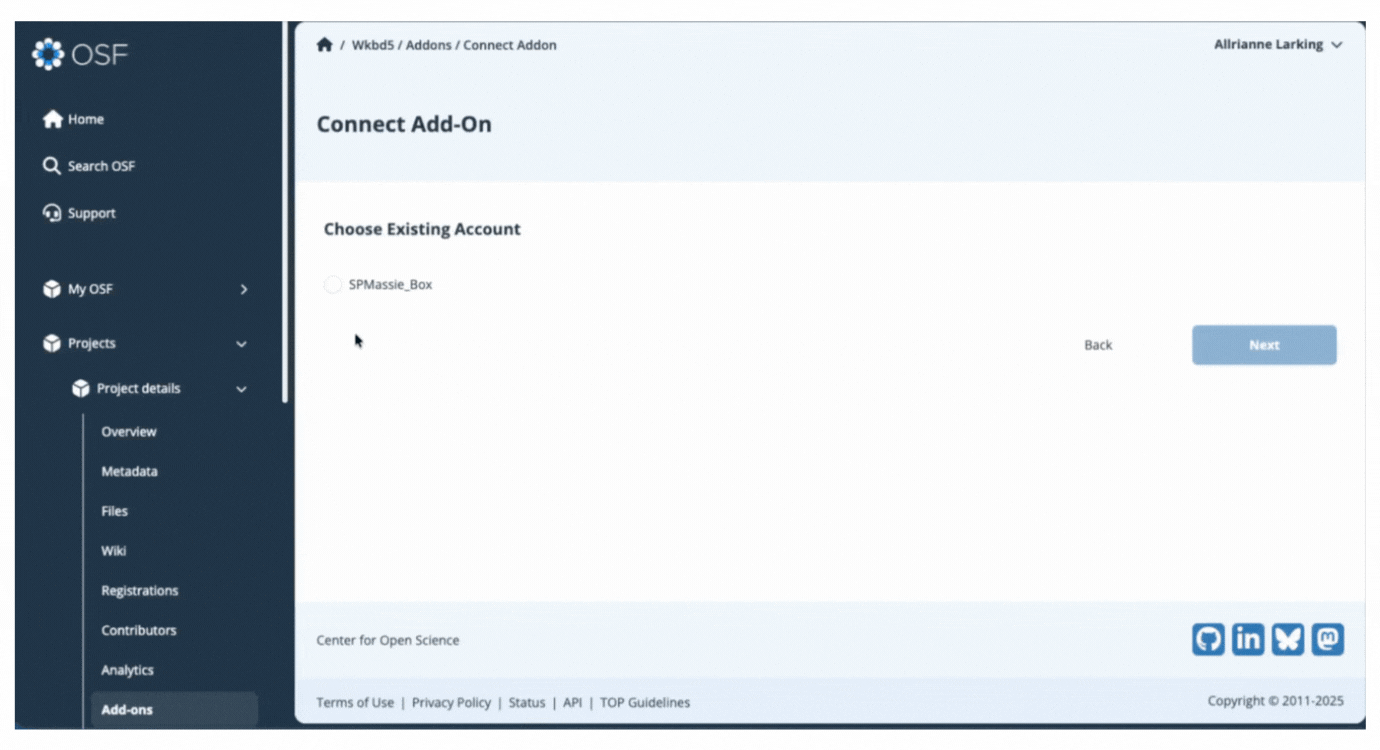
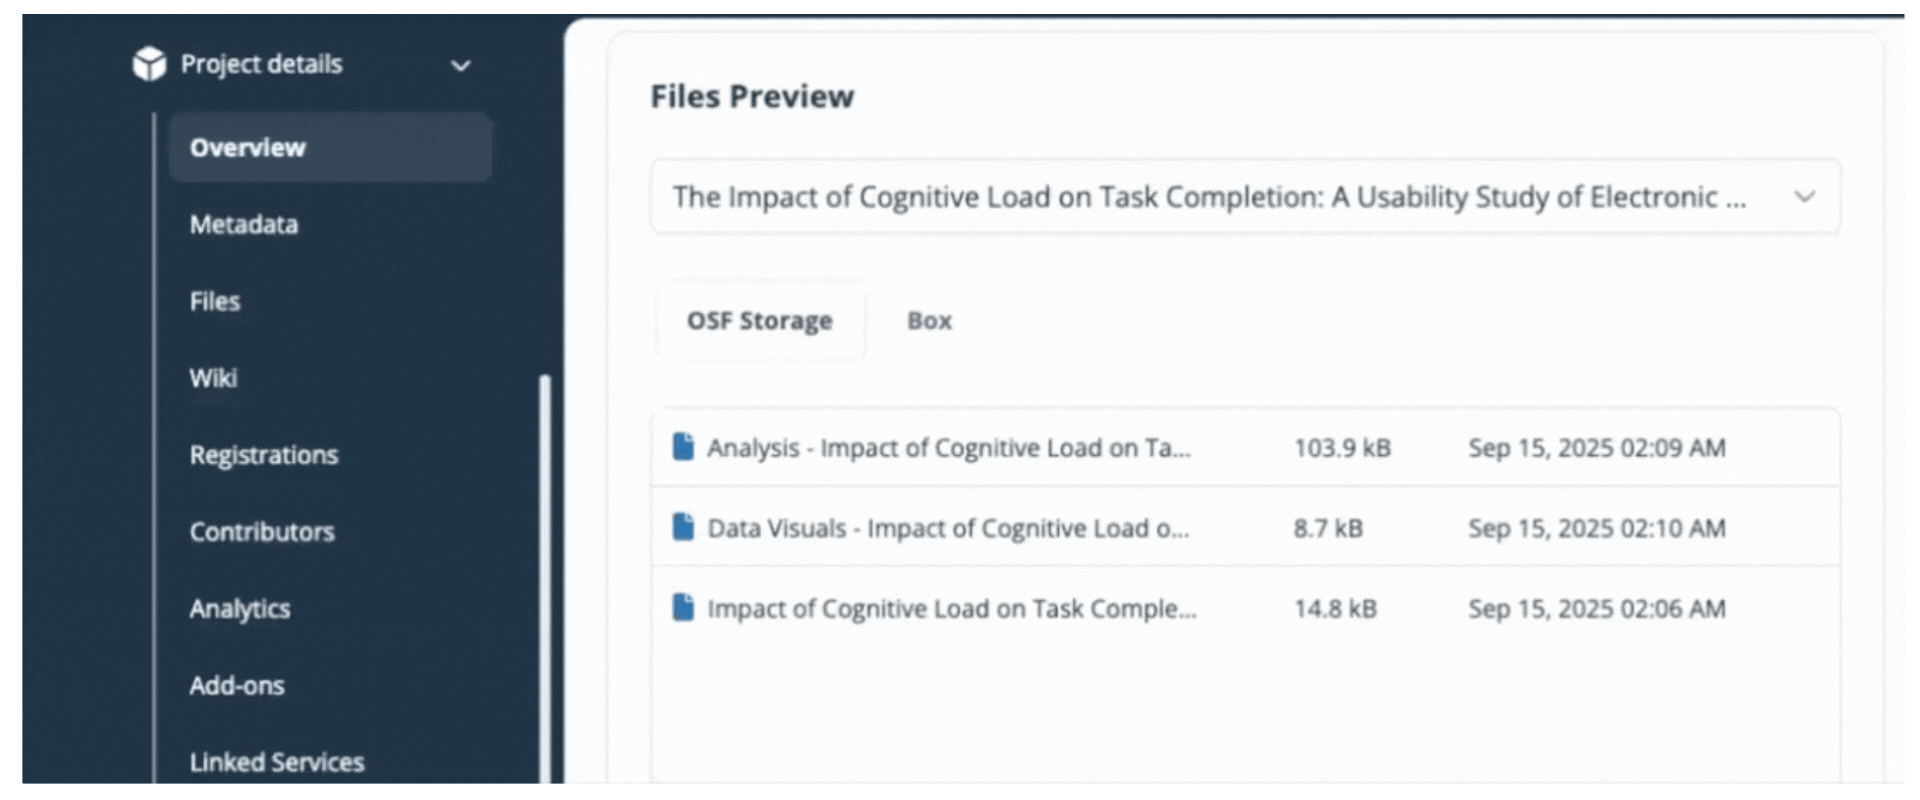
You have now connected your add-on library to your OSF project and will be returned to the add-on selection page. View your connected add-on folder from the Files section of your project.
Dataverse
Connect Dataverse to a Project
OSF connects with the Harvard Dataverse or any other instance of Dataverse 4.0.
Enabling Dataverse for your project allows contributors to view, download files, and upload files to/from a Dataverse study/dataset. Contributors to your project will have access to both released and draft versions of your study, but only the most recent release will be made public alongside your OSF project.
The Dataverse add-on allows you to connect external content to OSF. This connection does not store or back up this content on OSF.
Enable Dataverse in your project
Open your project, then click Add-ons in the left sidebar navigation. Select Linked Services from the drop down menu. Click the Connect button under Dataverse.

Review the terms in the confirmation modal, and click the Confirm button to enable Dataverse on your project.
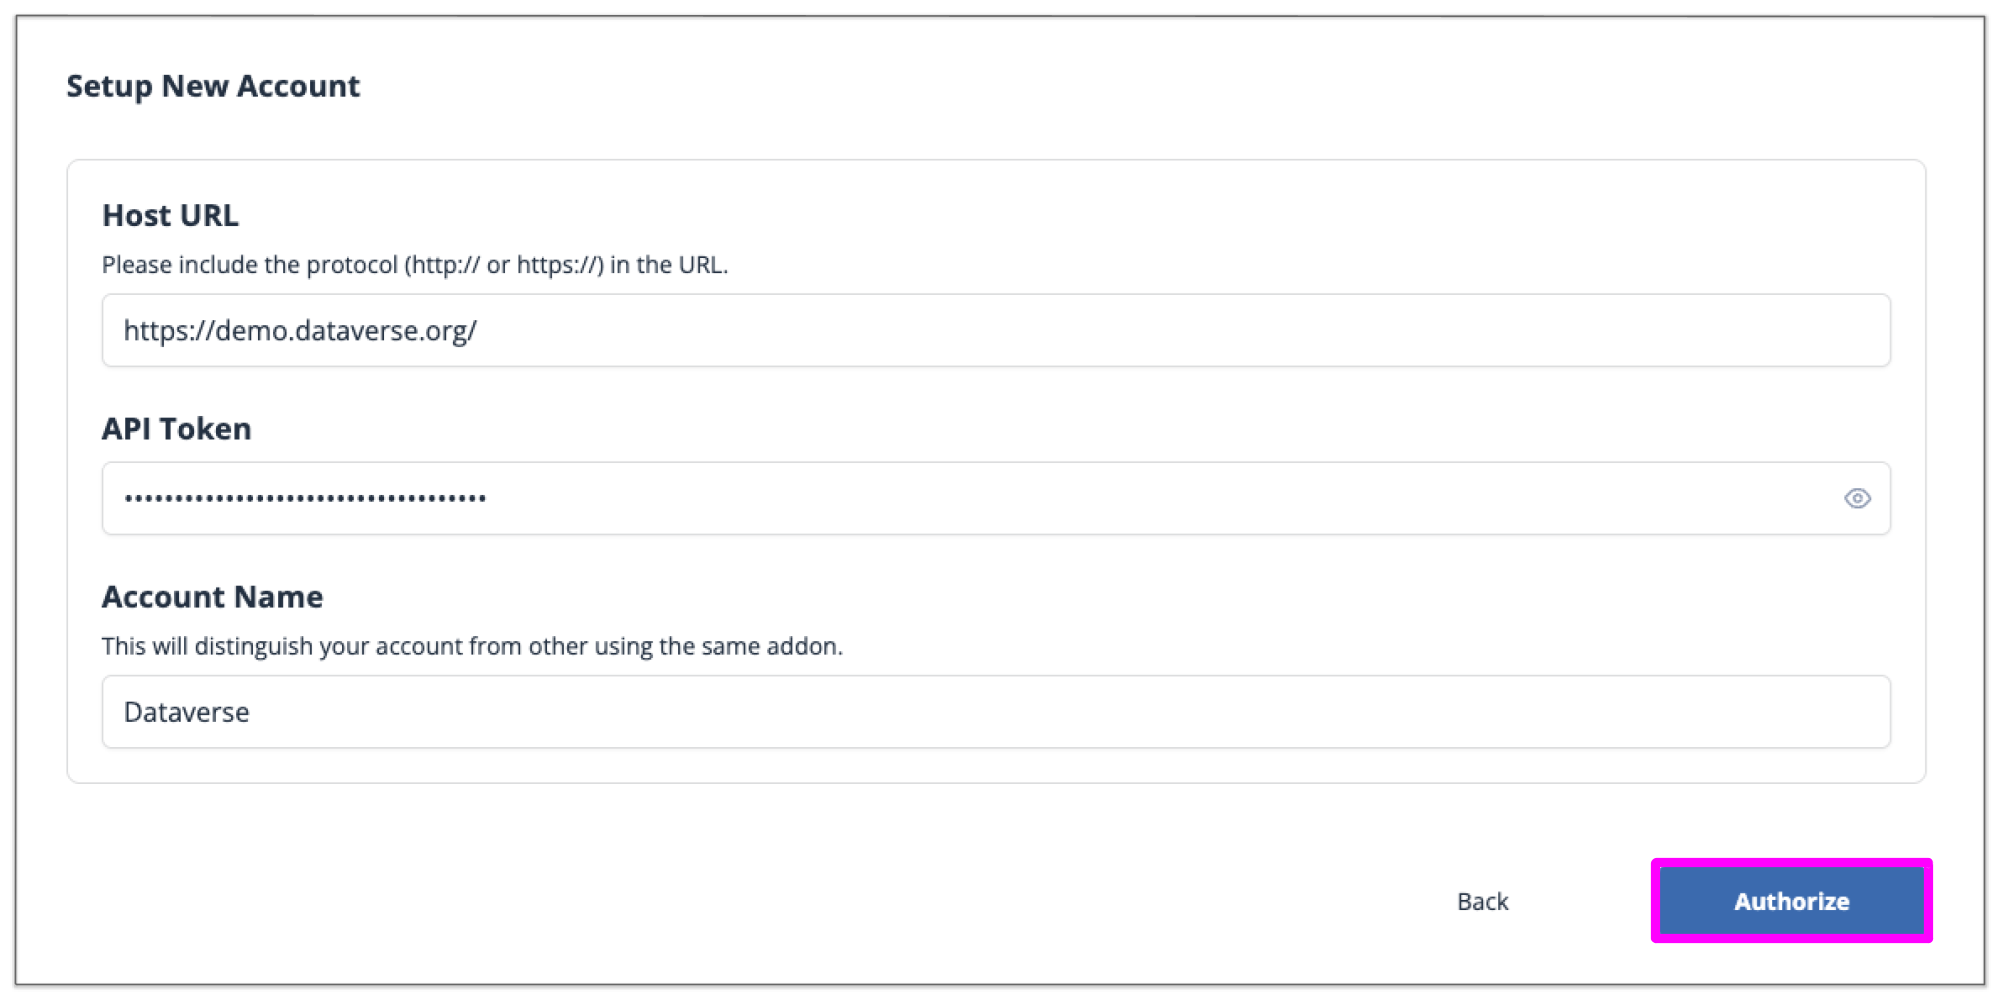
Setting up a new Dataverse Account & Authorization of Access to Add-on
Next, you will need to insert the host URL and your API Token. Log in to Dataverse to identify your host URL and Generate an API Token.
Because other contributors can connect their add-on accounts to a shared project, you'll be prompted to provide a unique name for your account. Choose a clear name like "Dataverse_YourName" to distinguish your connection from other collaborators'.
When you are finished entering the host URL, API Token, and name into the designated fields, click Authorize and then click Connect.
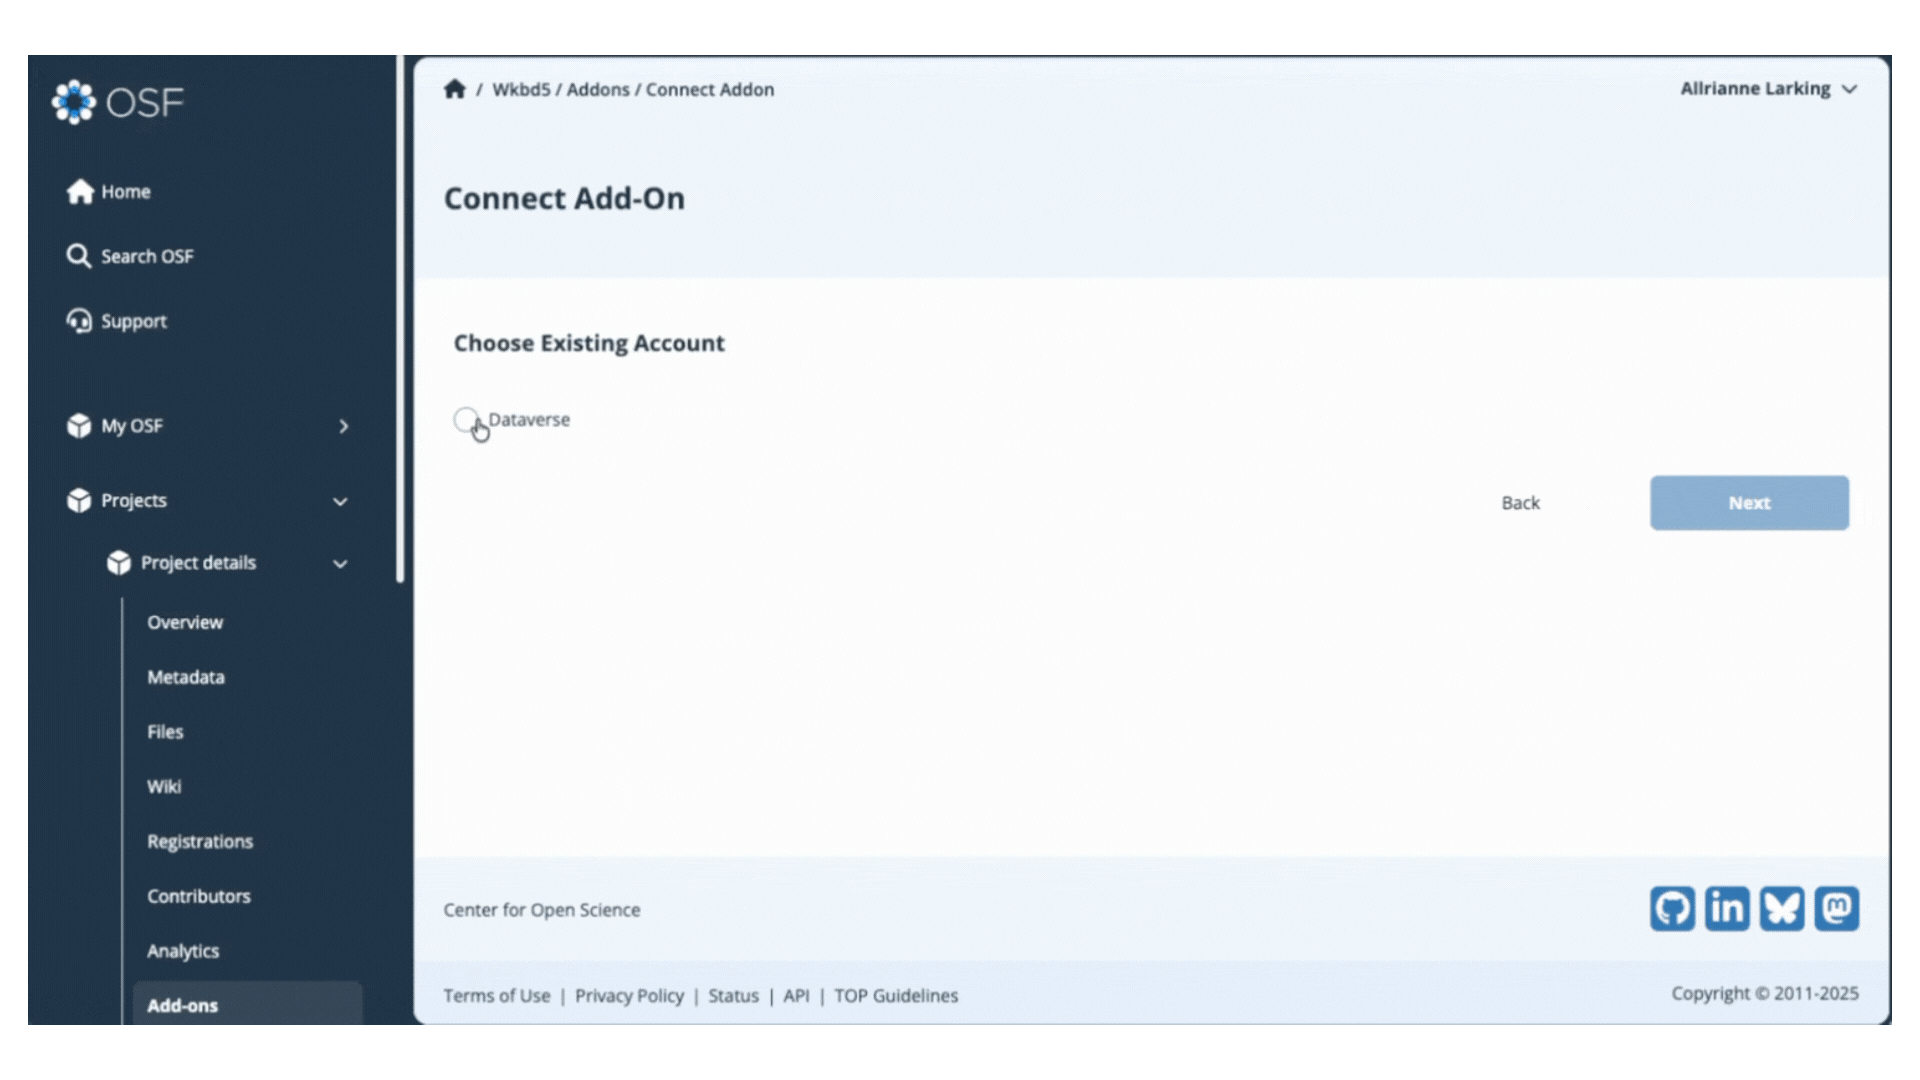
Configure Dataverse
You will then be returned to your OSF project, where you can select the Dataverse folder you would like to connect to your OSF project. You can navigate inside each folder by clicking the title of the folder. Click the small circle next to the account name, and then click Save.
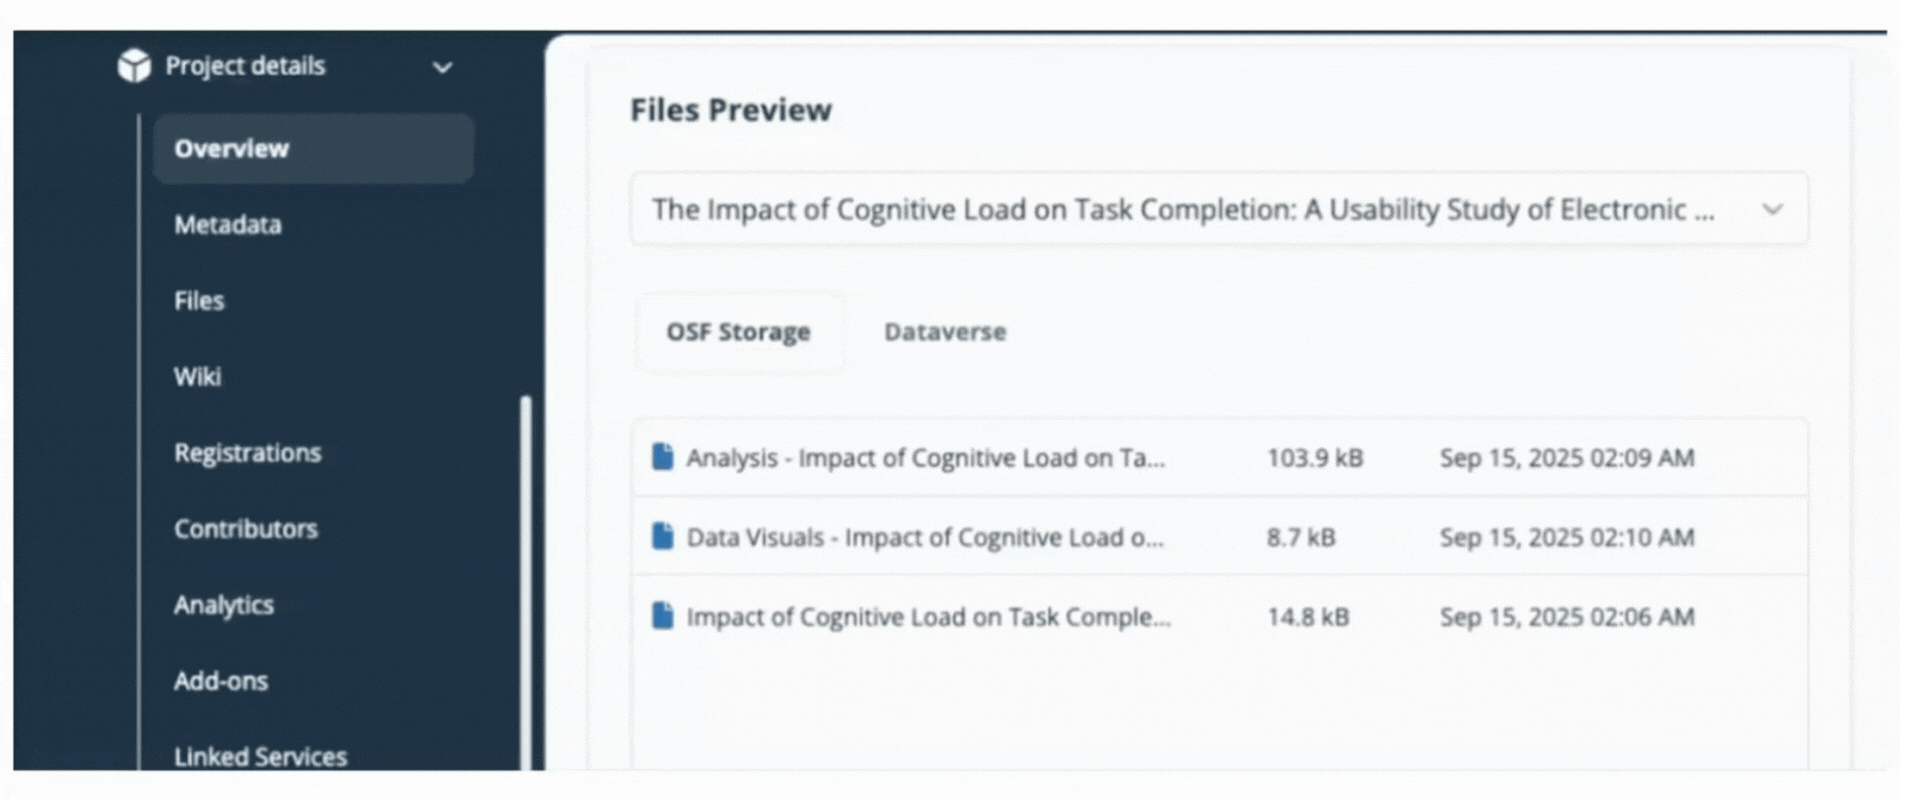
You have now connected your add-on library to your OSF project and will be returned to the add-on selection page. View your connected add-on folder from the Files section of your project.
Dropbox
Connect Dropbox to a Project
You can connect one Dropbox folder or an entire Dropbox account to your OSF project or component. Additional Dropbox folders can be linked individually to different components within the same project.
The connection between Dropbox and OSF is two-way, meaning you can add and update files from either application and your changes are synced.
The Dropbox add-on allows you to connect external content to OSF. This connection does not store or back up this content on OSF. To back up your content to OSF Storage, consider Registering Your Project.
Enable Dropbox in your project
Open your project, then click Add-ons in the left sidebar navigation. Select Additional Storage from the drop down menu. Click the Connect button under Dropbox.

Review the terms in the confirmation modal, and click the Confirm button to enable Dropbox on your project.
Setting up a new Dropbox Account
Because other contributors can connect their add-on accounts to a shared project, you'll be prompted to provide a unique name for your account.
Choose a clear name like "Dropbox_YourName" to distinguish your connection from other collaborators'. When you are finished naming click Authorize.
Authorization of Access to Add-on
After clicking Authorize, a new window tab will appear to allow you to sign in on the selected add-on. Log in with your username and password used on that add-on site, not your OSF account.
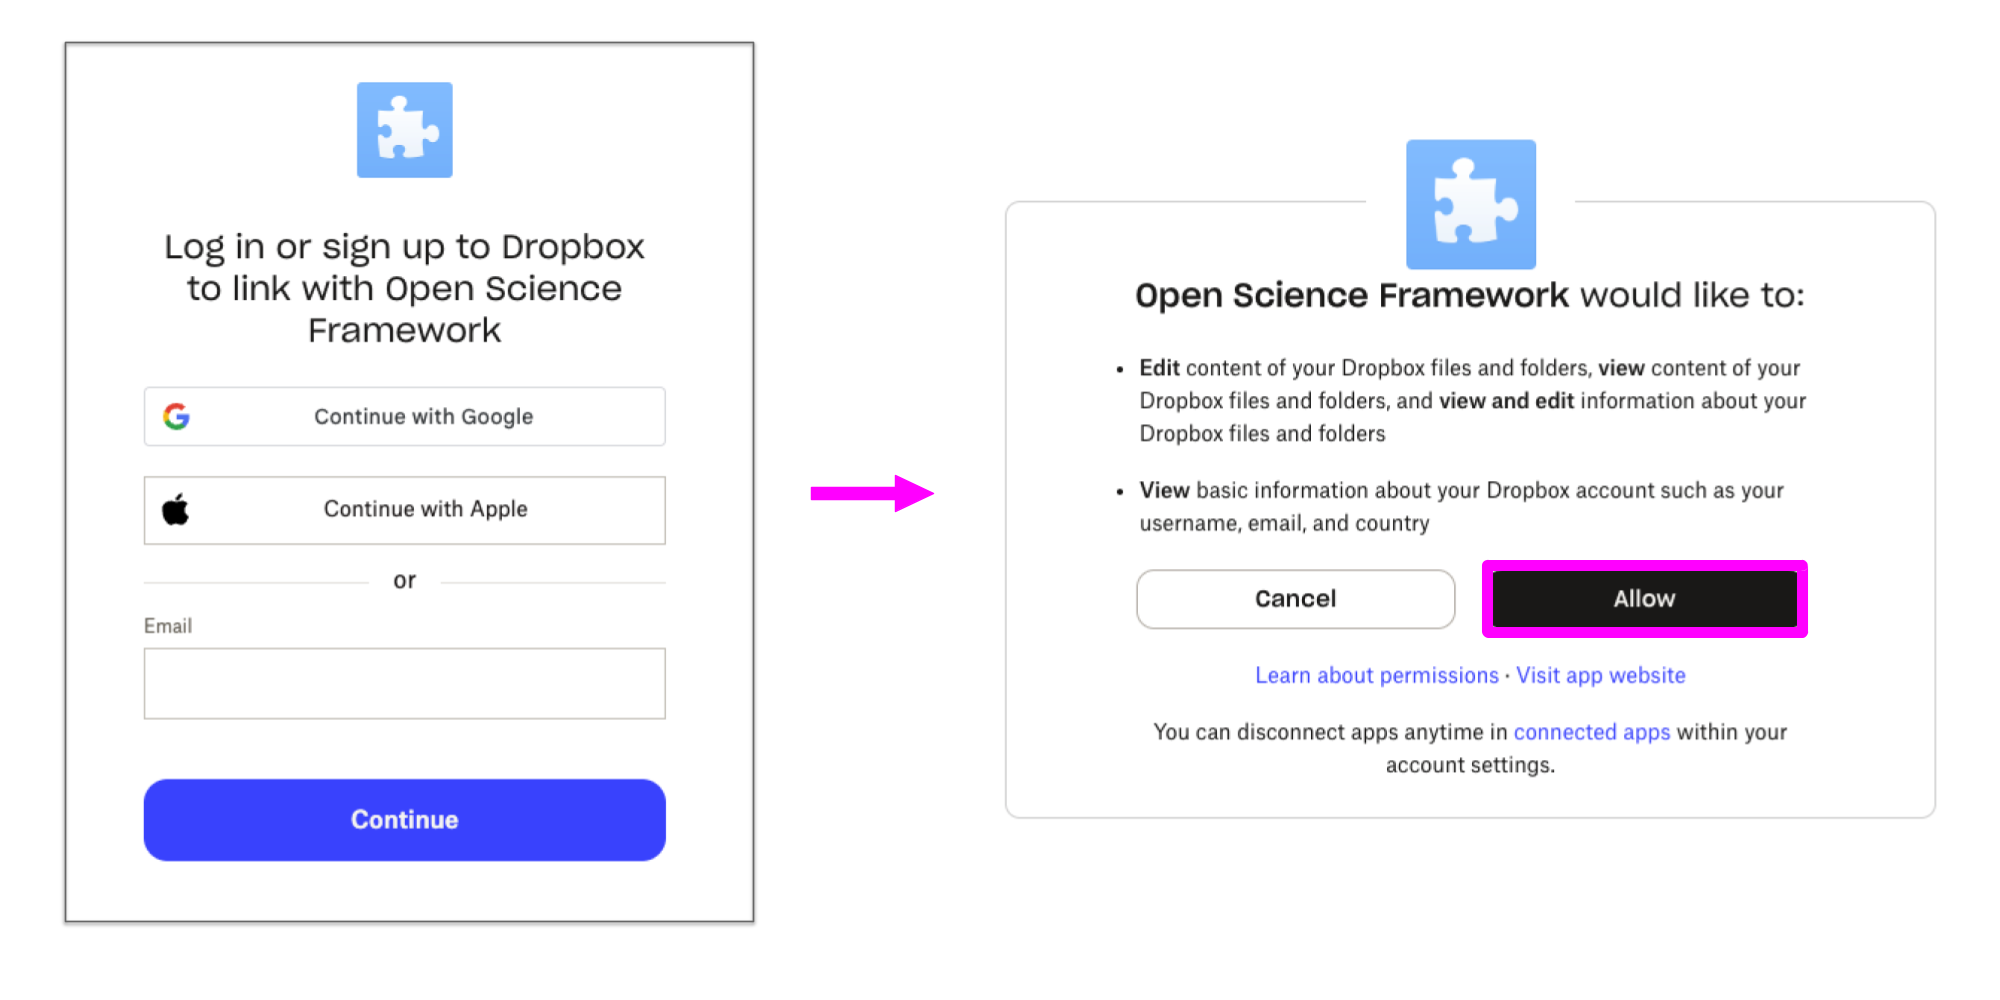
The add-on will then ask you if you would like to confirm the connection of your add-on account to your OSF Account. In this case, click Allow.
Configure Dropbox
You will then be returned to your OSF project, where you can configure the Box access. Select the folder you would like to connect to the project and then click Save.
You have now connected your add-on library to your OSF project and will be returned to the add-on selection page. View your connected add-on folder from the Files section of your project.
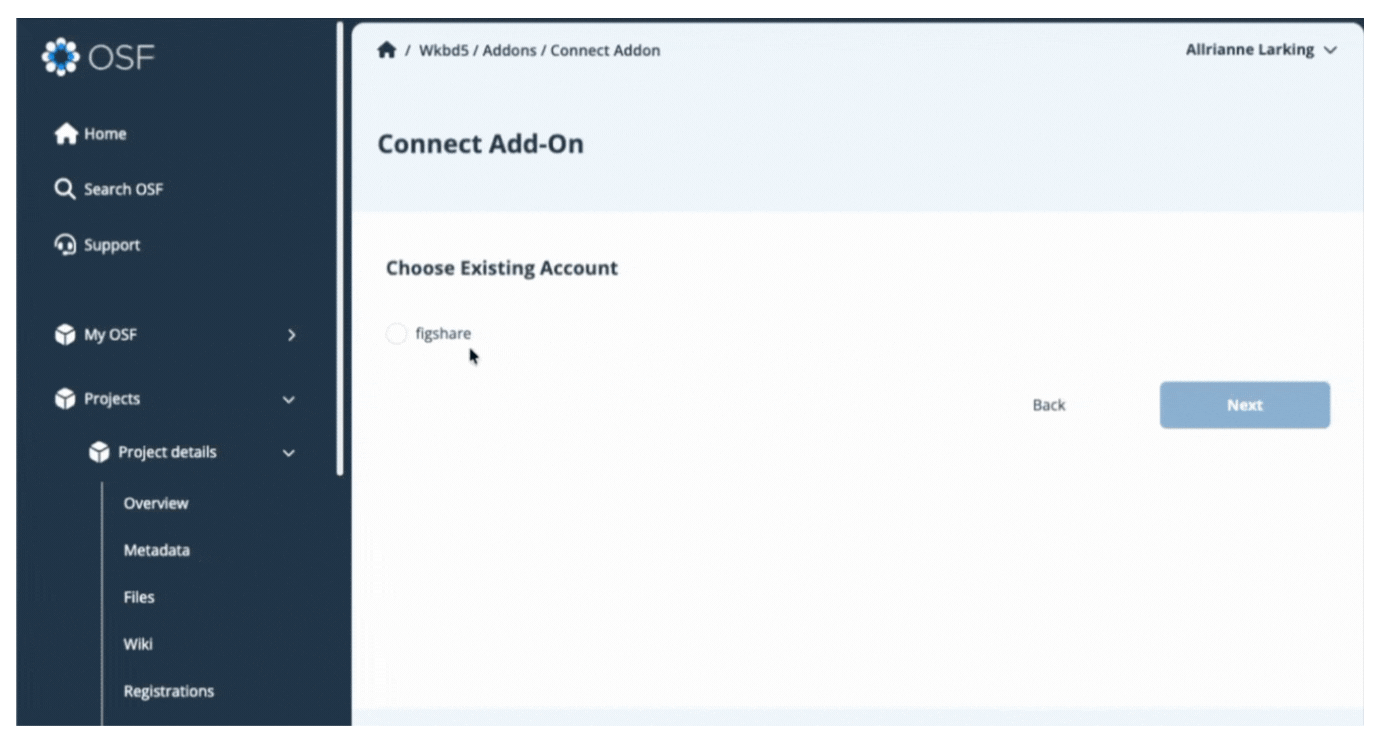
Figshare
Connect figshare to a Project
Figshare is an online digital repository that allows researchers to preserve and share their research outputs. You can connect one figshare folder to your OSF project. Additional folders can be linked individually to different components within the same project.
Connecting figshare for your OSF project allows contributors to move/copy files into figshare. Likewise, files added directly via figshare will be accessible on your connected OSF project.
Files published on figshare cannot be deleted. The figshare add-on allows you to connect external content to OSF. This connection does not store or back up this content on OSF. To back up your content to OSF Storage, consider Registering Your Project.
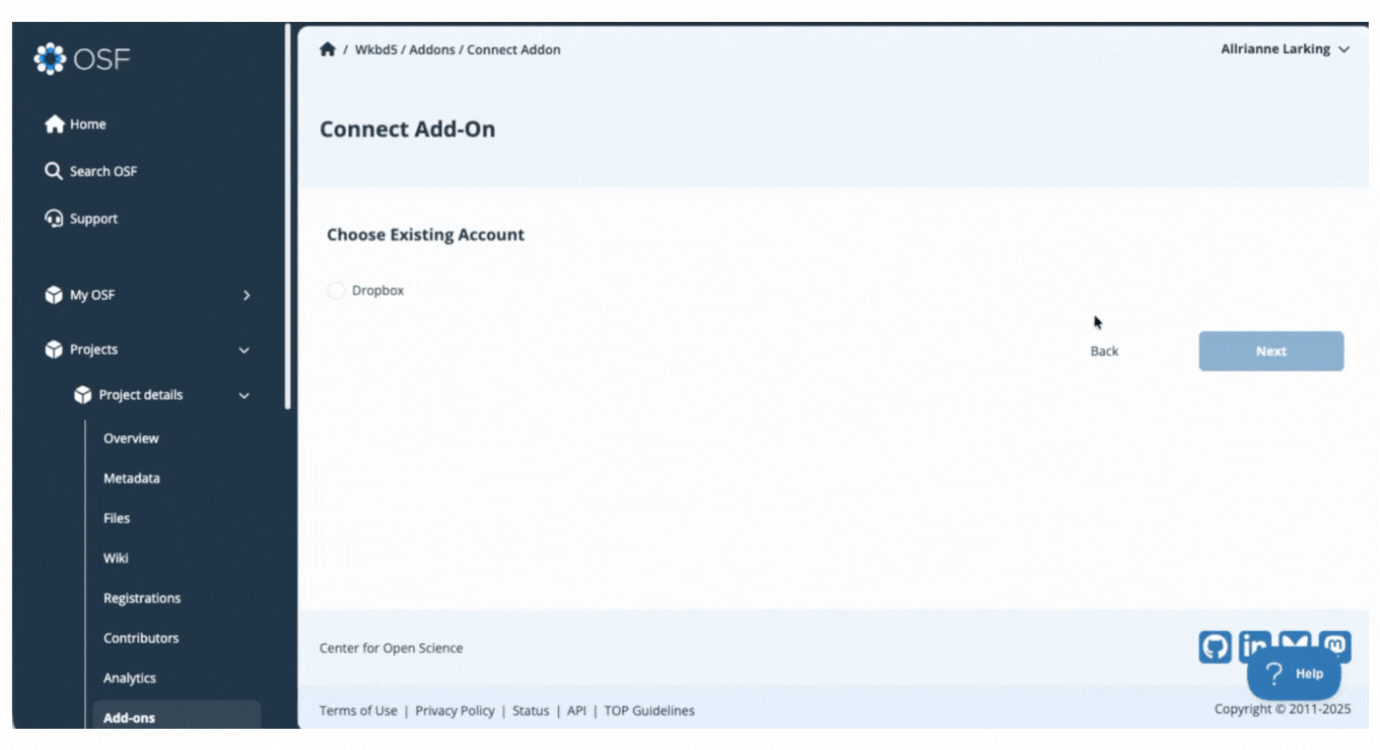
Enable figshare in your project
Open your project, then click Add-ons in the left sidebar navigation. Select Additional Storage from the drop down menu. Click the Connect button under figshare.

Review the terms in the confirmation modal, and click the Confirm button to enable Figshare on your project.
Setting up a new figshare Account
Because other contributors can connect their add-on accounts to a shared project, you'll be prompted to provide a unique name for your account.
Choose a clear name like "Figshare_YourName" to distinguish your connection from other collaborators'. When you are finished naming click Authorize.
Authorization of Access to Add-on
After clicking Authorize, a new window tab will appear to allow you to sign in on the selected add-on. Log in with your username and password used on that add-on site, not your OSF account.
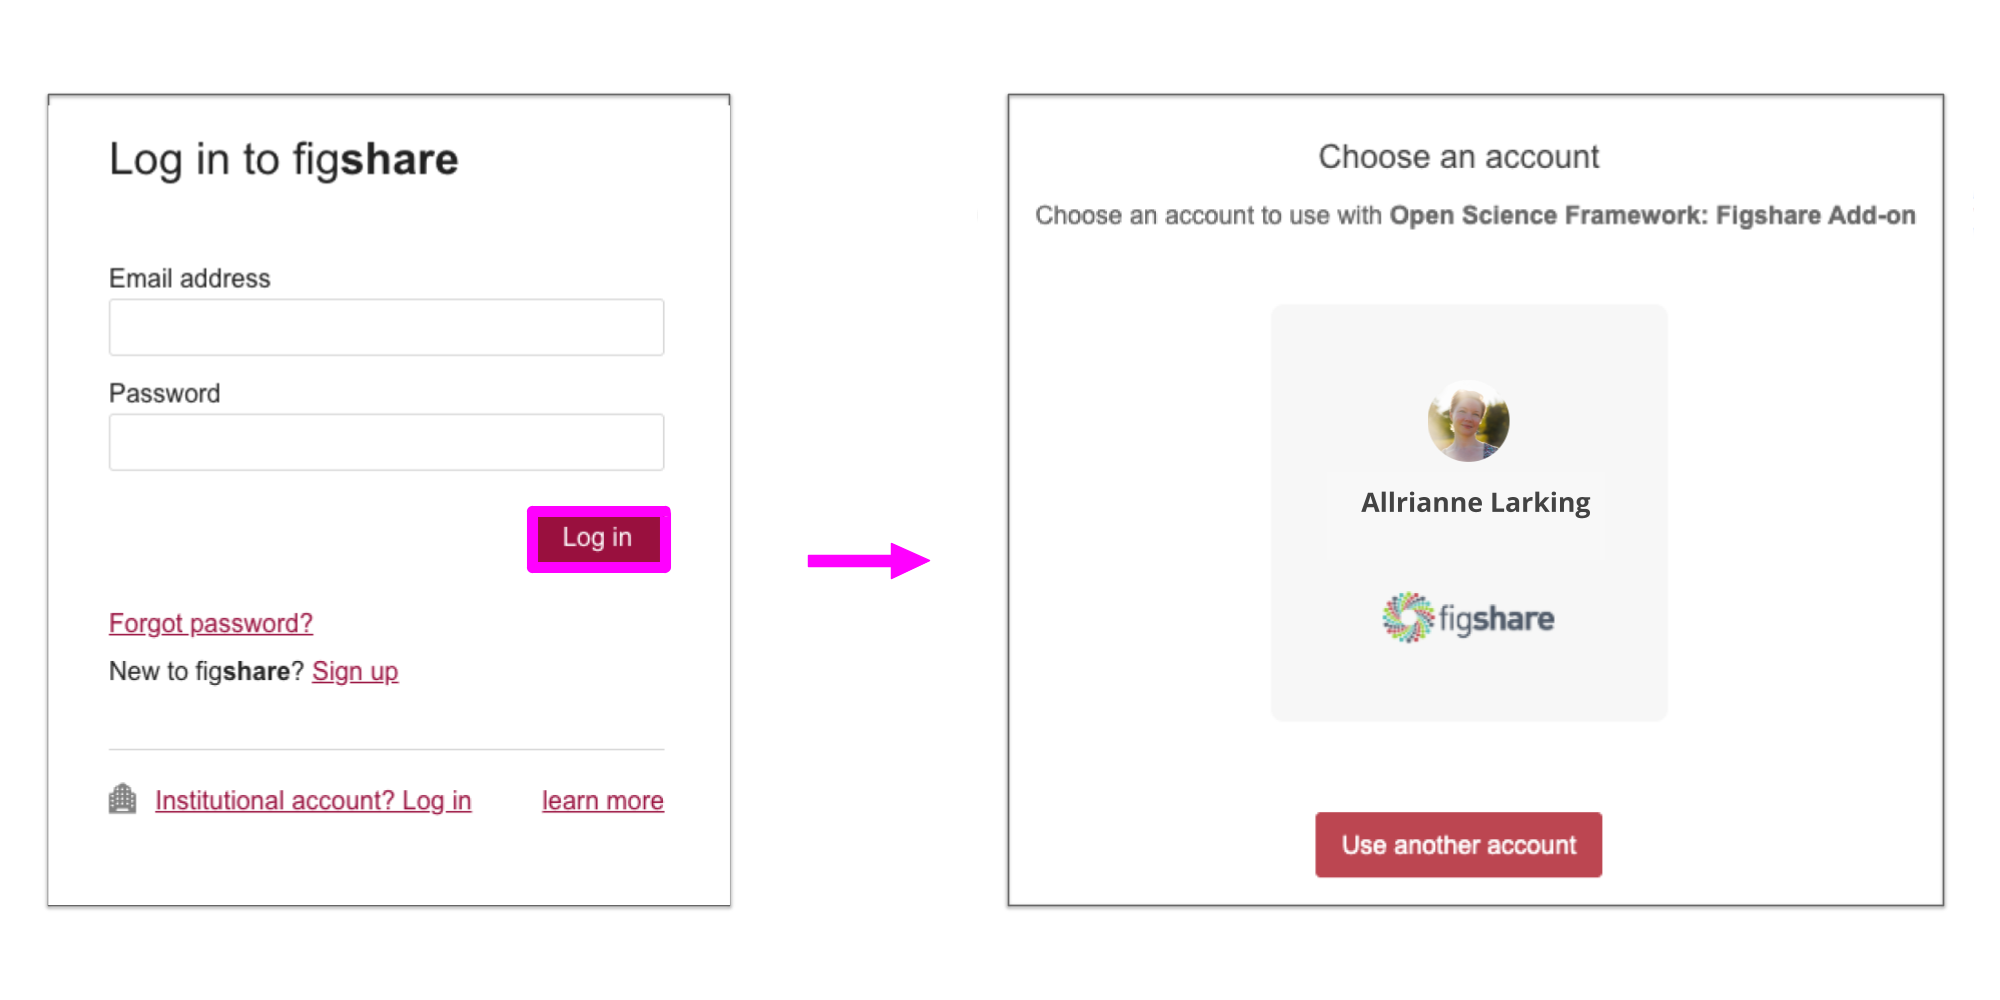
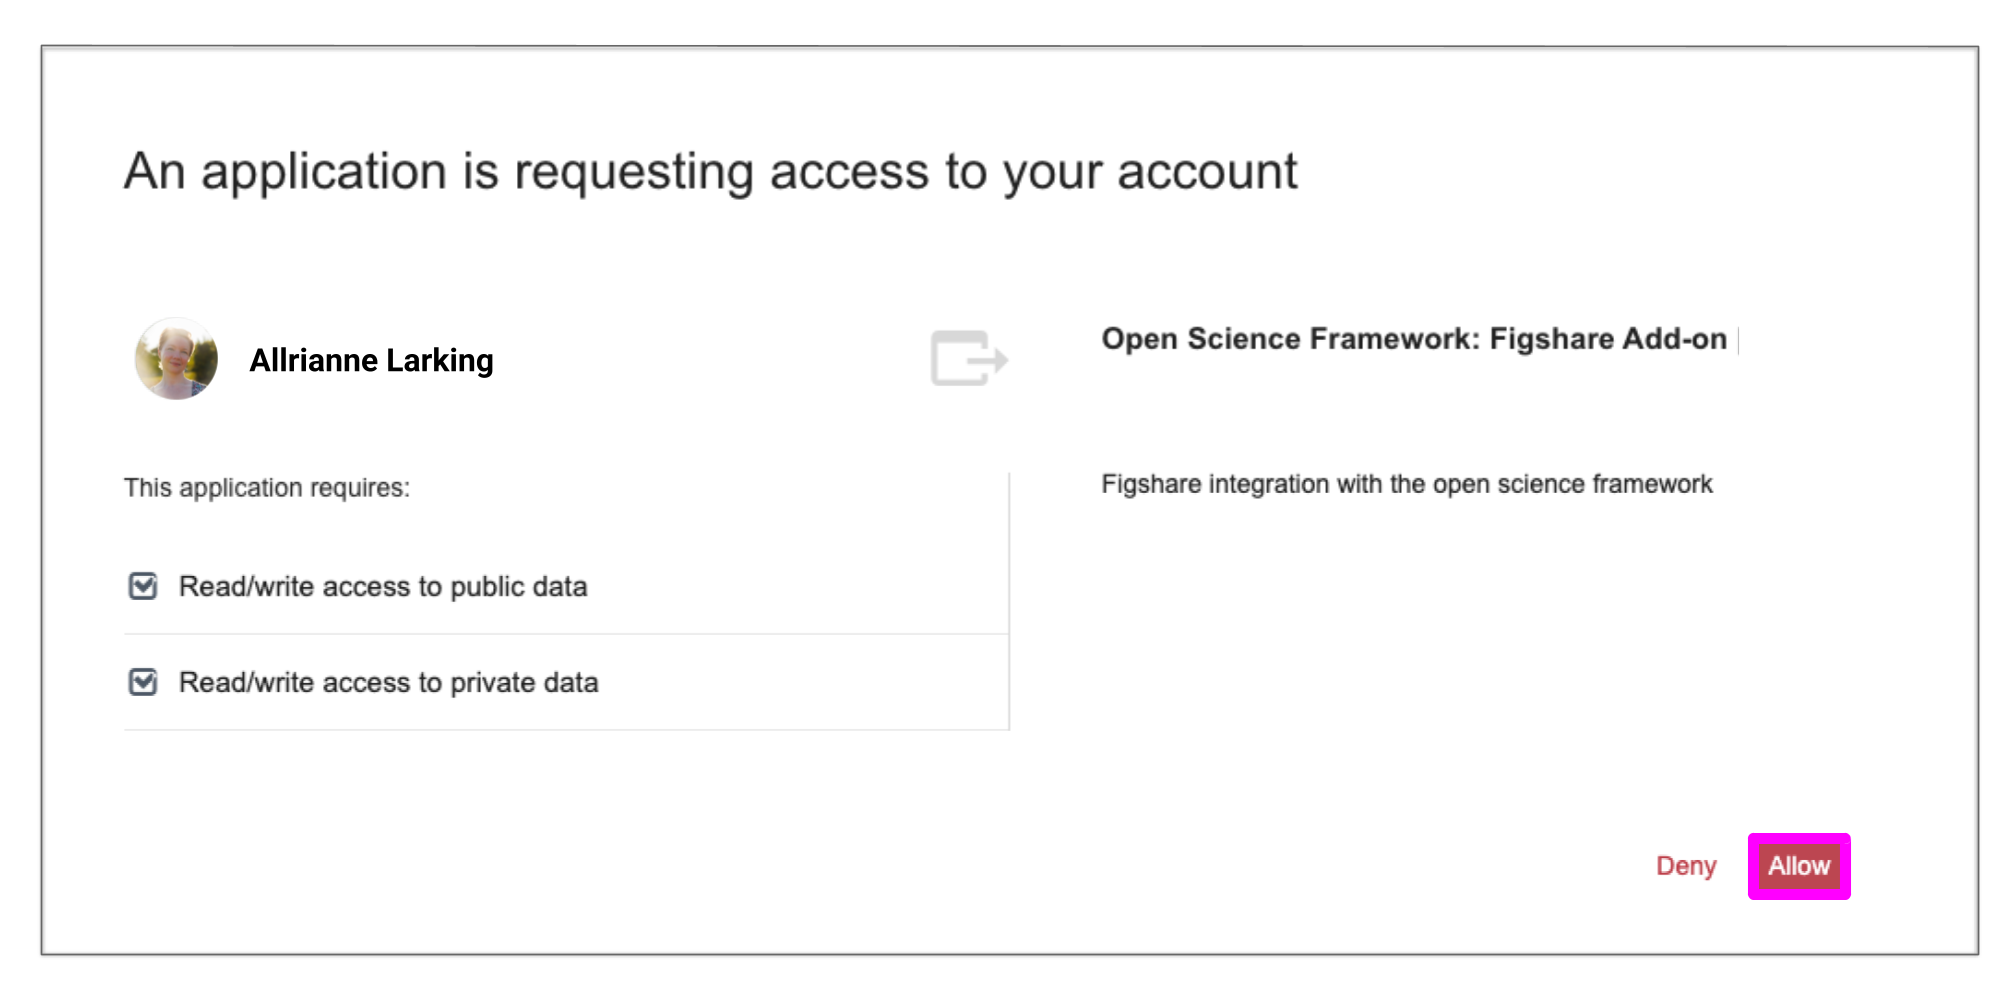
The add-on will then ask you if you would like to confirm the connection of your add-on account to your OSF account. In this case, Click Allow.
Configure Figshare
You will then be returned to your OSF project, where you can configure the figshare access. Select the folder you would like to connect to the project and then click Save.
You have now connected your add-on library to your OSF project and will be returned to the add-on selection page. View your connected add-on folder from the Files section of your project.
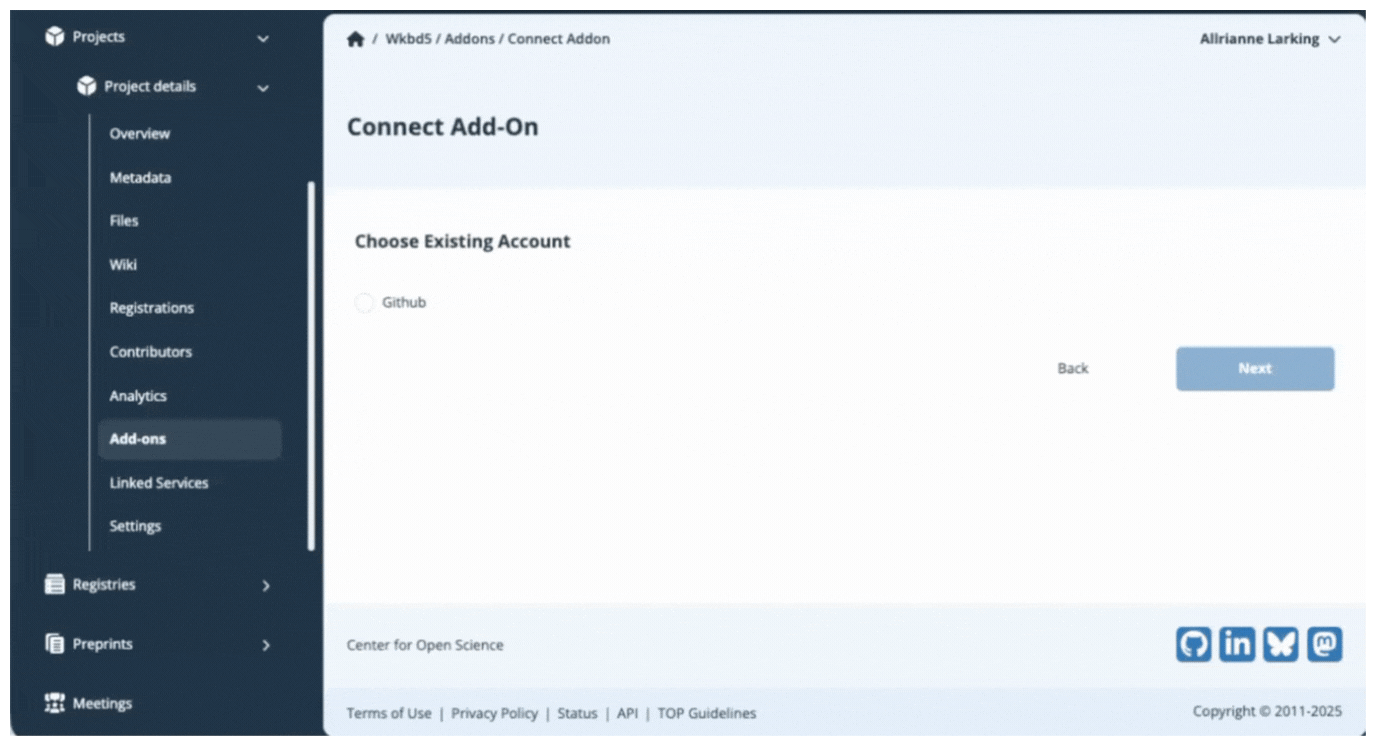
GitHub
Connect GitHub to a Project
GitHub is a commonly-used web-based Git repository-hosting service. You can connect oneGitHub repository per OSF project. Additional repositories can be linked individually to different components within the same project.
The connection between GitHub and OSF is two-way, meaning you can add and update files from either application and your changes are synced. You can also create a new GitHub repository from your OSF project by clicking Create repo.
The GitHub add-on allows you to connect external content to OSF. This connection does not store or back up this content on OSF. To back up your content to OSF Storage, consider Registering Your Project.
Enable GitHub in your project
Open your project, then click Add-ons in the left sidebar navigation. Select Additional Storage from the drop down menu. Click the Connect button under GitHub.

Review the terms in the confirmation modal, and click the Confirm button to enable GitHub on your project.
Setting up a new GitHub Account
Because other contributors can connect their add-on accounts to a shared project, you'll be prompted to provide a unique name for your account.
Choose a clear name like "GitHub_YourName" to distinguish your connection from other collaborators'. When you are finished naming click Authorize.
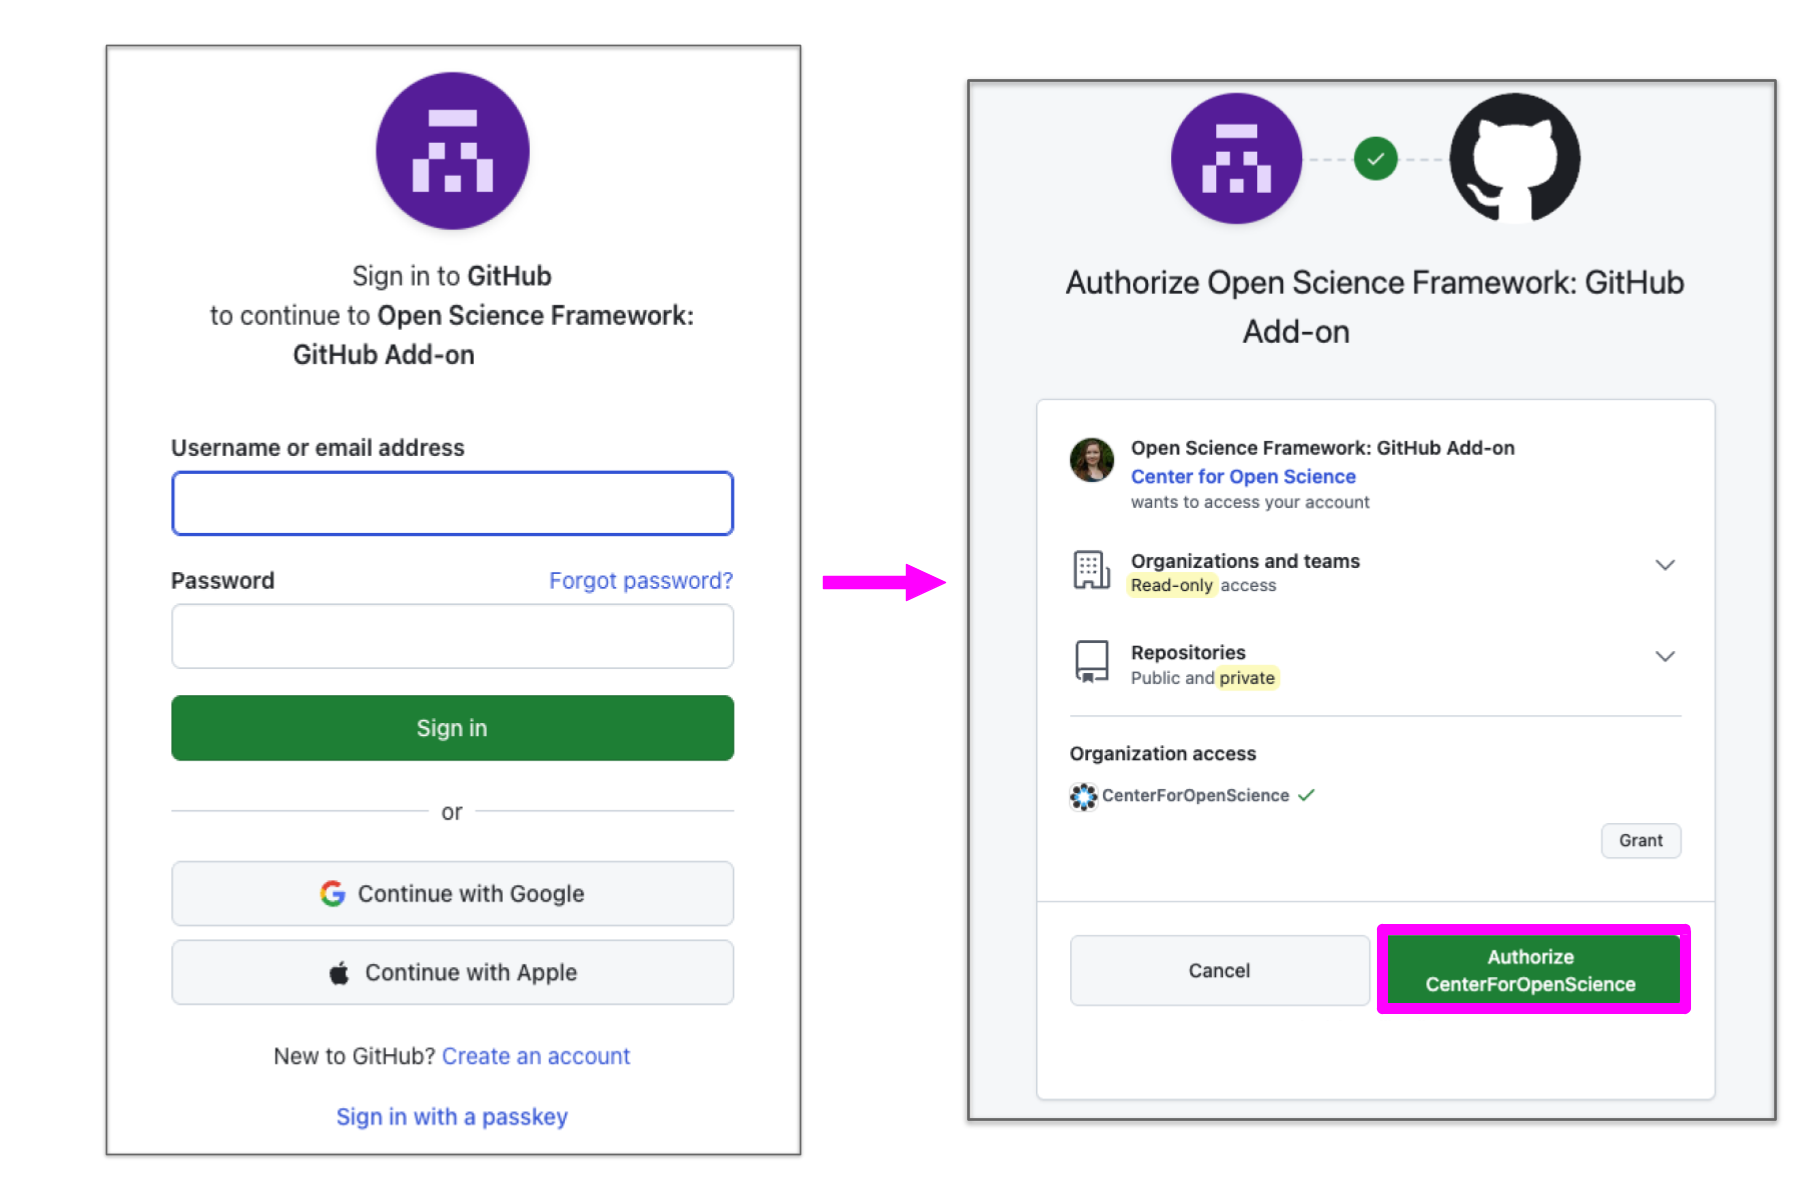
Authorization of Access to Add-on
After clicking Authorize, a new window tab will appear to allow you to sign in on the selected add-on. Log in with your username and password used on that add-on site, not your OSF account.
The add-on will then ask you if you would like to confirm the connection of your add-on account to your OSF account. In this case, click Authorize CenterForOpenScience.
Configure GitHub
You will then be returned to your OSF project, where you can configure the GitHub access. Select the repository you would like to connect to the project and then click Save.
You have now connected your add-on library to your OSF project and will be returned to the add-on selection page. View your connected add-on folder from the Files section of your project.

GitLab
Connect GitLab to a Project
GitLab is an open-source web-based git repository manager. You can link one repository per project. Additional repositories can be linked individually to different components within the same project.
The connection with GitLab is read-only, which means files added to your GitLab repository will be viewable - but not editable - via the OSF.
The GitLab add-on allows you to connect external content to OSF. This connection does not store or back up this content on OSF. To back up your content to OSF Storage, consider registering your project.
Enable GitLab in your project
Open your project, then click Add-ons in the left sidebar navigation. Select Additional Storage from the drop down menu. Click the Connect button under GitLab.

Review the terms in the confirmation modal, and click the Confirm button to enable GitLab on your project.
Setting up a new GitLab Account & Authorization of Add-on Access
Next, you will need to insert the host URL: https://gitlab.com and your API Token. Log in to GitLab to identify your host URL and Generate Project Access Tokens / Generate Personal Access Tokens, and, then enter them in the designated input fields.
Because other contributors can connect their add-on accounts to a shared project, you'll be prompted to provide a unique name for your account. Choose a clear name like "GitLab_YourName" to distinguish your connection from other collaborators'.
When you are finished entering the host URL, API Token, and name into the designated fields, click Authorize and then click Connect.

Configure GitLab
You will then be returned to your OSF project, where you can configure the GitLab access. Select the repository you would like to connect to the project and then click Save.
You have now connected your add-on library to your OSF project and will be returned to the add-on selection page. View your connected add-on folder from the Files section of your project.
Google Drive
Connect Google Drive to a project
You can link one Google Drive folder or an entire drive to any OSF project, component, or your profile. Additional folders can be linked individually to different components within the same project.
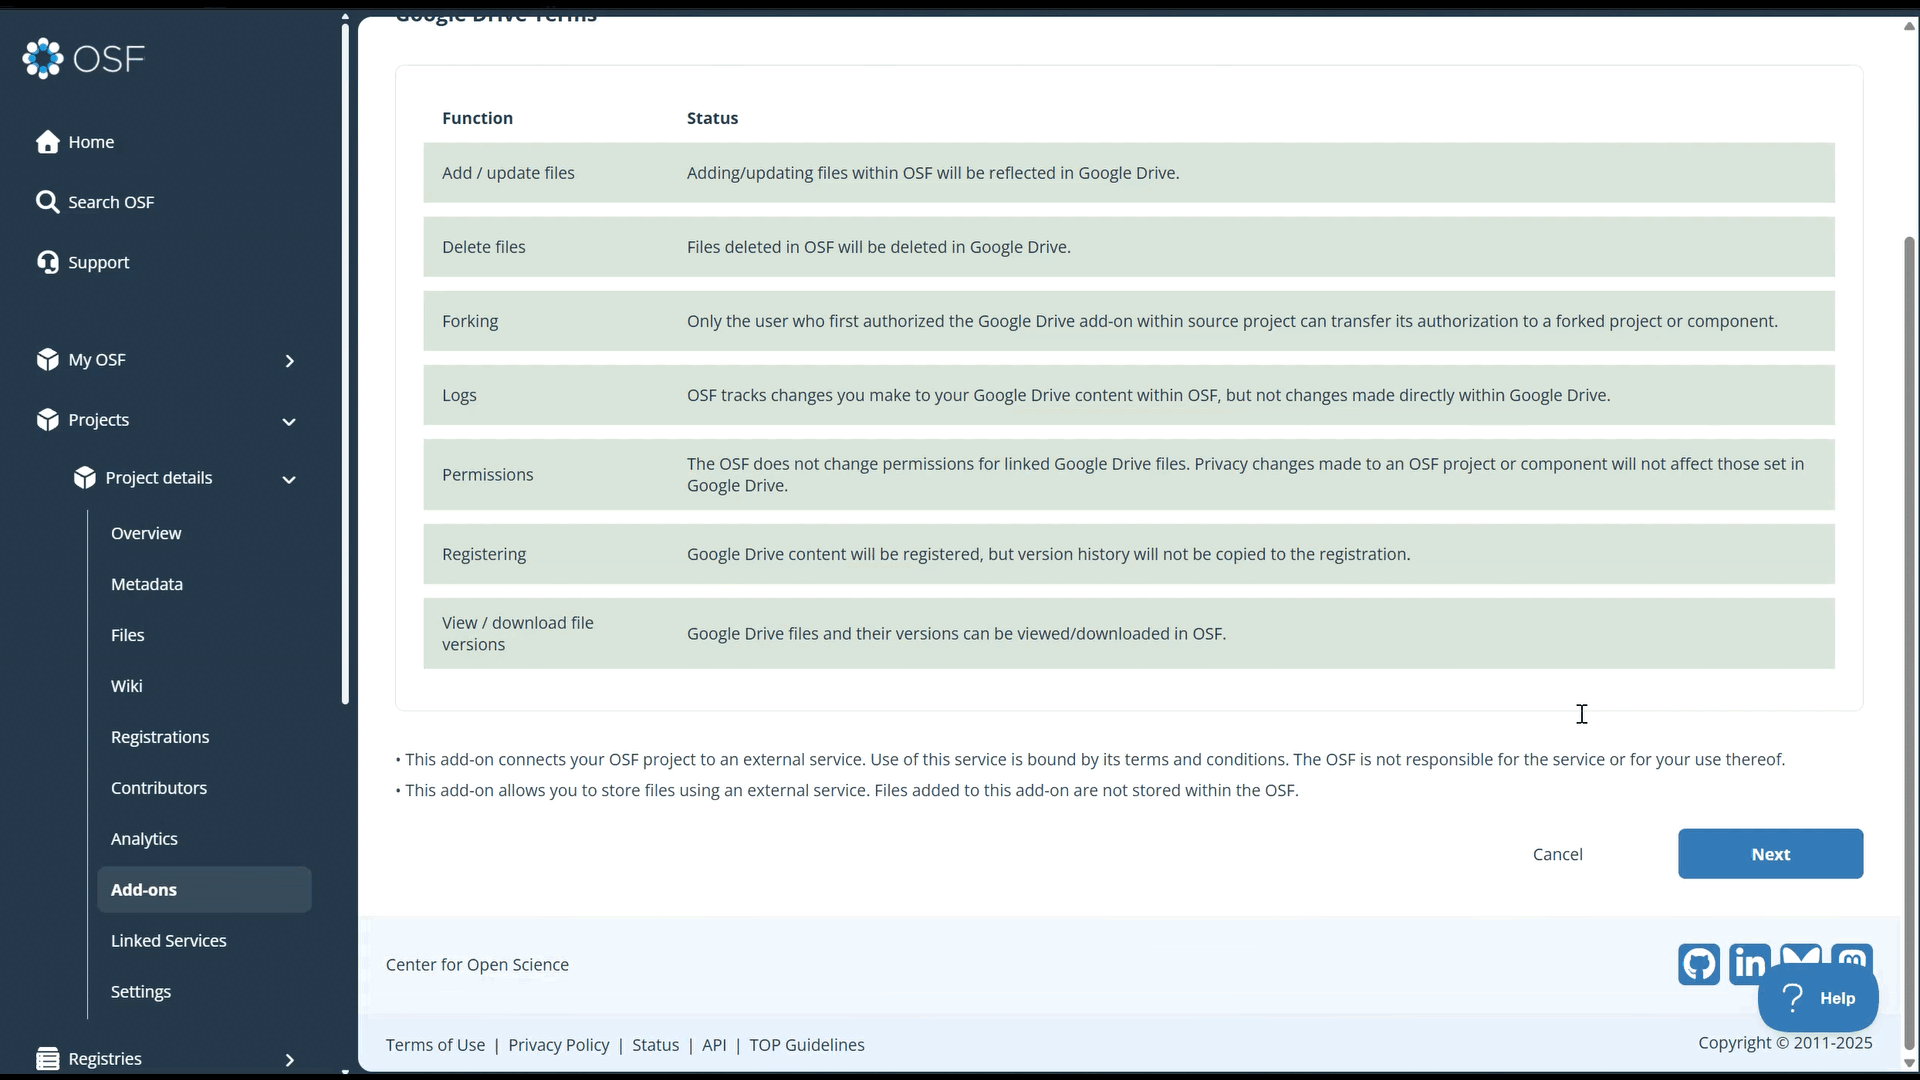
The connection between Google Drive and OSF is two-way, meaning you can add and update files from either application and your changes are synced. Google Docs, Sheets, and Slides will render in-browser via OSF, but cannot be edited directly on the platform.
The Google Drive add-on allows you to connect external content to OSF. This connection does not store or back up this content on OSF. To back up your content to OSF Storage, consider Registering Your Project.
Enable Google Drive on your project
Open your project, then click Add-ons in the left sidebar navigation. Select Additional Storage from the drop down menu. Click the Connect button under Google Drive.

Review the terms in the confirmation modal, and click the Confirm button to enable Google Drive on your project.
Because other contributors can connect their add-on accounts to a shared project, you'll be prompted to provide a unique name for your account.
Choose a clear name like "GoogleDrive_YourName" to distinguish your connection from other collaborators'. When you are finished naming click Authorize.
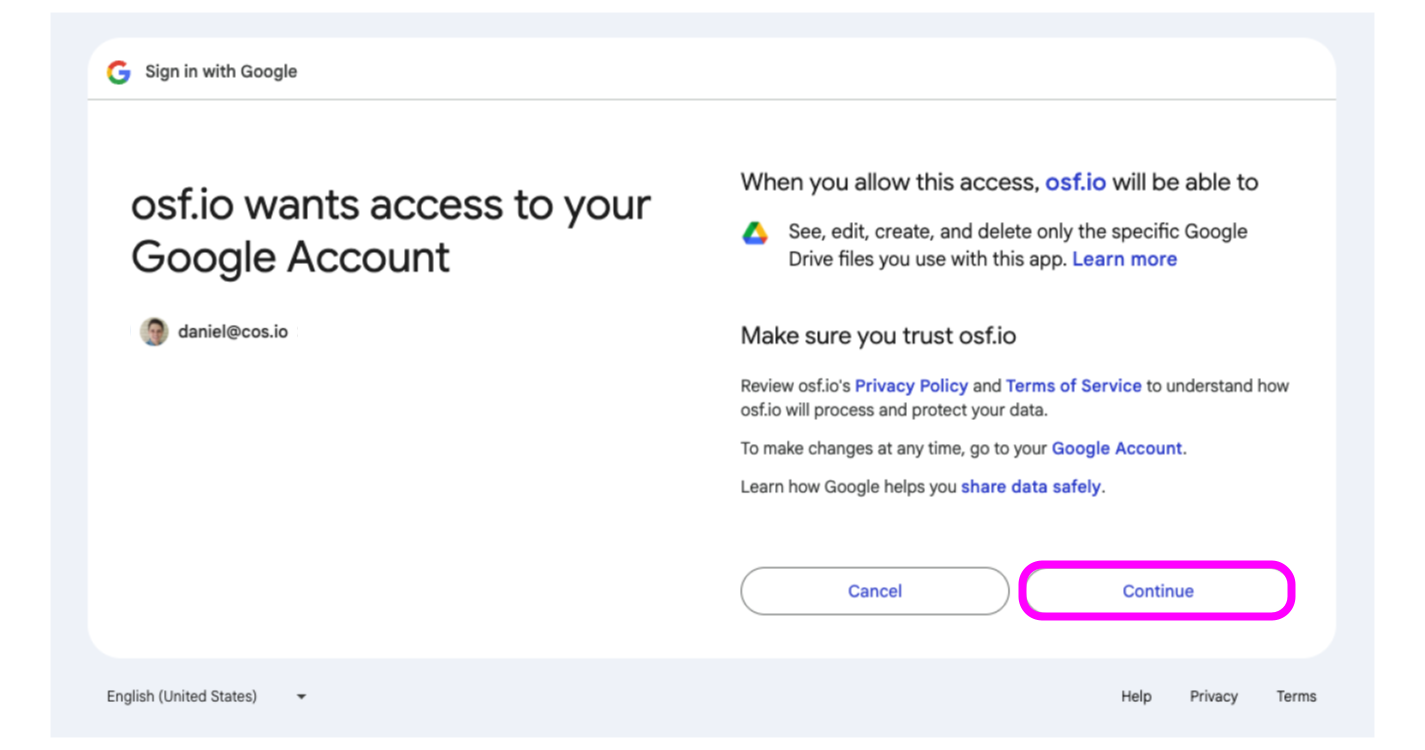
Authorization of Access to Add-on
After clicking Authorize, a new window tab will appear to allow you to sign in on the selected add-on. Log in with your username and password used on that add-on site, not your OSF account.
The add-on will then ask you if you would like to confirm the connection of your add-on account to your OSF account. In this case, click Continue.
Configure Google Drive
You will then be returned to your OSF project, where you can configure the Google Drive access.
Note: To make the "Select Root Folder" clickable, you must click the "Home" link above. This is a known bug and our team is looking into the issue.
Select the folder you would like to connect to the project and then click Save.
You have now connected your add-on to your OSF project and will be returned to the add-on selection page. View your connected add-on folder from the Files section of your project.

OneDrive
Connect OneDrive to a Project
OneDrive is a cloud-based storage service that is part of the Microsoft suite of tools that allows you to store and share files. You can connect one OneDrive folder or subfolder per project. Additional folders can be linked individually to different components within the same project.
The connection between OneDrive and OSF is two-way, meaning you can add and update files from either application and your changes are synced.
The OneDrive add-on allows you to connect external content to OSF. This connection does not store or back up this content on OSF. To back up your content to OSF Storage, consider Registering Your Project.
Enable OneDrive in your project
Open your project, then click Add-ons in the left sidebar navigation. Select Additional Storage from the drop down menu. Click the Connect button under OneDrive.

Review the terms in the confirmation modal, and click the Confirm button to enable OneDrive on your project.
Setting up a new OneDrive Account
Because other contributors can connect their add-on accounts to a shared project, you'll be prompted to provide a unique name for your account.
Choose a clear name like "OneDrive_YourName" to distinguish your connection from other collaborators'. When you are finished naming click Authorize.
Authorization of Access to Add-on
After clicking Authorize, a new window tab will appear to allow you to sign in on the selected Add-on. Log in with your username and password used on that add-on site, not your OSF account.
The add-on will then ask you if you would like to confirm the connection of your add-on account to your OSF Account. Once you have finished approving the add-on connection, you will then be returned to your OSF project,
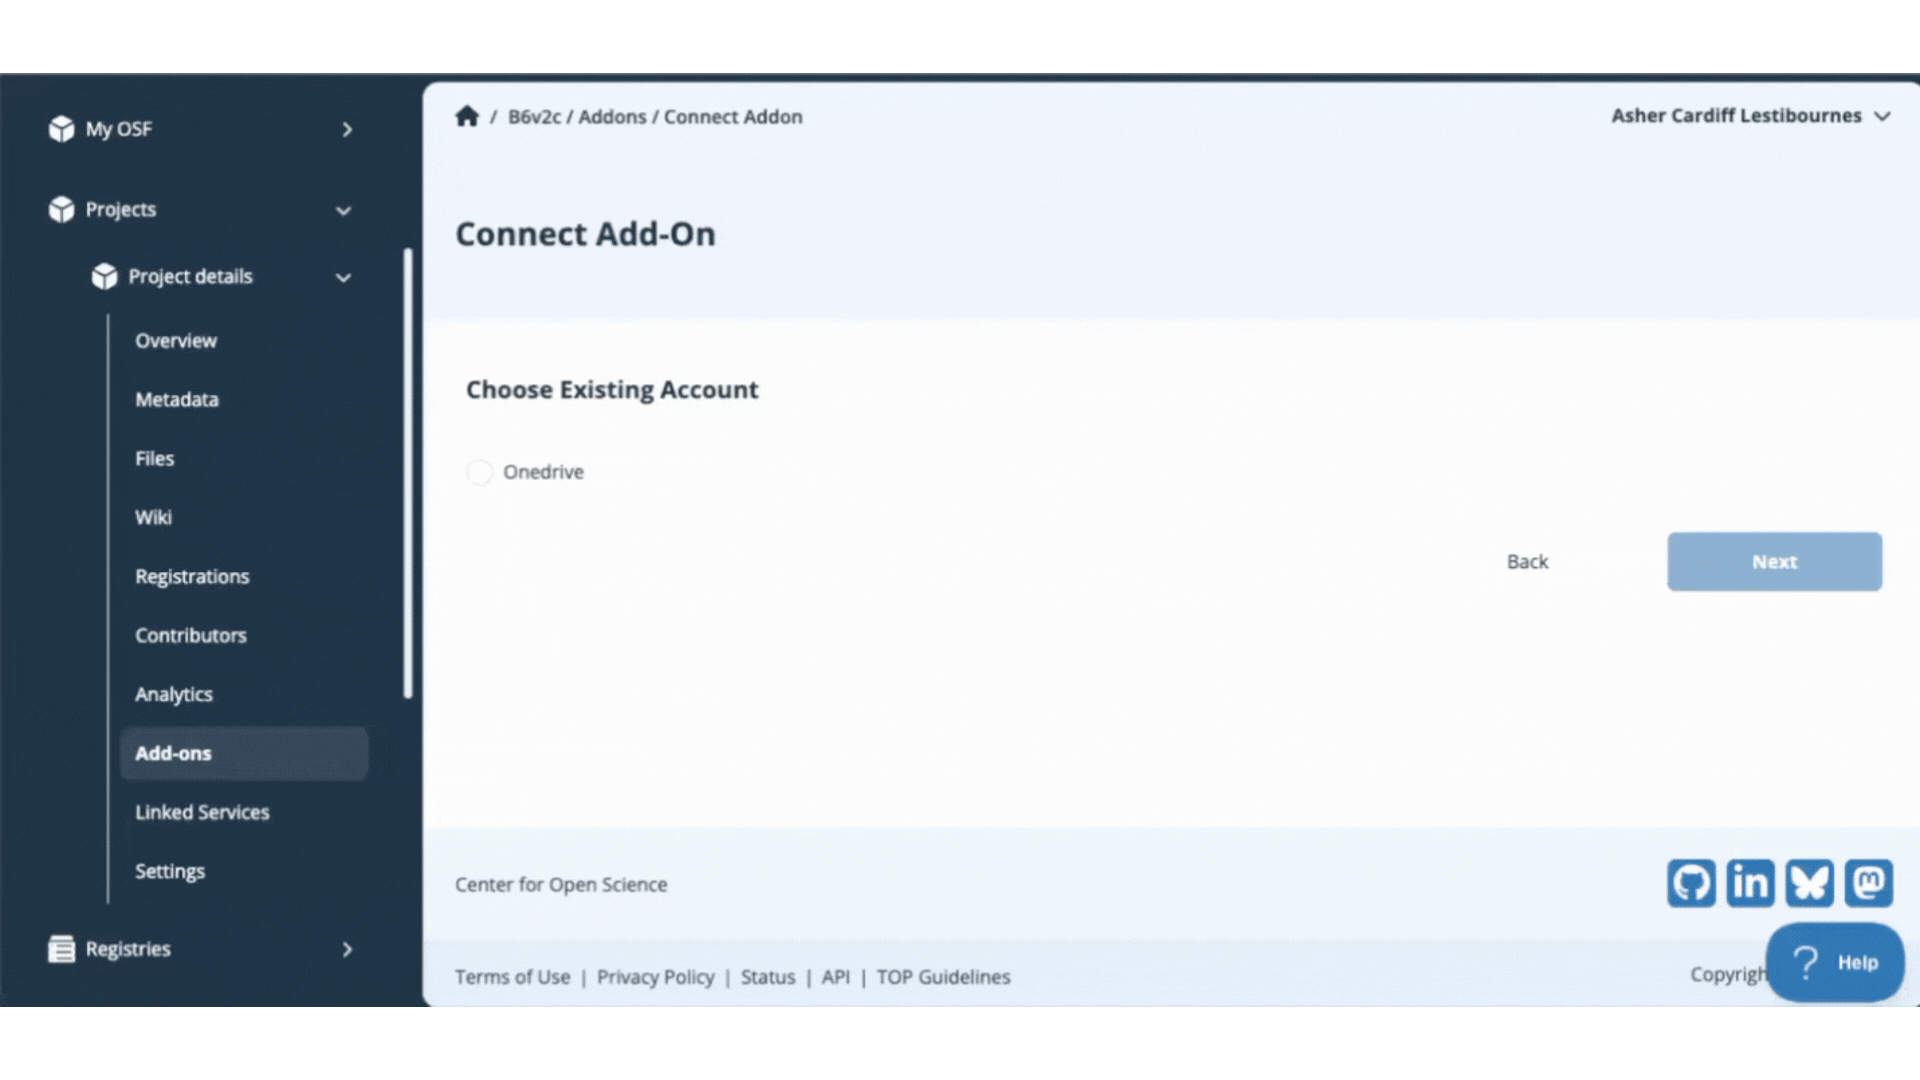
Configure OneDrive
You will then be returned to your OSF project, where you can configure the OneDrive access. Select the folder you would like to connect to the project and then click Save.
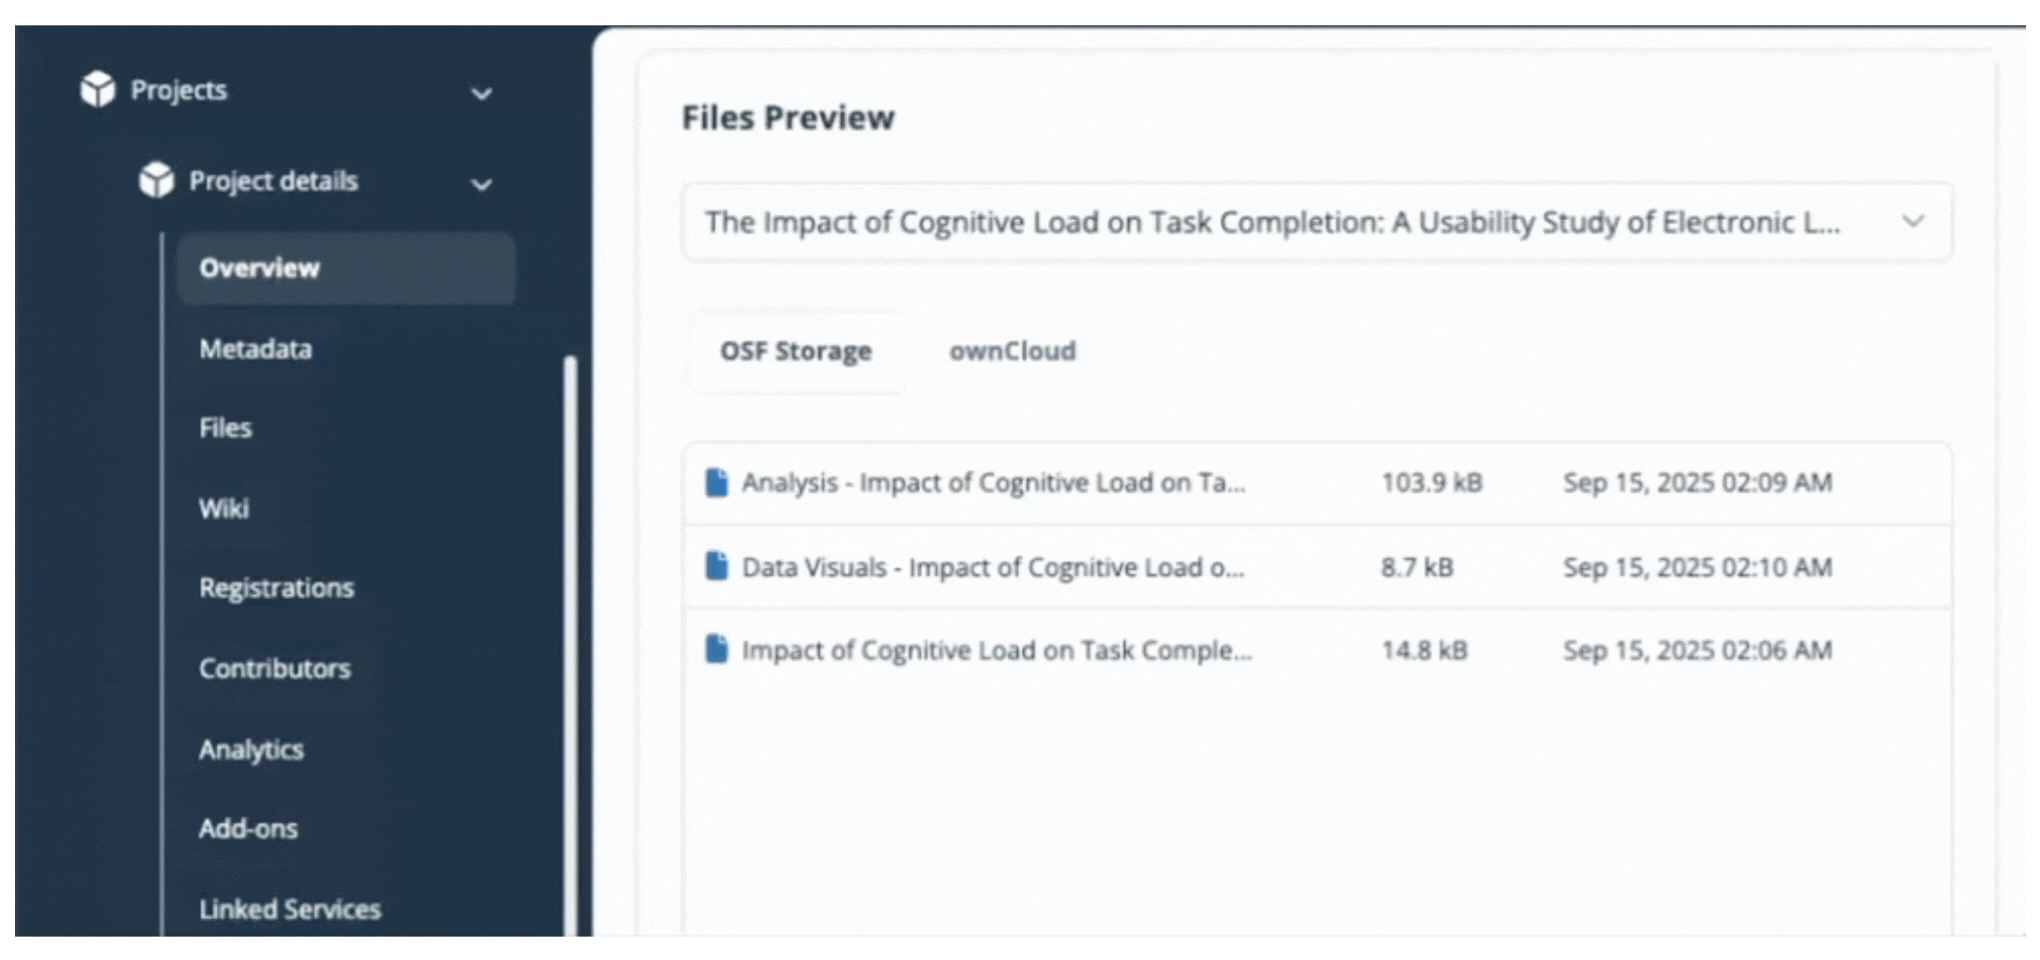
You have now connected your add-on library to your OSF project and will be returned to the add-on selection page. View your connected add-on folder from the Files section of your project.
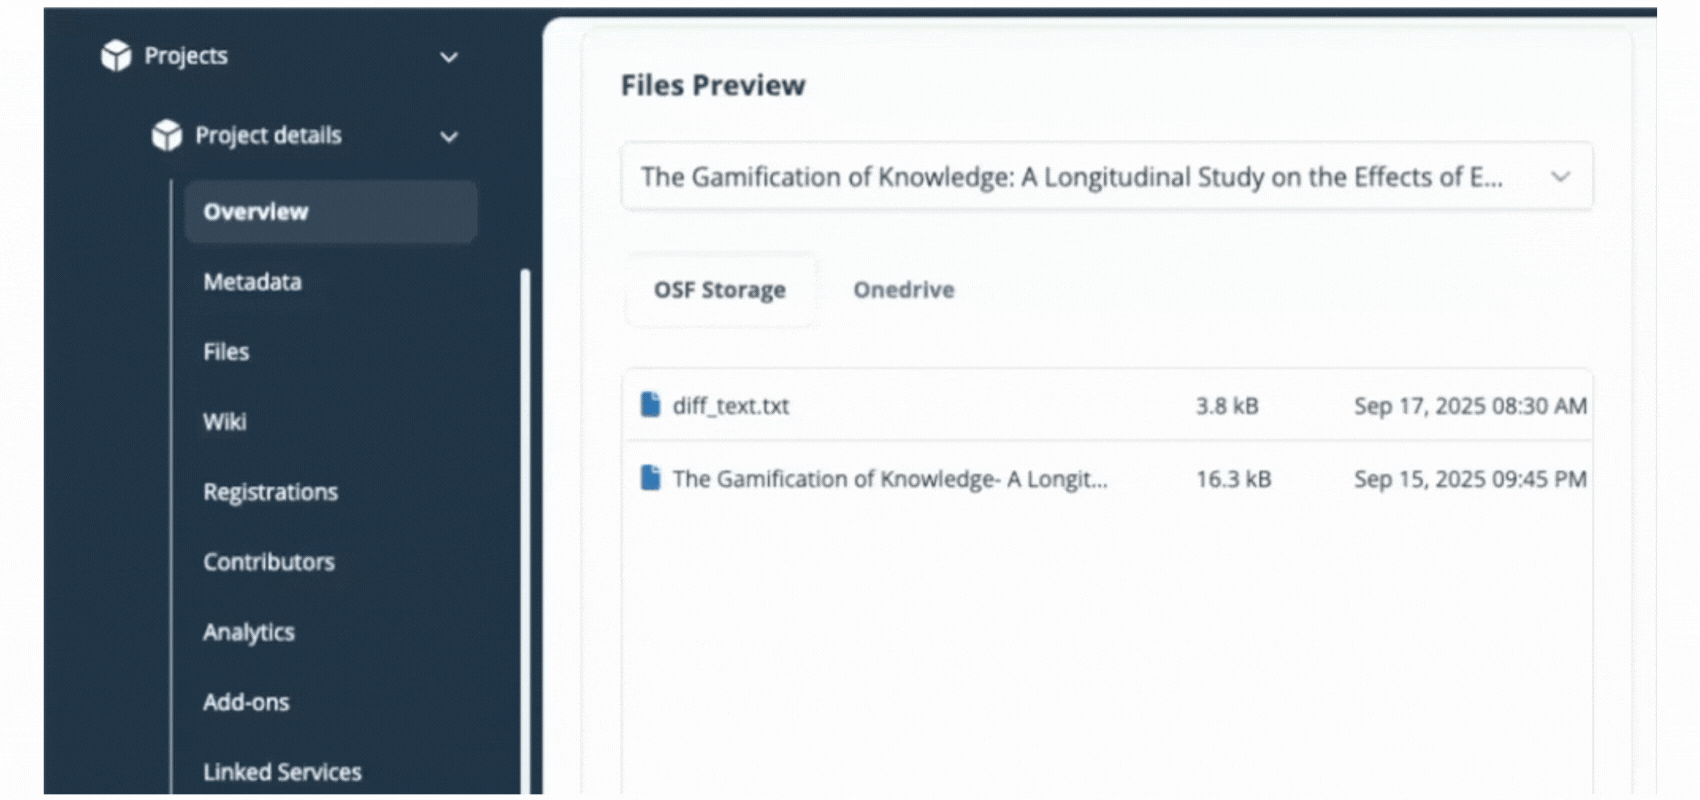
ownCloud/nextCloud
Connect ownCloud/nextCloud to a Project
OwnCloud is an open-source, universal file access platform that is self-hosted on your servers. Some ownCloud instances have alternate names, like nextCloud.
The connection between ownCloud and OSF is two-way, meaning you can add and update files from either application and your changes are synced.
The ownCloud add-on allows you to connect external content to OSF. This connection does not store or back up this content on OSF. To back up your content to OSF Storage, consider Registering Your Project.
Enable ownCloud in your project
Open your project, then click Add-ons in the left sidebar navigation. Select Additional Storage from the drop down menu. Click the Connect button under ownCloud.

Review the terms in the confirmation modal, and click the Confirm button to enable ownCloud on your project.
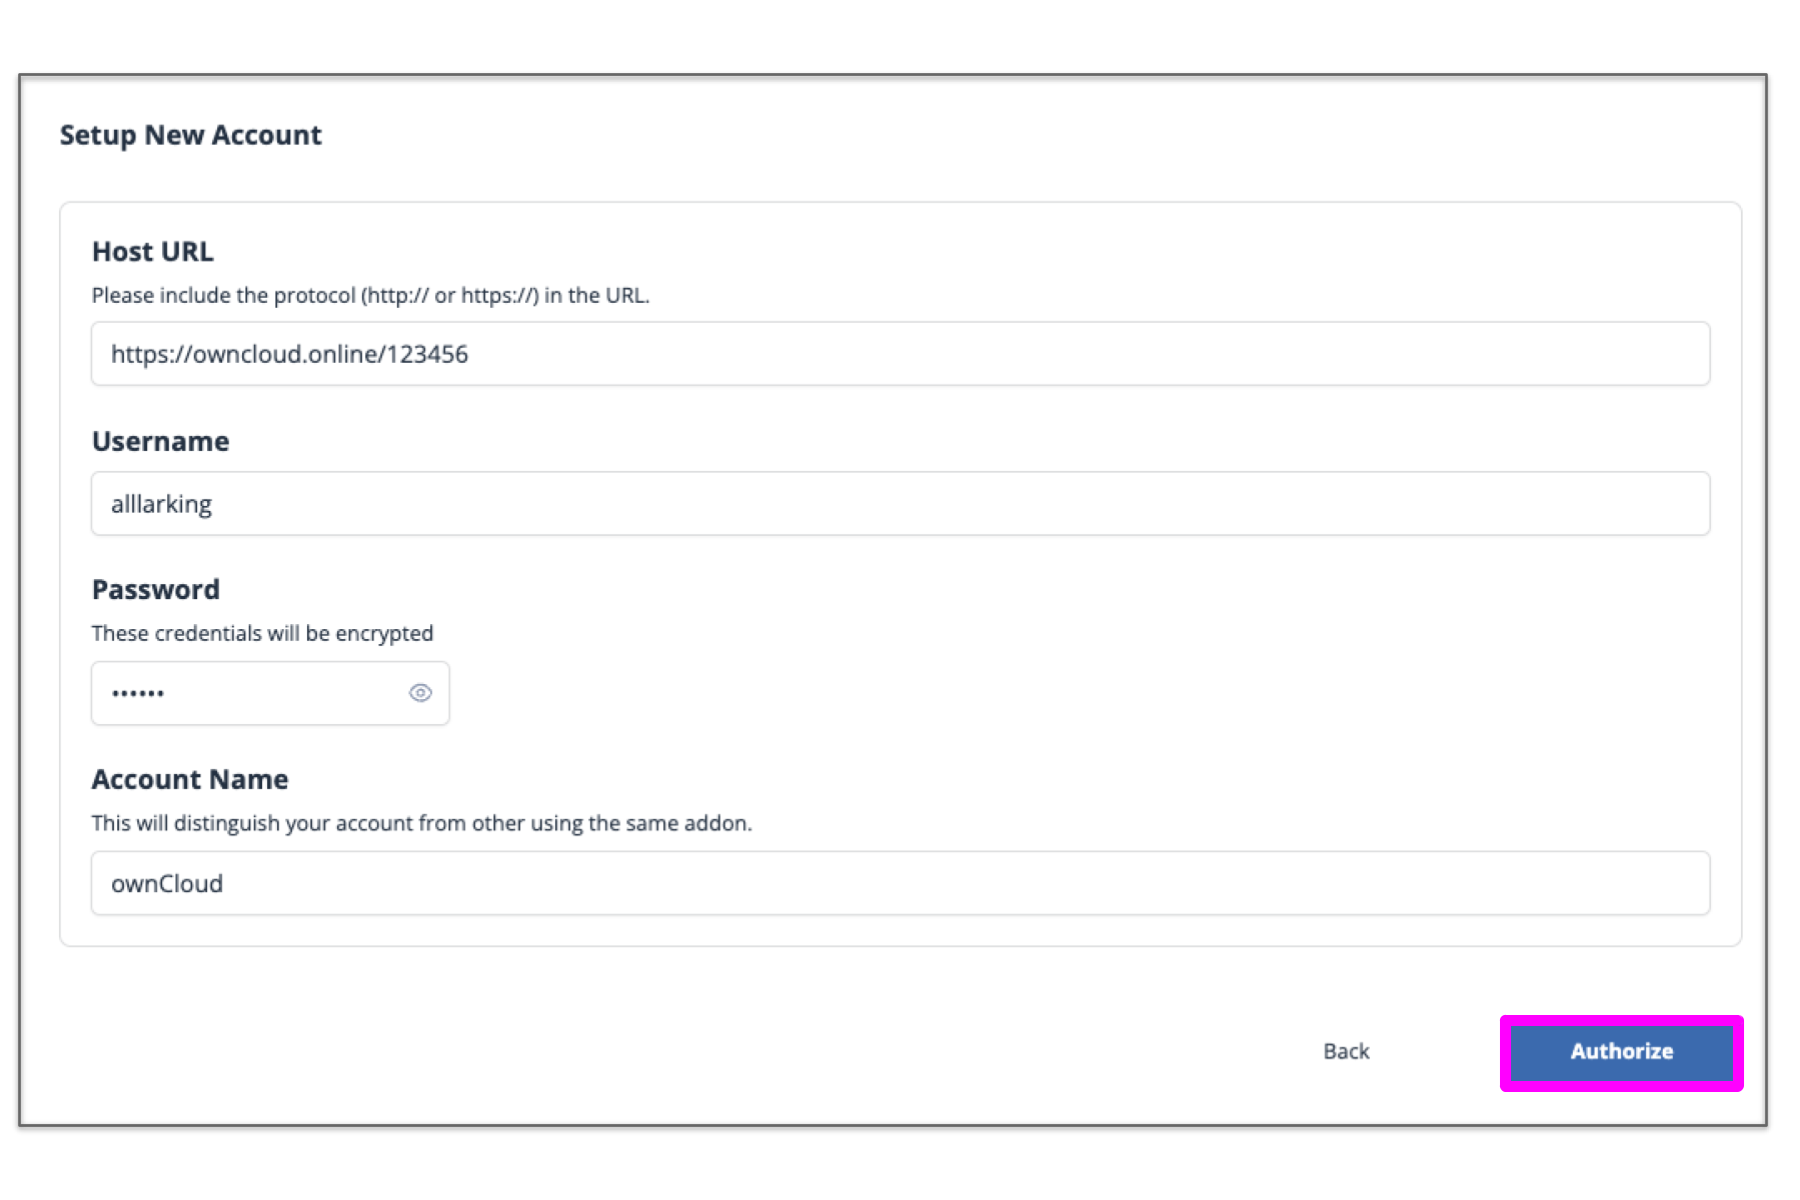
Setting up a new ownCloud Account & Authorization of Access
Because other contributors can connect their add-on accounts to a shared project, you'll be prompted to provide a unique name for your account.
Choose a clear name like "ownCloud_YourName" to distinguish your connection from other collaborators'.
To authorize you will need to provide the URL for ownCloud (the URL to use will be for the WebDAV API), along with your OwnCloud password.
When you are finished entering the host URL, Username, Password, and name into the designated fields, click Authorize and then click Connect.
Configure OwnCloud
You will then be returned to your OSF project, where you can configure the OwnCloud access. Select the folder you would like to connect to the project and then click Save.
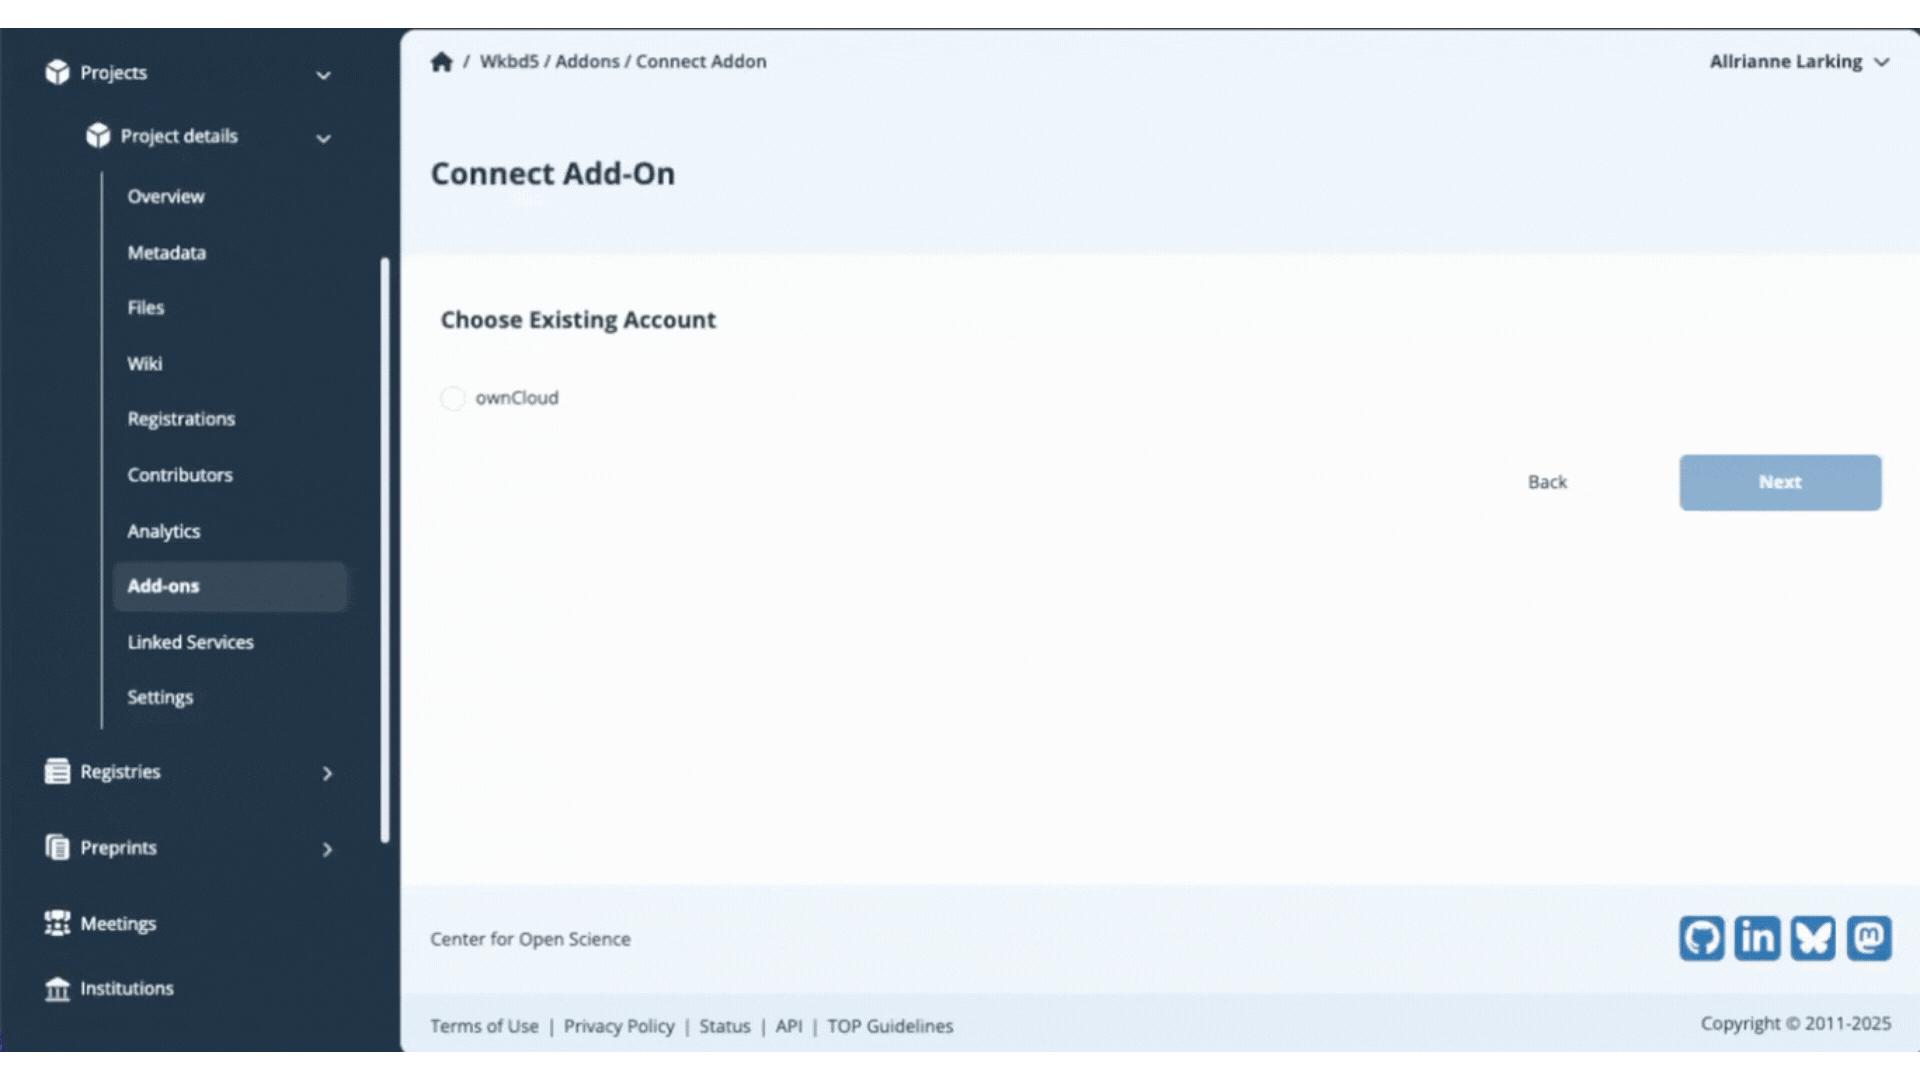
You have now connected your add-on library to your OSF project and will be returned to the add-on selection page. View your connected add-on folder from the Files section of your project.
Citation add-ons
Citation software is an excellent way to collect and manage references within a research study. The OSF is compatible with Mendeley and Zotero. Please see our help guide below for more information:
- Connect Mendeley to a Project: Connecting a Mendeley folder to your OSF project allows you, your contributors, and others viewing your project to see references you store on Mendeley.
- Connect Zotero to a Project: You can manage and collaborate on your Zotero references directly from your OSF projects.
- Reauthorize Citation Add-on: Having trouble seeing your Zotero libraries and folders? You may need to reauthorize Zotero as an add-on to your OSF account. (Follow the same steps if you need to update Mendeley).
Mendeley
Connect Mendeley to a Project
The connection with Mendeley is read-only, which means references added to your Mendeley folder will be viewable - but not editable - via OSF.
You can link one folder per project. Different folders can be linked to different components within the same project.
The Mendeley add-on allows you to connect external content to OSF. This connection does not store or back up this content on OSF. If registering your project with Mendeley connected, Mendeley content will not be registered.
Enable Mendeley in your project
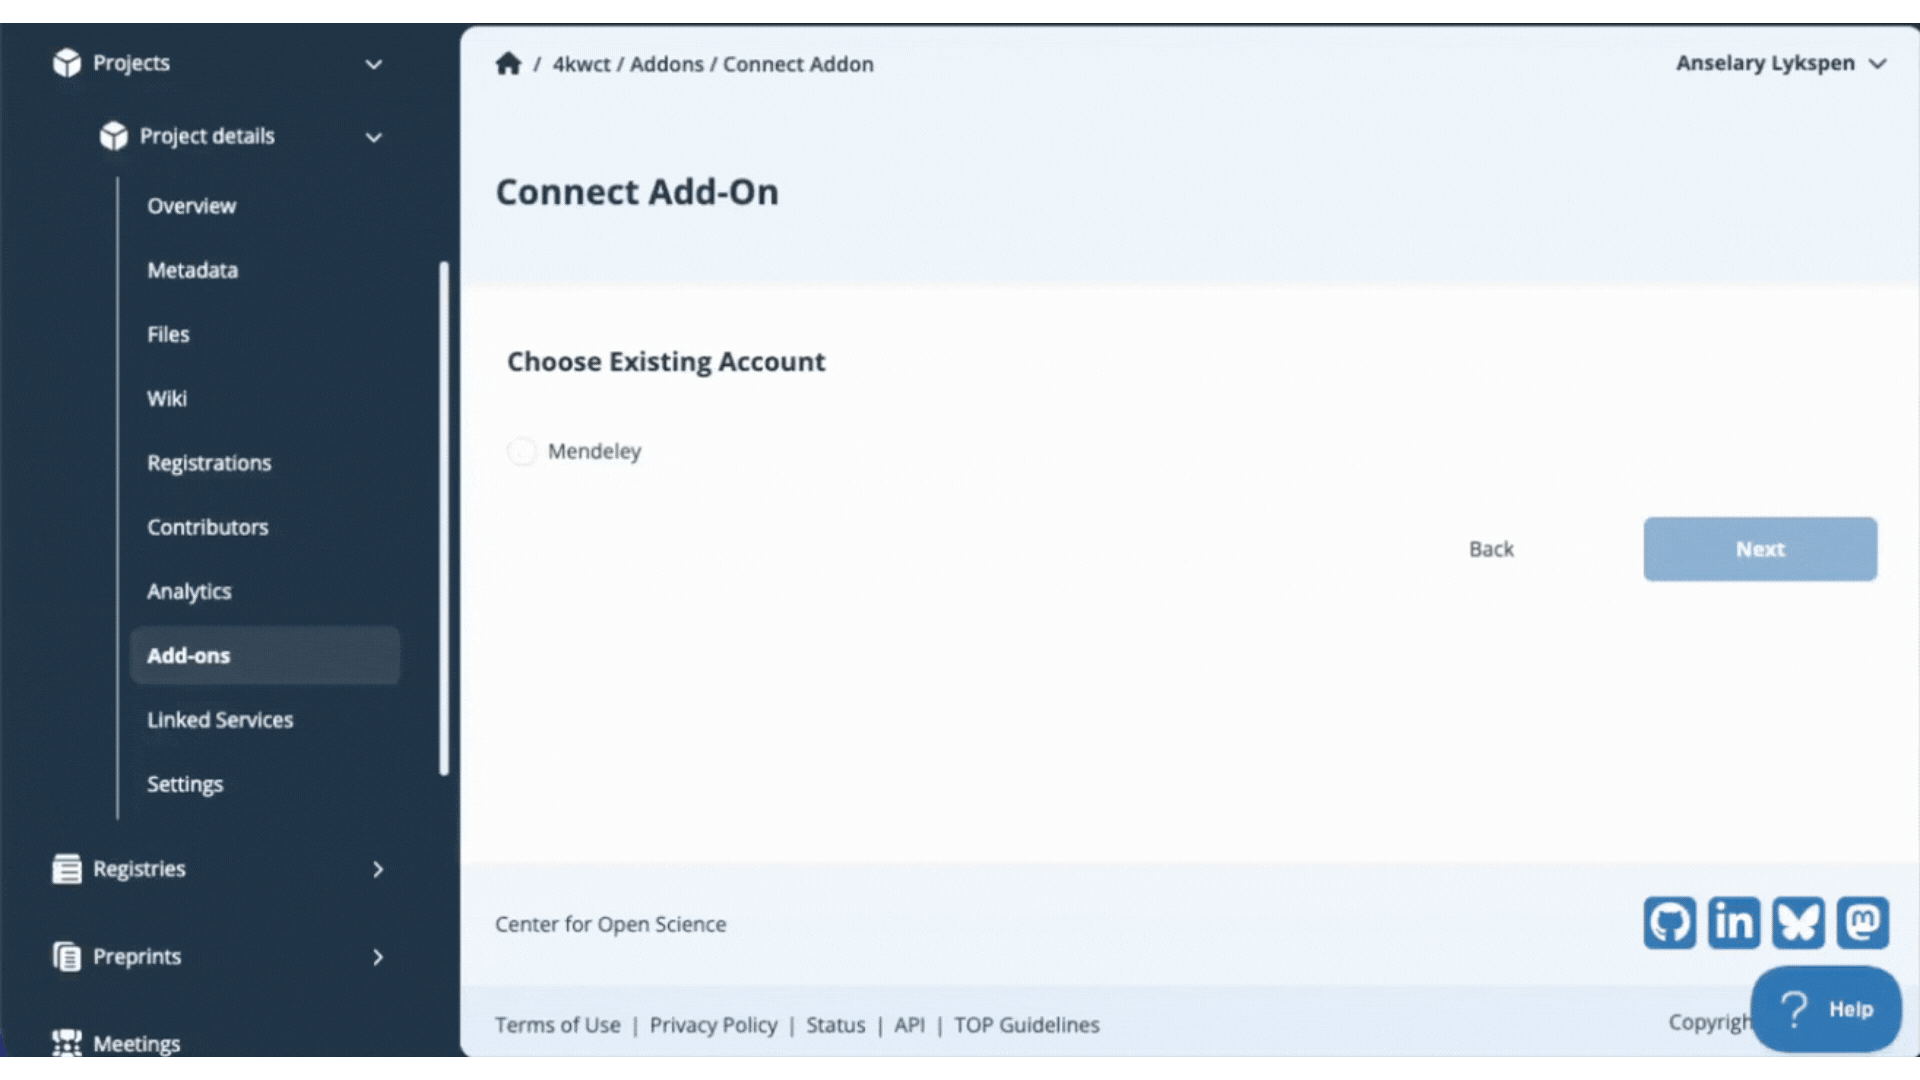
Open your project, then click Add-ons in the left sidebar navigation. Select Citation Manager from the drop down menu. Click the Connect button under Mendeley

Review the terms in the confirmation modal, and click the Confirm button to enable Mendeley on your project.
Setting up a new Mendeley Account
Because other contributors can connect their add-on accounts to a shared project, you'll be prompted to provide a unique name for your account.
Choose a clear name like "Mendeley_YourName" to distinguish your connection from other collaborators'. When you are finished naming, click Authorize.
Authorization of Access to Add-on
After clicking Authorize, a new window tab will appear to allow you to sign in on the selected add-on. Log in with your username and password used on that add-on site, not your OSF account.
The add-on will then ask you if you would like to confirm the connection of your add-on account to your OSF Account. In this case, Click Connect Account.
You will then be returned to your OSF project, where you can select the add-on account you would like to connect to your OSF project. Click the small circle next to the account name, and then click Authorize. Confirm the connection of the account by clicking Confirm.
Configure Mendeley
Select which folders you would like to connect by clicking the files link or using the select bubble for specific files. Then click Save.
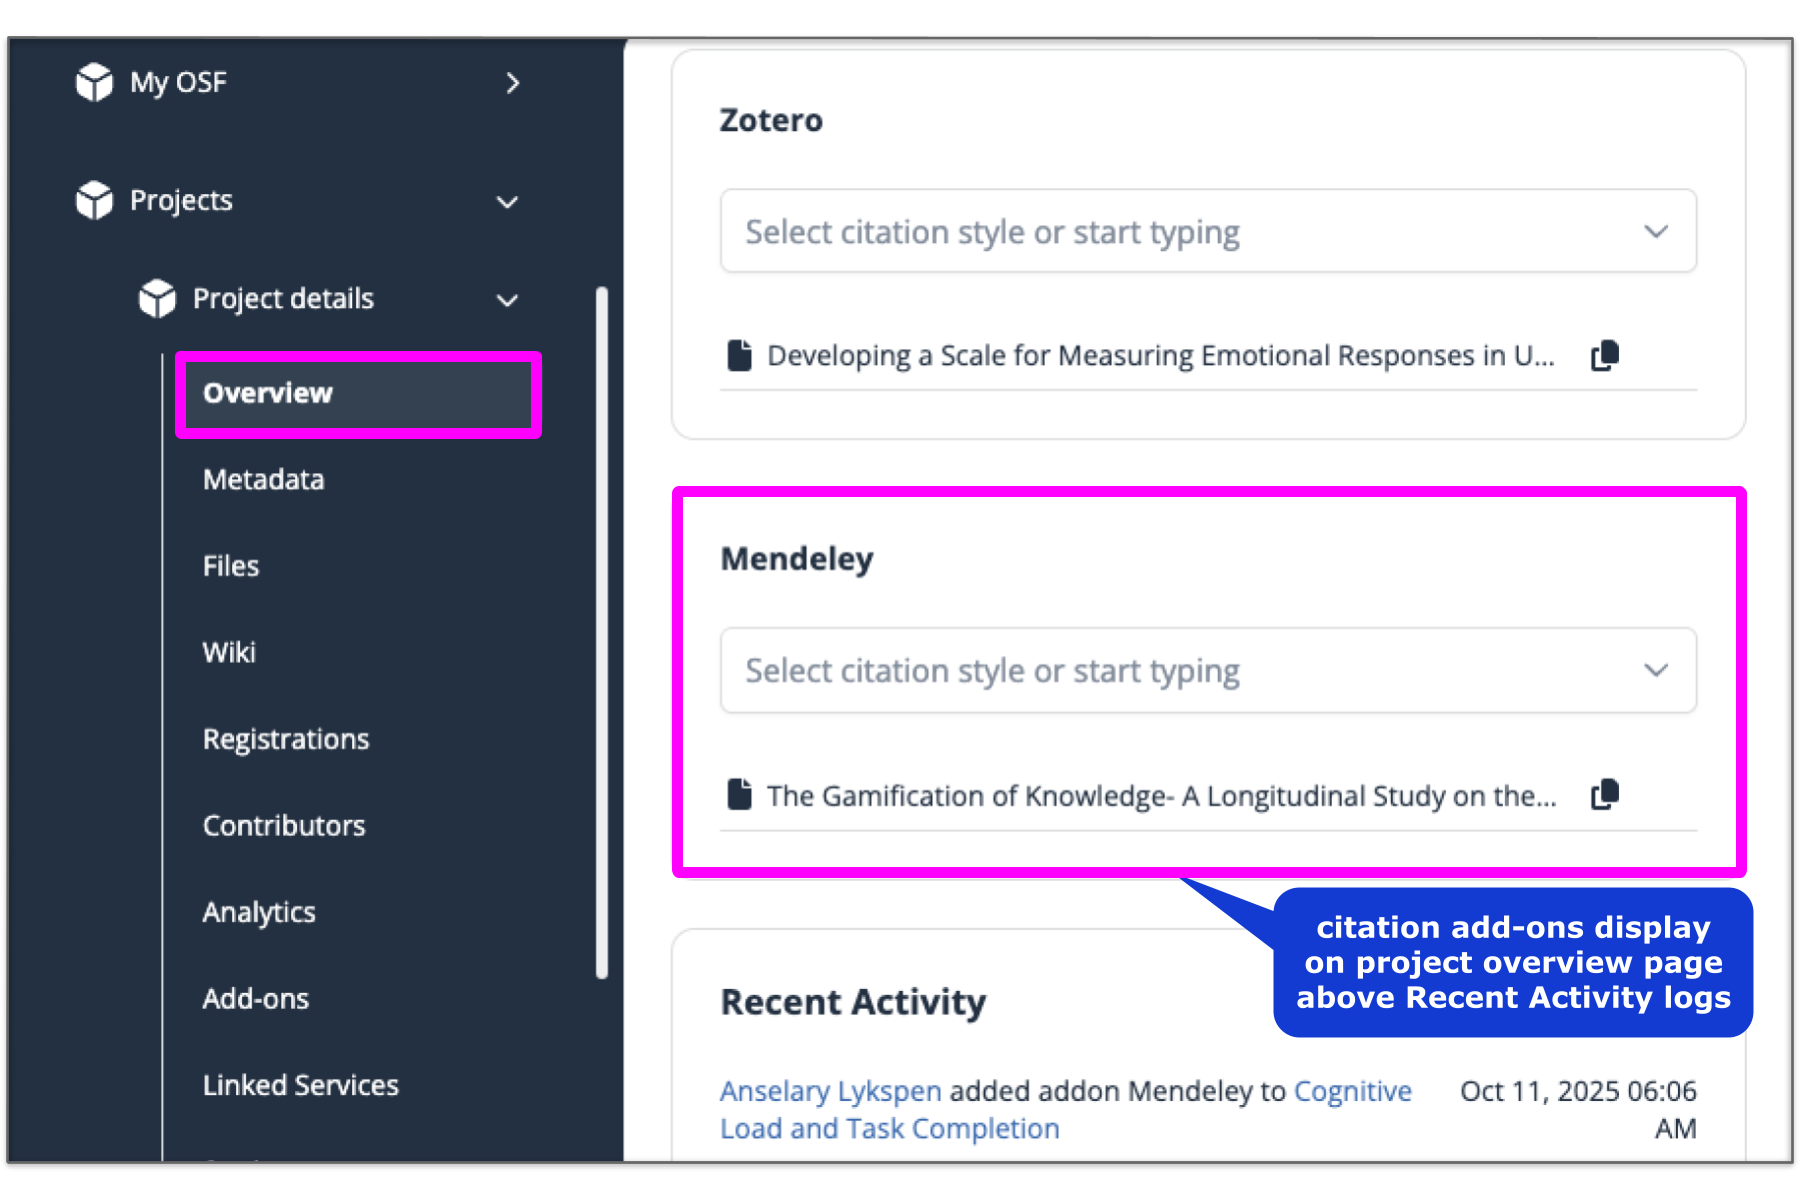
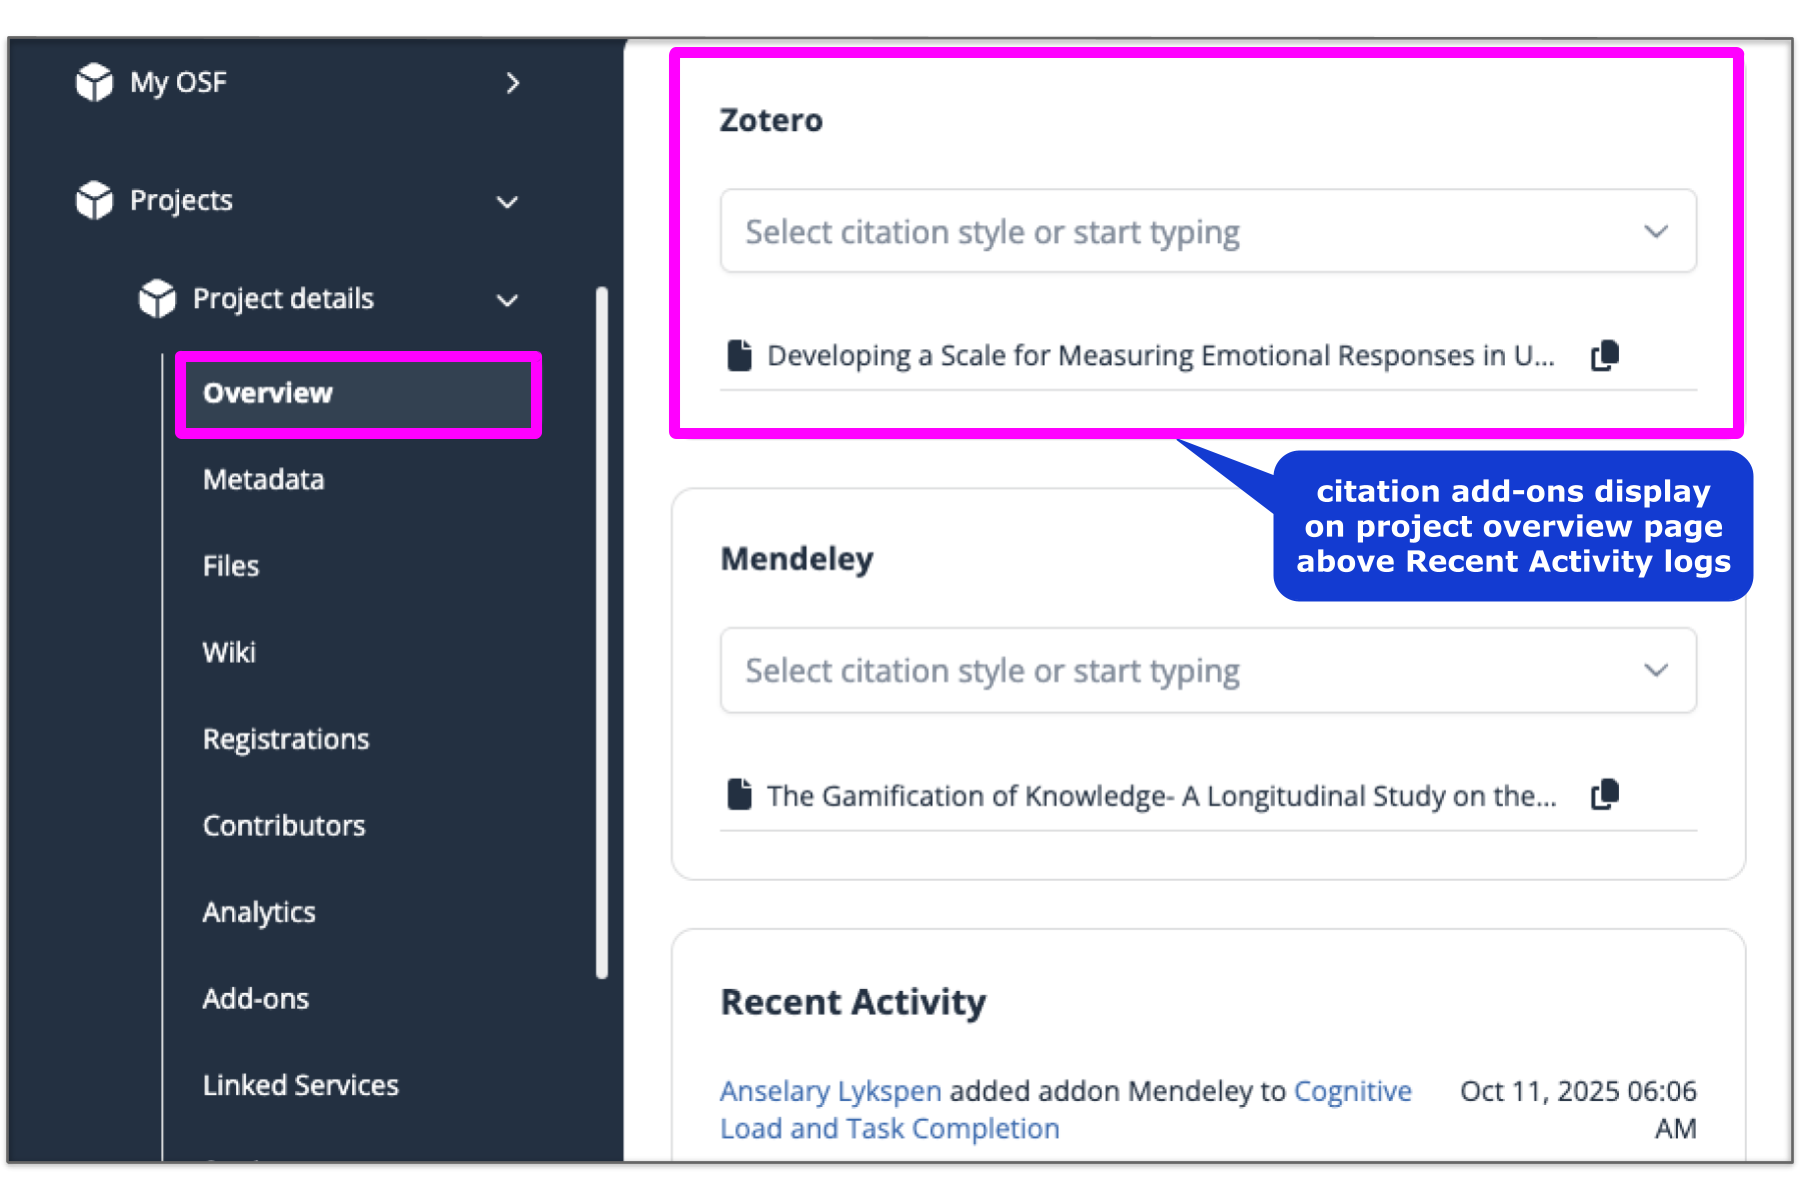
You have now connected your add-on library to your OSF project and will be returned to the add-on selection page. View your connected citation citation manager on the Overview page of your project; scroll to the bottom and look just above Recent Activity.
Zotero
Connect Zotero to a Project
Manage and collaborate on your Zotero references directly from your OSF projects; connect relevant personal or group libraries to individual projects.
Note: If Zotero is already configured in your OSF account, you may have trouble viewing your Group Libraries. See Reauthorize Zotero for help.
The Zotero add-on allows you to connect external content to OSF. This connection does not store or back up this content on OSF. If registering your project with Zotero connected, Zotero content will not be registered.
Enable Zotero in your project
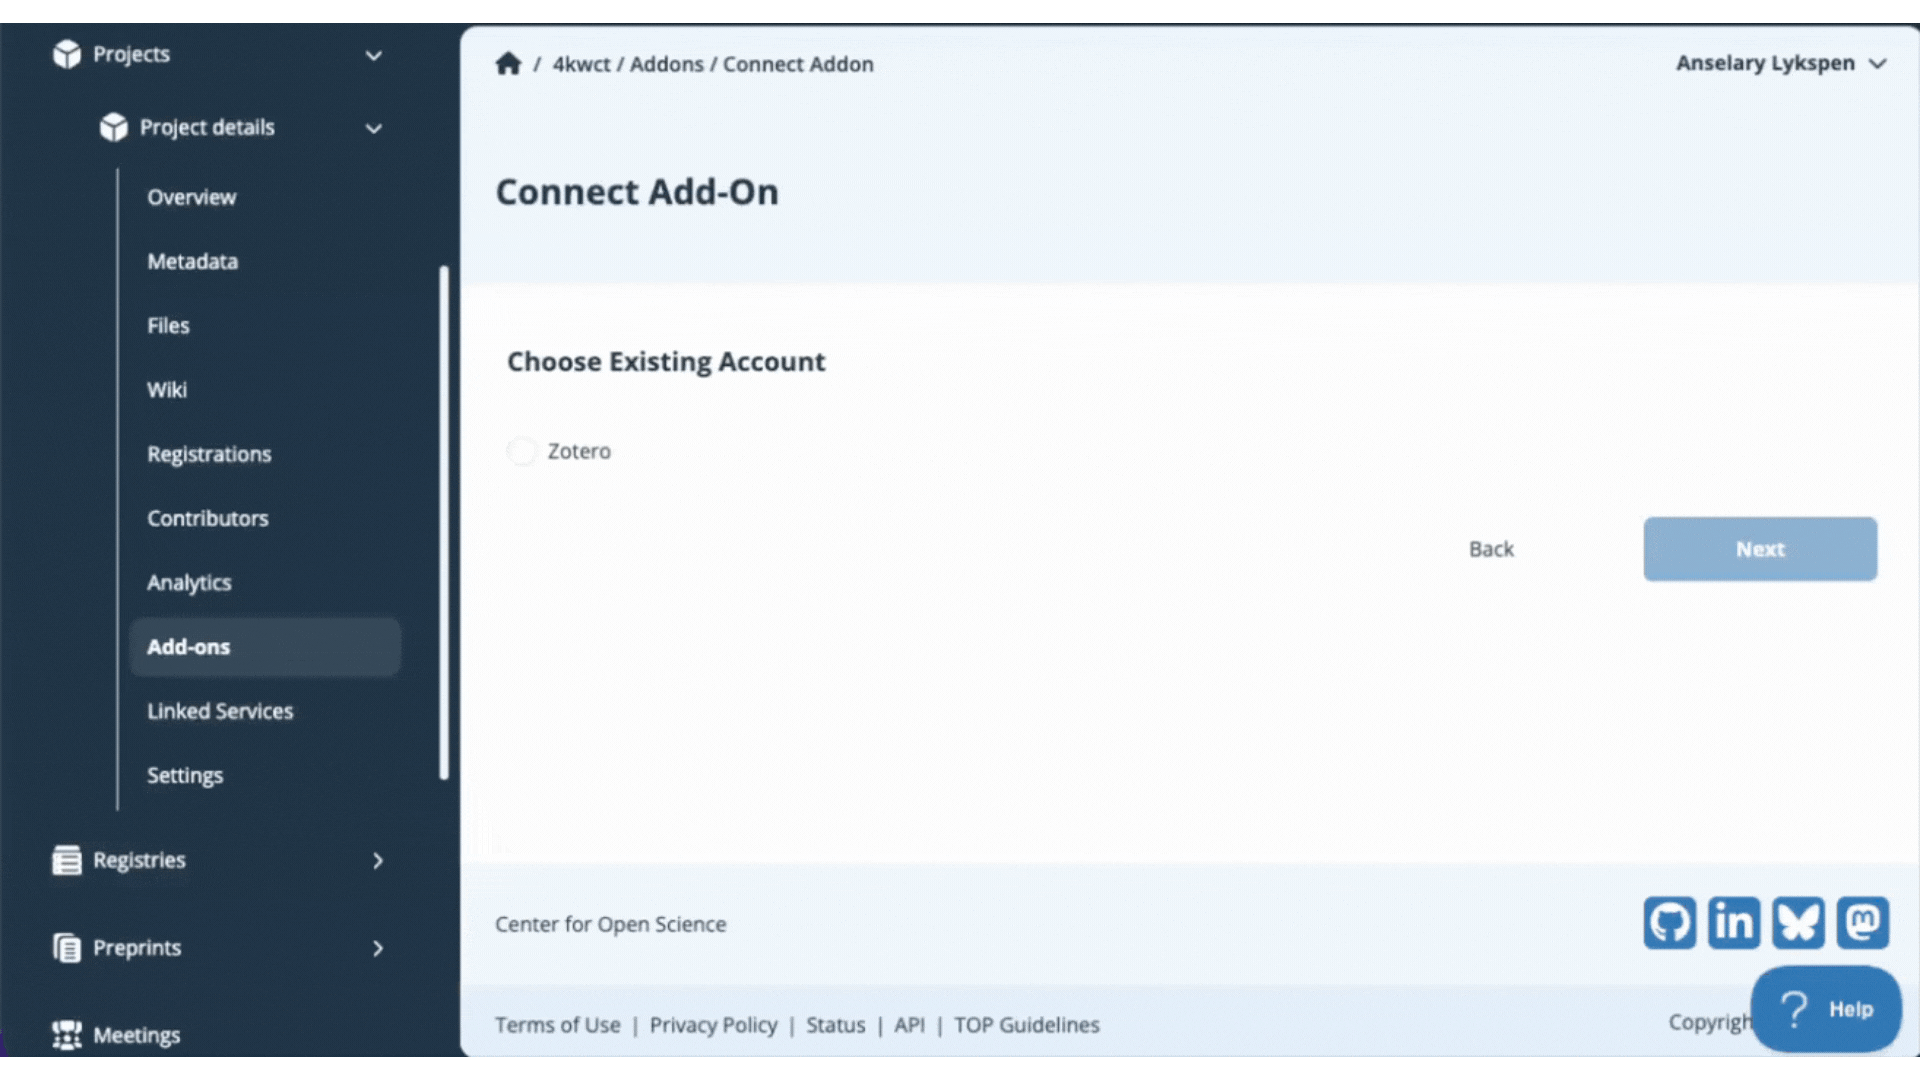
Open your project, then click Add-ons in the left sidebar navigation. Select Citation Manager from the drop down menu. Click the Connect button under Zotero.

Review the terms in the confirmation modal, and click the Confirm button to enable Zotero on your project.
Setting up a new Zotero Account
Because other contributors can connect their add-on accounts to a shared project, you'll be prompted to provide a unique name for your account.
Choose a clear name like "Zotero_YourName" to distinguish your connection from other collaborators'. When you are finished naming click Authorize.
Authorization of Access to Add-on
After clicking Authorize, a new window tab will appear to allow you to sign in on the selected add-on. Log in with your username and password used on that add-on site, not your OSF account.
The add-on will then ask you if you would like to confirm the connection of your add-on account to your OSF account. In this case, click Connect account. In the Case of Zotero, you have the ability to Edit Permissions or Accept Defaults for the setting of the connection.
Configure Zotero
You will then be returned to your OSF project, where you can select the add-on account you would like to connect to your OSF project. Click the small circle next to the account name, and then click Authorize.
Confirm the connection of the account by clicking Confirm.
Select which folders you would like to connect by clicking the “all documents” link or using the select bubble for specific files. Then click Save.
You have now connected your add-on library to your OSF project and will be returned to the add-on selection page. View your connected citation citation manager on the Overview page of your project; scroll to the bottom and look just above Recent Activity.
Reauthorize Zotero
Having trouble seeing your Zotero libraries and folders? This help guide will walk you through how to reauthorize Zotero as an add-on to your OSF account.
- * Reauthorizing Zotero will disconnect Zotero from any projects where you currently have it configured. After you reauthorize, you will need to re-connect Zotero to each project individually.
Disconnect, or Reconfigure Zotero as an add-on
Sign in to the OSF. Click Settings from the left sidebar navigation, then click Configure Add-ons from the drop down menu.
Click on Connected Add-ons tab and select Citation Manager from the drop down menu. Find Zotero in the list. You will have the choice to 1) reconnect your add-on connection, 2) disable your entire Zotero account
Upon selection, a pop up window will appear. If you are disconnecting a folder or the Zotero account an OSF pop-up window will confirm your action. Click the Disconnect button.
If you are reconfiguring your account, a new tab will open and you will be prompted to login to Zotero account.
Accept the default settings or edit the permissions from your Zotero account.
You will be returned to your account settings page after the add-on was successfully reconnected.
Linked Services
Overview
Linked Services point to content hosted outside OSF—with a verified and secure connection. Acting like lightweight integrations, they help keep research materials visible and traceable—without requiring full account linking like traditional OSF Add-ons.
What Makes Linked Services Different than Addons?
| Feature | Linked Service | Addon |
|---|---|---|
| Access | Links outside OSF | Available inside OSF |
| Archivable | No | Yes |
| Requires Login/Auth | Yes | Yes |
| Appears on Components | Yes | Yes |
Adding a Linked Service

Follow these steps to add a Linked Service to your OSF Project or Component:
- Navigate to the relevant OSF Project or Component.
- In the top-right corner, click Add-ons to open the Add-ons management page.
- On the left-hand side, select the Add-on tab.
- Click Connect to begin the setup.
- Follow the step-by-step prompts to authorize and configure the Linked Service. Each service may ask different questions, but the process is consistent.
- After completion, you’ll see a confirmation message and be returned to the Add-ons page.
Your Linked Service will now appear in:
- The Linked Service tab (visible to all contributors and viewers)
- The Add-ons configuration page (visible to contributors only)
Viewing a Linked Service

Once connected, your Linked Service will appear in the Linked Service panel:
- Clicking the name opens the linked resource in a new tab
- Viewers and contributors can access links from the sidebar
Permissions and Limitations
- Only one Linked Service per external service (e.g., Dataverse) can be added per project/component
- Admins and write contributors can add a Linked Service
- Only the admin or the original contributor who created the link can edit or delete it
Managing Linked Services

You can manage existing Linked Service from either the Linked Service tab or the Add-ons management page.
Option 1: From the Linked Service Tab
- Go to the Linked Service tab in the sidebar
- Click the green Edit button beside the link
- You’ll be redirected to the Add-ons page to reconfigure it
Option 2: From the Add-ons Page
- Click Add-ons in the top-right of your project or component
- Select the Linked Service tab
- Click the Connected tab
- Click Edit next to the Linked Service you want to update
Editing Process
- The configuration flow mirrors the original setup
- You can update the name, URL, and other service-specific fields
- You’ll receive a green confirmation message when the update is successful
API Integrations
The OSF hosts an Open Application Programming Interface (API). With this API you can access users, projects, components, logs, and files from the Open Science Framework (OSF), which is a free, open-source service maintained by the Center for Open Science.
- Protocols.io is an example of a tool that uses the OSF API
- Developer Help Guides contains the OSF API documentation
protocols.io
Protocols.io has developed an integration using the OSF API that allows users to sync their protocols to OSF projects. To initiate the integration, navigate to protocols.io and complete the following steps.
- Navigate to a protocol or create a new protocol from your protocols.io dashboard.
-
From the drop down menu, select Export > PDF > Copy to OSF.
Indicate whether Only materials or Only commands should be exported. Then confirm that the correct file is selected.
- An OSF authentication window will appear. Selecting Allow will populate a list of your OSF projects.
- Select the project you want your protocol to be exported to, and then click Synchronize.
- Navigate to or refresh your chosen OSF project page where your protocol will be visible in the Files interface.
Third-Party Vendors
COS uses several third-party vendors to help operate OSF and its suite of products. This document provides a list of third-party vendors and their purposes, organized by category. Please refer to our Privacy Policy to understand why and when COS shares information with third-party vendors.
Cloud-computing Services
Purpose: to host web services and to store and back-up operational data, logs, and files uploaded to OSF Storage.
Site Analytics
Purpose: to track and aggregate activity and usage on OSF and its suite of products.
Monitoring
Purpose: to track error logs on OSF and its suite of products.
Spam Detection
Purpose: to automate spam detection.
DOIs
Purpose: to issue DOIs for OSF projects, registrations, and preprints.
User Support
Purpose: to provide user support and log user feedback.
Relationship Management
Purpose: to document partnerships, events, and member activity
Communication
Purpose: to track transactional and engagement emails sent from OSF and its suite of products to users.
FAQs:
Add-ons, Storage, & API Integration FAQ’s
Storage
Where does OSF store my data?
The United States is the default storage location for OSF Storage. You can set a global storage location for newly created projects going forward; different locations can be set on a per-project basis upon creation. Setting a global storage location is not retroactive: All existing projects will continue to be stored in the United States. As of now, the storage locations available are
- United States
- Canada - Montréal
- Germany - Frankfurt
- Australia - Sydney
Files connected to third-party storage add-ons are not stored or backed up on OSF; please refer to the provider's server locations for information on where this content is stored.
What is the individual file size limit?
Individual files must be 5GB or less to be uploaded to OSF Storage. Larger files can be stored in an add-on. Learn more about storage add-ons
What is the cap on data per user or per project?
Currently, there is no applied overall cap on the amount of OSF Storage per user. Beginning November 3, 2020, OSF limited the capacity of private projects and components utilizing OSF Storage to 5 GB and public projects and components to 50 GB. Each project is created with a default OSF Storage enabled. View our Storage Caps help guide for additional information.
My project says I have exceeded the storage capacity, but I need to add more files. What do I do?
There are several options:
- Enable storage add-ons to the project or component where you've reached the limit. Review our Add-Ons help guide for more guidance.
- If you are working in a private project or component, consider making it public to automatically increase your OSF Storage capacity to 50 GB. Our help guide on privacy settings has more information.
- If parts of the project could be made public, organize the project with components to manage access to contents. See an example here. Learn how to create a component by reviewing our Create Components help guide.
- If you wish to discuss these options or additional needs, please contact our OSF support team. Contact our support team using the support center beacon found on the bottom right side of any OSF support page:
I have cleared storage space in my project, Why has my storage tracker has not gone down?
When large amounts of files/data are moved or deleted at once, this sometimes can cause the storage calculator to freeze or stall. Contact our support team using the support center beacon and we can reset your storage calculator.
I have a nested project structure with components. Is the limit for the entire structure?
Each project and component has its own storage limit, depending on the public or private status. Each is calculated independently. Storage totals are not cumulative across the project and components. For example, if you currently structure your project into sections using folders consider replicating part of this structure using components within the project/component.
Are there additional fees if I exceed the storage limit?
There are no additional fees associated with OSF Storage, though you will not be able to add additional files to a project or component that has exceeded its storage limit.
What is the size limit for a registration?
Registrations archive and preserve both OSF Storage and add-ons connected to projects. Registrations must be 5GB or less across all storage being registered. If you need to create a registration larger than 5GB, Contact our support team using the support center beacon found on the bottom right side of any OSF support page:
How does OSF store and backup files that I upload to the site?
For OSF Storage, files are stored in multiple locations and on multiple media types on Google Cloud. We keep three types of hashes (MD5, SHA-1, SHA-256) for files. We keep parity archive files to recover from up to 5% bit error.
The OSF database is backed up via streaming replication 24 hours a day, and incremental restore points are made twice daily. Further, the OSF database is maintained in encrypted snapshots for an additional 60 days. Database backups are verified monthly.
Operational data (e.g., config files) for other OSF services are backed up in primary cloud file storage for 60 days.
Logs are primarily stored in Google Cloud cold storage indefinitely. In certain cases a third party aggregation service is used for up to 90 days.
If I delete a file or project, can I get them back?
Unfortunately, no. When a user deletes a file or project from OSF, access to this content is removed for all users.
How do I move a file from one storage add-on to another? Or one component to another?
You can move files between components and add-ons (provided the components and add-ons are a part of the same project) from the Files interface on your project. The Dataverse add-on does not currently support this functionality. (Learn more)
If I make a donation to COS, can I request more storage in my projects?
The best mechanisms to support OSF Storage for your and others’ projects for many years in the future is to have your institution become a member, help us identify and resource more storage integrations with OSF, and to write OSF into your next grant or project budget. Visit cos.io/grants to learn how to include OSF in your next proposal.
Add-Ons
What services can I use with OSF?
OSF supports many third-party add-ons. For storage, you can connect to Amazon S3, Bitbucket, Box, Dataverse, Dropbox, Figshare, Github, GitLab, Google Drive, OneDrive, and Owncloud. For citation management, you can connect to Mendeley and Zotero. OSF also has its own default storage add-on, OSF Storage, if you choose not to connect to any third-party add-ons. Please refer to the Add-ons section of our Guides for more information on how to use add-ons.
What features or storage rules are included with the OSF add-ons? How do I choose?
Please review our Add-ons comparison chart. If you do not see your preferred personal or institutional storage provider, please contact our support team to discuss options. Contact our support team using the support center beacon found on the bottom right side of any OSF support page:
What are the common storage limitations with these add-on providers?
The limit of add-on storage options varies by provider. We recommend users utilize the storage option that is ideal for their data (e.g., with respect to accessibility or security) and connect that service to their OSF project(s) rather than transfer the data to OSF storage.
| Storage providers on OSF | Storage by provider | File size limits when uploaded to each add-on from OSF |
| Amazon S3 | 5GB free or a paid package based on location and storage plan | 5GB |
| Bitbucket | 1GB free per repository | Read-only connection with OSF |
| Box | 10GB free | 5GB |
| Dataverse | 1TB free on Harvard Dataverse; other Dataverses set alternate limits | 6GB |
| Dropbox | 2GB free | 5GB |
| figshare | 20GB free private storage, unlimited public | 50MB |
| GitHub | 1GB free per repository | 100MB |
| GitLab | 10GB free per repository | Read-only connection with OSF |
| Google Drive | 15GB free | 5GB |
| OneDrive | 5GB free | Read-only connection with OSF |
| ownCloud | 5GB free | 512MB |
Many academic research institutions may offer enterprise licenses for the tools above that provide increased storage limits. Institutions may also offer access to locally available storage options for users that have OSF Institutions.
There is no limit imposed by OSF for the amount of storage used across add-ons connected to a given project. OSF storage is offered as a complement to these options and to allow complete documentation of a research project’s lifecycle. Please see the COS Terms of Use for details.
The add-ons we use at my institution are not available. How can I follow your guides?
Determine if you have access to additional storage options, or request your institutions storage options be integrated with OSF add-ons by contacting our support team using the support center beacon found on the bottom right side of any OSF support page:
I am leaving my institution and my add-on is tied to an institutional account. Will I still be able to see and modify my files through OSF?
OSF relies on an authentication or provider token process to verify access to each of your provider accounts. Once your permissions are revoked by the institution, OSF cannot continue to grant access to those resources. While preparing to change institutions, consider moving your files to a provider that you will allow you to retain access. Also reference any data management policies provided by your institution. If you have concerns or would like to discuss options, please contact our support team using the support center beacon found on the bottom right side of any OSF support page:
If I move my files to an add-on, what happens to my OSF links to individual files?
Files moving to most providers will not change the file’s URL and all links and embeds will continue to function as expected. For more information on file behavior within and between OSF add-ons, visit our Add-Ons help guides.
What can I do with a file after uploading it into a storage add-on?
You can view, download, delete, and rename any files uploaded into OSF Storage. All files are assigned unique, persistent identifiers, suitable for use in citations.
Files in third party storage add-ons might have restrictions on renaming or deleting.
Does registering a component with storage in an add-on mean the files are now stored/archived at COS?
Yes, those files are archived with the registration on OSF Storage and are unrelated to your project storage total.
If I have external storage, how do I know which privacy settings apply? Do I keep track of two sets of permissions/link access?
Privacy settings for each individual project or component are controlled separately, and content linked from external storage will inherit the public visibility of your project. Consider adding components that can remain private if this content should not be accessed publicly. Review our help guides to learn more about privacy settings and components.
API Integration
Does OSF have a public API?
Yes! Read more on the API docs
Will storage limits interrupt API syncing / workflows?
Attempting to add to a project or component past its storage limit will result in a “507 Insufficient Storage” status.
|
|
This Article Is Licensed Under CCO For Maximum Reuse. |