Welcome to Registrations & Preregistrations!
The following is a Table of Contents that links directly to specific sections within the guide.
- Overview
- Preparing your registration
- Select a Registration template
- Effective Practices for a Rigorous Preregistration
- Select a registration template
- Actions
- Manage draft registration
- Manage Contributors
- Submit a registration
- Approving a registration
- Viewing your Registrations
- Submit to a Community-run Registry
- Add metadata to your registration
- Edit metadata in a registration
- Add a metadata record to the Registration
- Add metadata to files
- Update a registration
- Create a View-Only Link
- End Embargo Early
- Withdraw a registration
- Add resources to your registration
- Files in your Registration
- Links
- FAQs
OVERVIEW
Registrations are a formal, transparent “story” of your study. This story describes what your research plans to do, any updates that need to be made, and the results.
Preregistration is the practice of posting a time-stamped, read-only version of your study plan to a public repository before beginning data collection or analysis. This establishes a transparent record of your research intentions. Learn more.
Preparing your Registration
- If registering from a project, be aware any files associated with the Project (in OSF Storage, or other Storage Add-ons) will be attached to your registration up to 5 GB.
- Determine if you need to Anonymize your registration. This will require your registration be private or placed under embargo (Maximum 4 years from creation date).
- Ensure any files associated with the registration are also anonymous this is especially important if you are registering from a project.
Effective Practices for a Rigorous Preregistration1
- Use your preregistration as a way to draft your methods and results section of a journal article. This helps you think through what is to be done and how you will report it
- Be precise and explicit with your plan, e.g. list out your hypotheses and which variables you’ll use
- Make design and analysis decisions before you view the data
- What contingencies might you need to consider?
- Consider writing out "if then" decision trees, e.g., "if the assumptions for this test are violated, we will use this alternate test"
- Describe the statistical tests you will use on the data and what decision criteria you are using for interpreting the result
- Demonstrate your methodology and how the hypotheses will be tested
- Say what exclusion rules will be applied
- Describe if and how variables will be combined
- List which model form, covariates, and characteristics will be used
- Detail what outcomes will be reported
- Describe what unplanned work you might do as well as the planned analyses
- Anticipate what deviations from the plan may occur and include them in your plan
1 Nosek et al, 2019. Preregistration is Hard, And Worthwhile
Select a Registration Template
We do not recommend a specific template as we do not know the details of your study, your institution's policies (if any), or the standards of your community. Instead, use the information below to help determine which template will best work for you. If you're thinking of choosing a Preregistration template see this blog post.
Templates and examples
| Template | Description | Links | Example |
| OSF Preregistration |
Standard, comprehensive, and general purpose preregistration form. Most commonly used. |
Open and download Google Doc |
https://doi.org/10.17605/OSF.IO/WEKMB |
| Open-Ended registration | Most flexible template. Only use if another template doesn't fit your study design or registering a completed project. | Open and download Google Doc |
https://doi.org/10.17605/OSF.IO/YRP3F |
| EEG and ERP Methods | Template for registering studies that include EEG and ERP within its methodology | Open and download Google Doc | https://doi.org/10.17605/OSF.IO/KMPFG |
| Eye-tracking | This template is for preregistering eye-tracking studies using both webcam-based and infrared methodologies. |
|
|
| Generalized Systematic Review | For preregistering systematic reviews, scoping reviews, and meta-analyses | Open and download Google Doc | https://doi.org/10.17605/OSF.IO/F8QD5 |
| Pre-Registration in Social Psychology | Preregister a research study outlining the hypotheses, methods, and analysis plan | Open and download Google Doc | https://doi.org/10.17605/OSF.IO/WSQKZ |
| Preregistration Template from AsPredicted.org | Eight questions derived from content recommended by AsPredicted.org. | Open and download Google Doc | https://doi.org/10.17605/OSF.IO/9P3T8 |
| Qualitative Preregistration | Template for registering primarily qualitative work | Open and download Google Doc | https://doi.org/10.17605/OSF.IO/SWJMN |
| Registered Report Protocol Preregistration | Register your protocol AFTER having been given "in-principle acceptance" from a Registered Report journal | Open and download Google Doc | https://doi.org/10.17605/OSF.IO/P5SJB |
| Replication Recipe (Brandt et al., 2013): Post-Completion | Register a replication study after it has been conducted with questions regarding the outcomes of the replication. | Open and download Google Doc | https://doi.org/10.17605/OSF.IO/9M8RN |
| Replication Recipe (Brandt et al., 2013): Pre-registration | Register a replication study with a series of questions regarding the original work. | Open and download Google Doc | https://doi.org/10.17605/OSF.IO/4MTWH |
| Secondary Data Preregistration | For preregistering a research project that uses an existing dataset. | Open and download Google Doc |
https://doi.org/10.17605/OSF.IO/GVCS |
| Simulation Studies | Register a simulation study in methodological research. This template is based on the ADEMP (Aims, Data-generating mechanism, Estimands and other targets, Methods, Performance measures) design and reporting framework that has gained traction in biostatistics in recent years. | Open and download Google Doc | https://doi.org/10.17605/OSF.IO/MES3C |
| Theory-based Predictions | A template for registering theory-based predictions before outcomes are known. It allows correct predictions to demonstrate a theory’s forecasting power while missed predictions highlight areas for refinement. | Open and download Google Doc | https://doi.org/10.17605/OSF.IO/KFYNP |
Create a Registration
There are two ways to start a new registration using the OSF platform:
- Start from scratch: you will enter information and attach documents as you build out your research plan.
- Start from an existing OSF project: the registration will pull metadata and files from the project or component.
In both cases, the new registration will have a connected OSF project for continuing the research lifecycle, where you can show and share your work.
This guide will walk you through both approaches to submitting to the OSF Registry. If you want to submit to a Community-run registry hosted on the OSF infrastructure, read our guide.
NOTE: If you plan to submit your registration for blinded peer-review, check to make sure that no identifying information is included in any of the metadata or attached documents when you submit your registration and that you EMBARGO your registration. After submission, you can create a view-only link to anonymize and share for peer review. The anonymized type of view-only link will remove your name on the Registration Overview page and the "Authors" section of the registration metadata. Once you submit a registration, you will not be able to edit or make changes to it or any associated files.
Start a registration
You can start a registration from the Registry Discover Page OR from your My OSF, “My Registrations” page. IF you are submitting your registration to a Community-run Registry such as Stiftelsen DAM, Global Flourishing Studies (GFS), or Real World Evidence (RWE) please see the section on Submit to a Community-run Registry.
"My Registrations" page
From your OSF dashboard (Home), navigate to your “My Registrations” page, select “My OSF” and then “My Registrations”. Your “My Registrations" page will appear.

There are two ways to start a new registration using the OSF platform:
- Start from scratch: you will enter information and attach documents as you build out your research plan.
- Start from an existing OSF project: the registration will pull metadata and files from the project or component.
In both cases, the new registration will have a connected OSF project for added flexibility and collaboration, where you can show and share your work.
This guide will walk you through both approaches to submitting to the OSF Registry. If you want to submit to a branded registry hosted on the OSF platform, see this section.
Start a registration from Scratch
Start by clicking on “Add a Registration”
Step 1: “Do you have content for registration in an existing OSF project?” Select “No”

Step 2: Select the registration template that best fits your research project. You can learn more about the different registration forms that are available on OSF in the in the section “ Select Registration Template”.

Select “Create Draft”, and you will be taken to the draft registration template. Now, you can begin filling in the registration metadata and provide responses to the registration template you selected.
An email containing the link to this registration draft will be sent to your OSF affiliated email address.
Important: Save this link for future access to your draft registration or find your draft registration in your my registrations section (https://osf.io/my-registrations?tab=drafts)

Start a registration from an Existing Project or Component
NOTE: When starting a new registration from an existing Project or Component any files associated with the Project or Component, either in OSF Storage OR in a connected Add-on will be included in the registration up to 5GB of data.
There are two convenient ways of starting a new registration from an existing OSF project or component.
From the "Add a Registration" button on your “My Registrations” page
Step 1: “Do you have content for registration in an existing OSF project?” Select “Yes”
Step 2: A dropdown list of your projects and components will appear. Select the project or component you would like to create the registration from. This list will only show projects or components that you have admin permissions to.

Step 3: Select the registration template that best fits your research project. You can learn more about the different registration forms that are available on OSF in the section “ Select Registration Template”.

Create a Registration from a Project or Component
From the Project details tab, navigate to the Registrations tab. Then select “Add a Registration”.

You will be taken to the “Add a Registration”. Step 1 and Step 2 will be prefilled.
Step 1: “Yes” will be preselected.
Step 2: The project or component will also be preselected.
Step 3: Select the registration template that best fits your research project. You can learn more about the different registration forms that are available on OSF in the in the section “ Select Registration Template”.

From a Component of a Project
Navigate to the project and then the component you want to register.

1) Then select the Registration tab on the left sidebar.
2) Then select “Add a Registration”
You will be taken to the “Add a Registration”. Step 1 and Step 2 will be prefilled out.
Step 1: “Yes” will be preselected.
Step 2: The project or component will also be preselected.
Step 3: Select the registration template that best fits your research project. You can learn more about the different registration forms that are available on OSF in the in the section “ Select Registration Template”.

Manage draft registration
Using your “My Registrations" page
The other way is using your “My Registrations” page
Navigate to ”My OSF”, then select “My Registrations”, then make sure you are on “Drafts, Or click here to see your My Registration Drafts page

Delete draft registration
You can delete a draft registration by selecting the "Delete" option on the Registration under your “My Registrations” Drafts section.

You will then confirm the "Delete" this is IRREVERSIBLE, once a draft has been deleted it cannot be recovered.

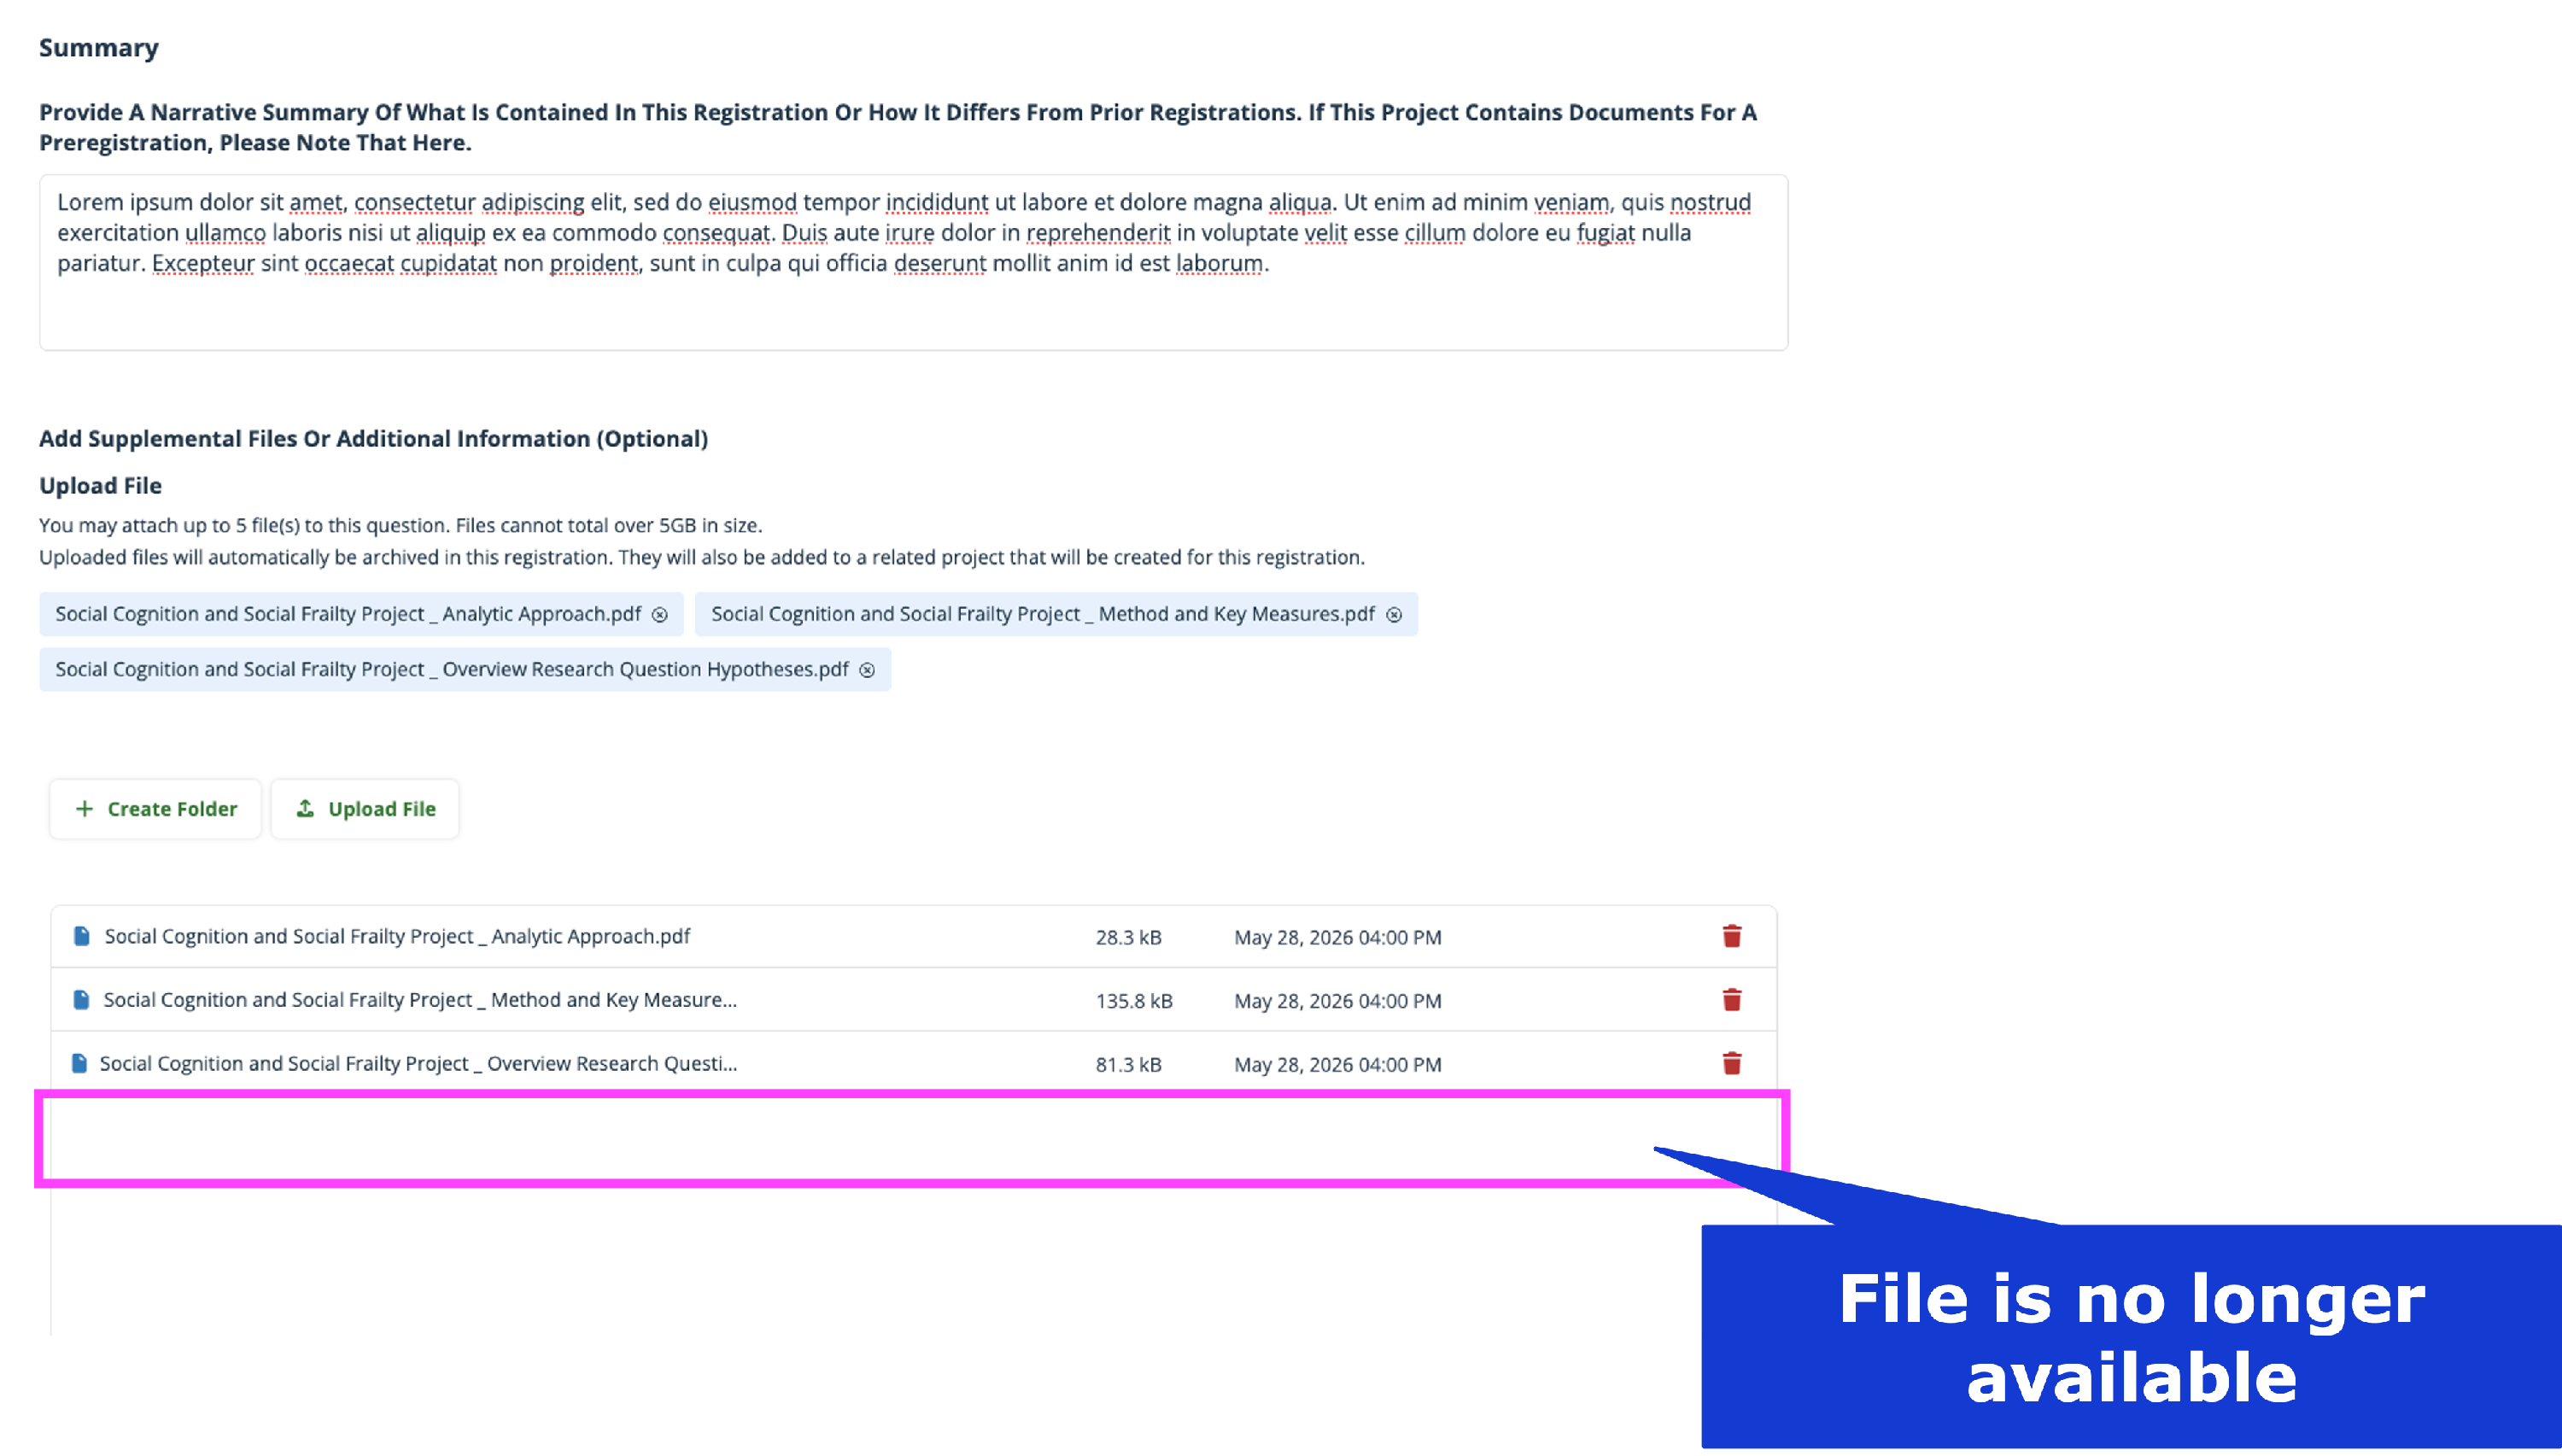
Delete a File in a Draft Registration
To delete a file in a draft registration select the RED trashcan icon
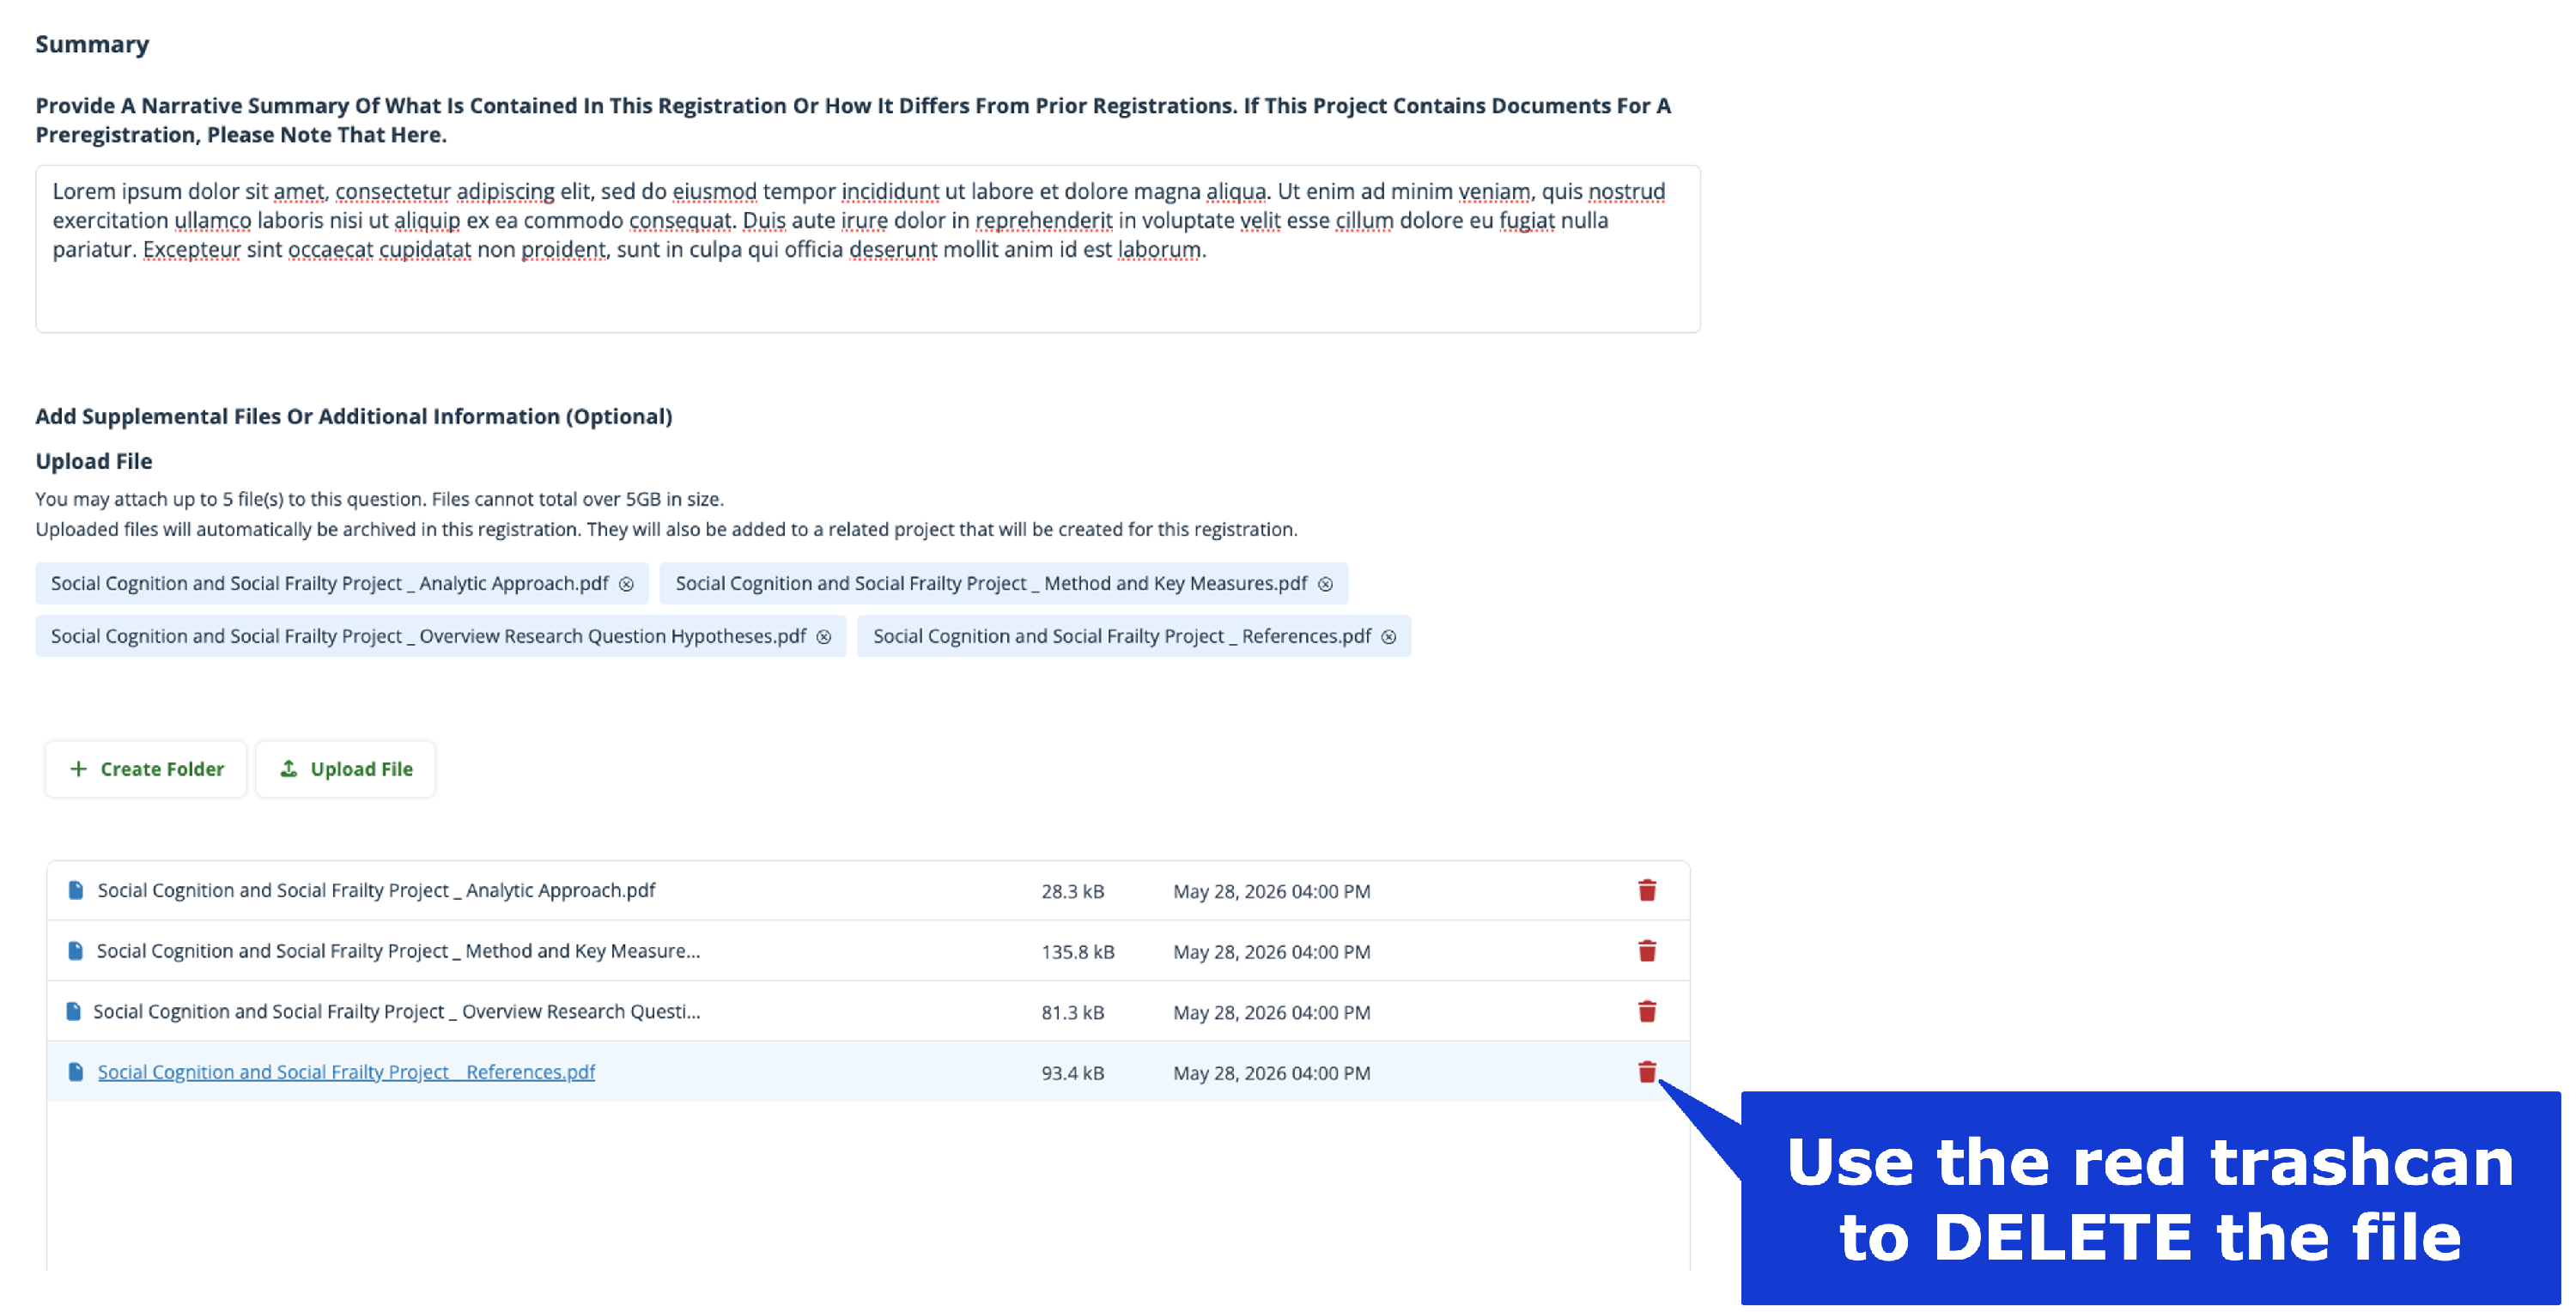

This will remove the file from the draft
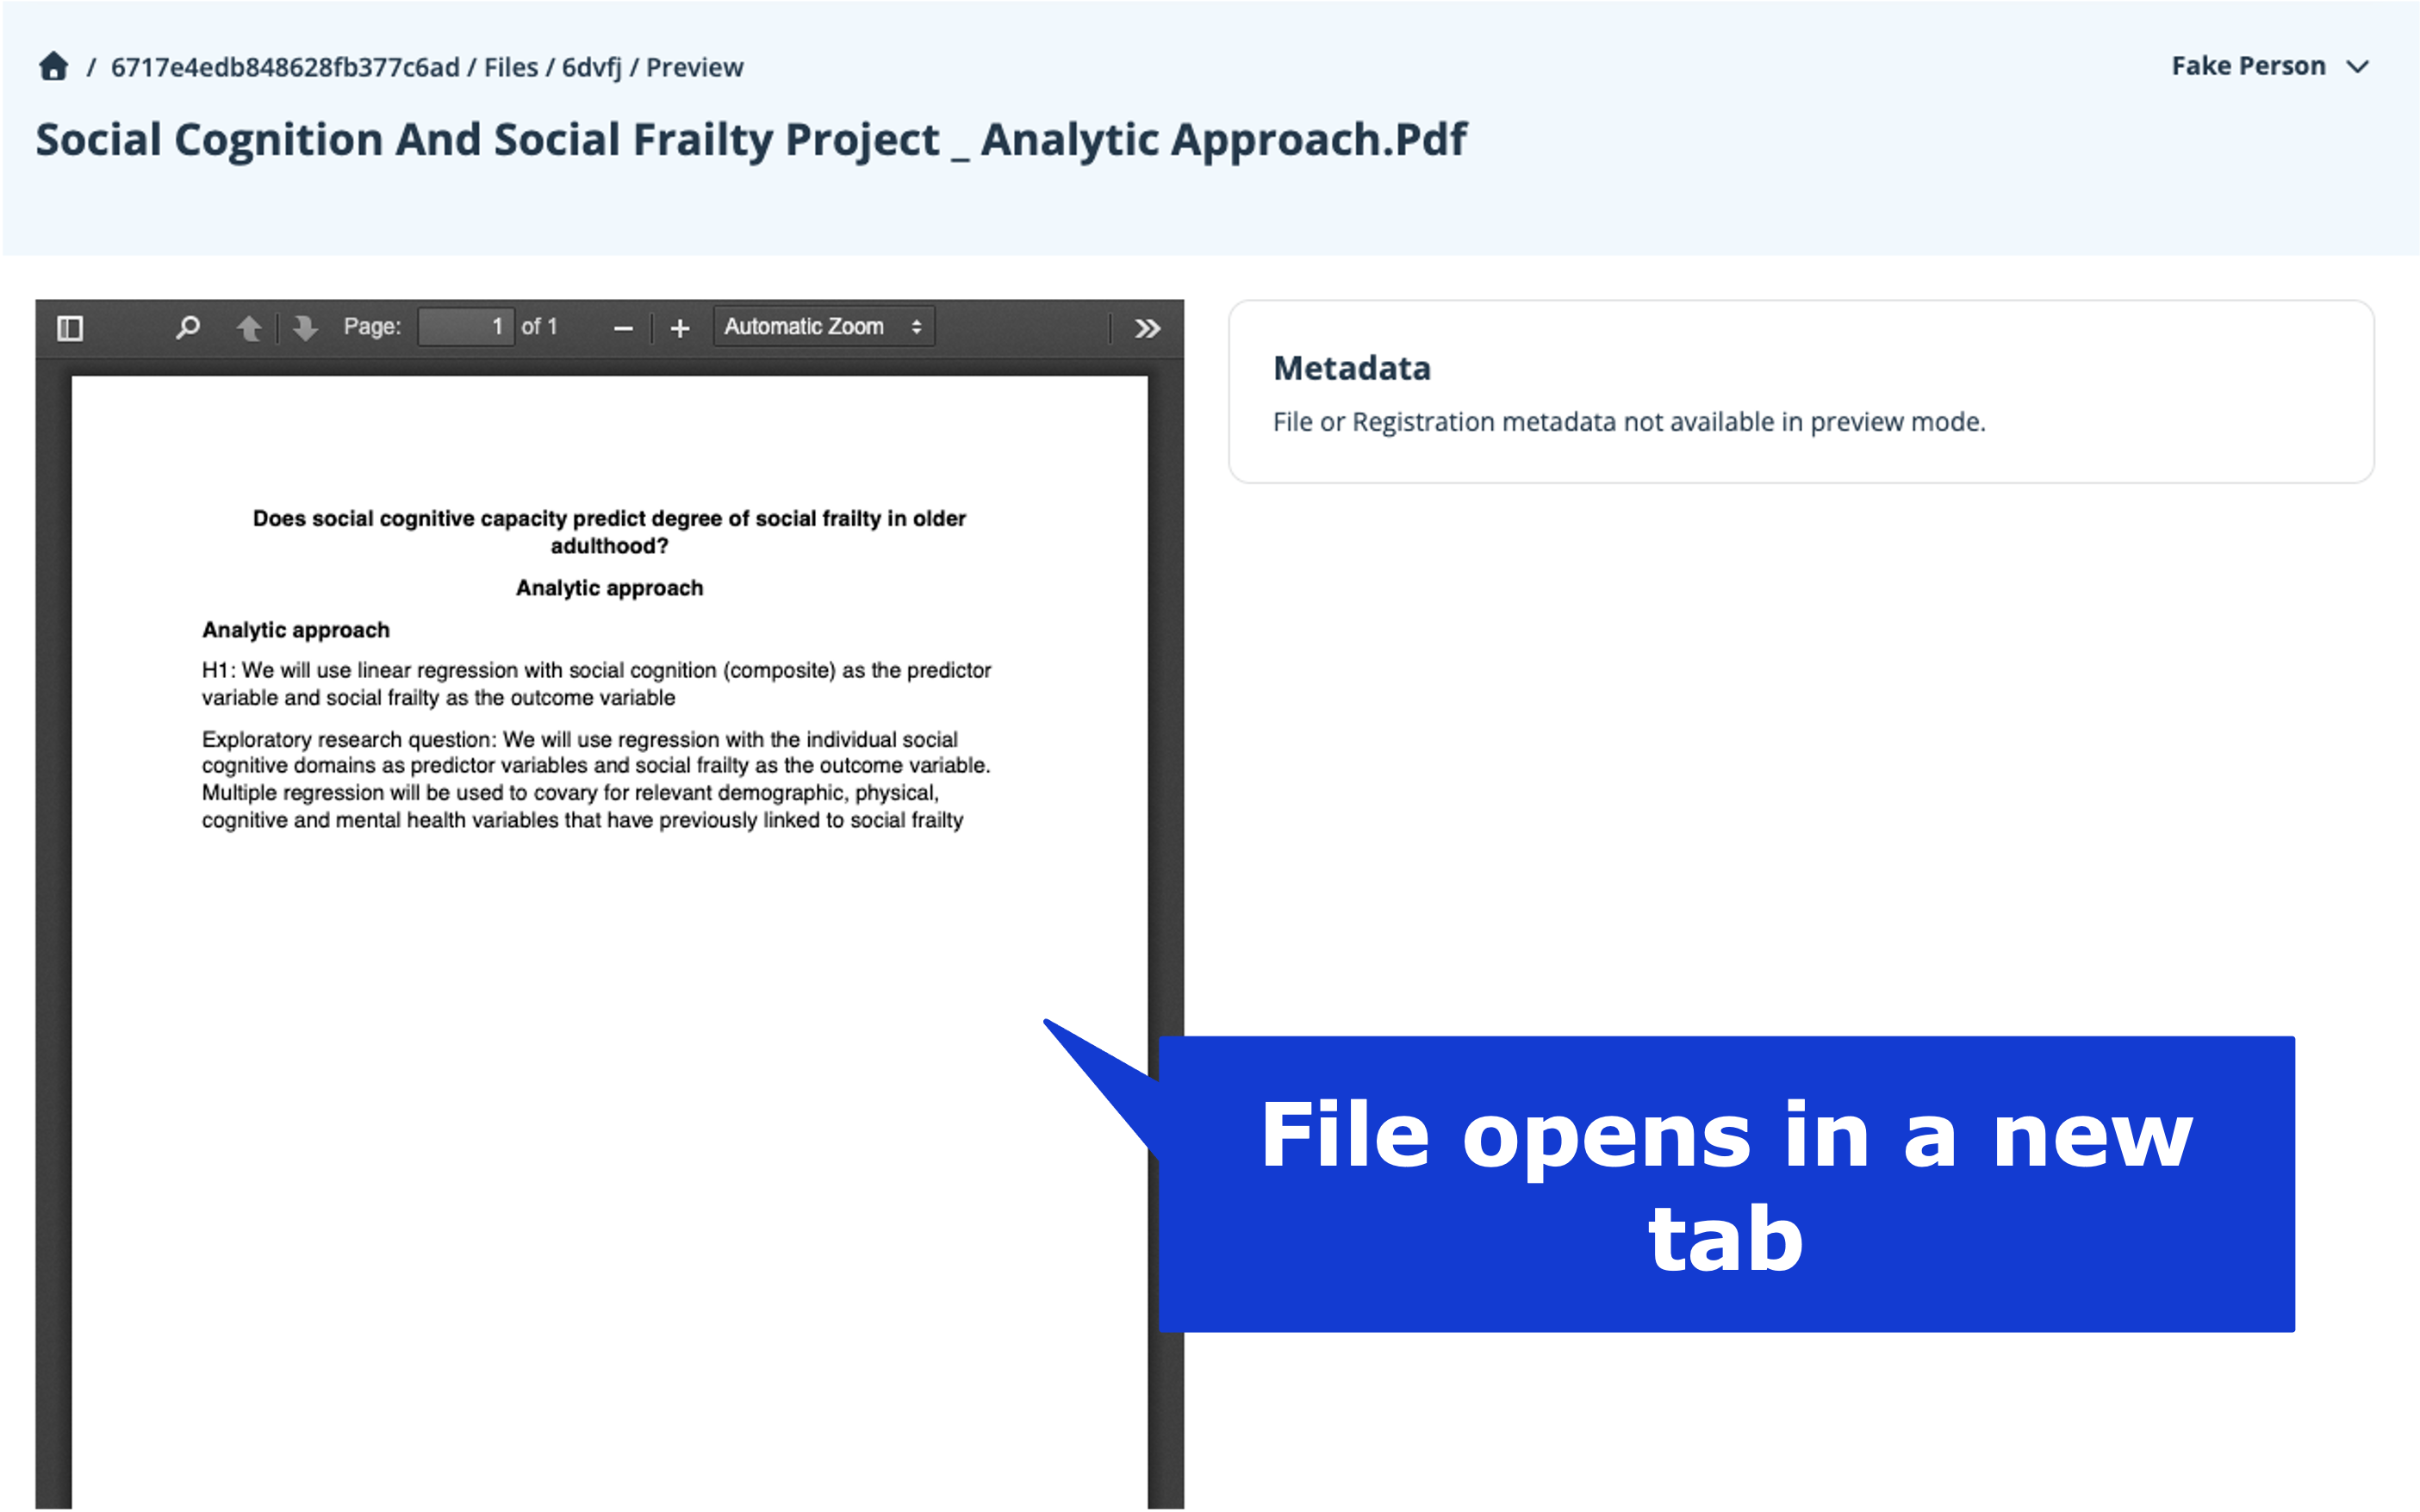
Preview a file in a Draft Registration
On the page with the files uploaded
Select the file you wish to view
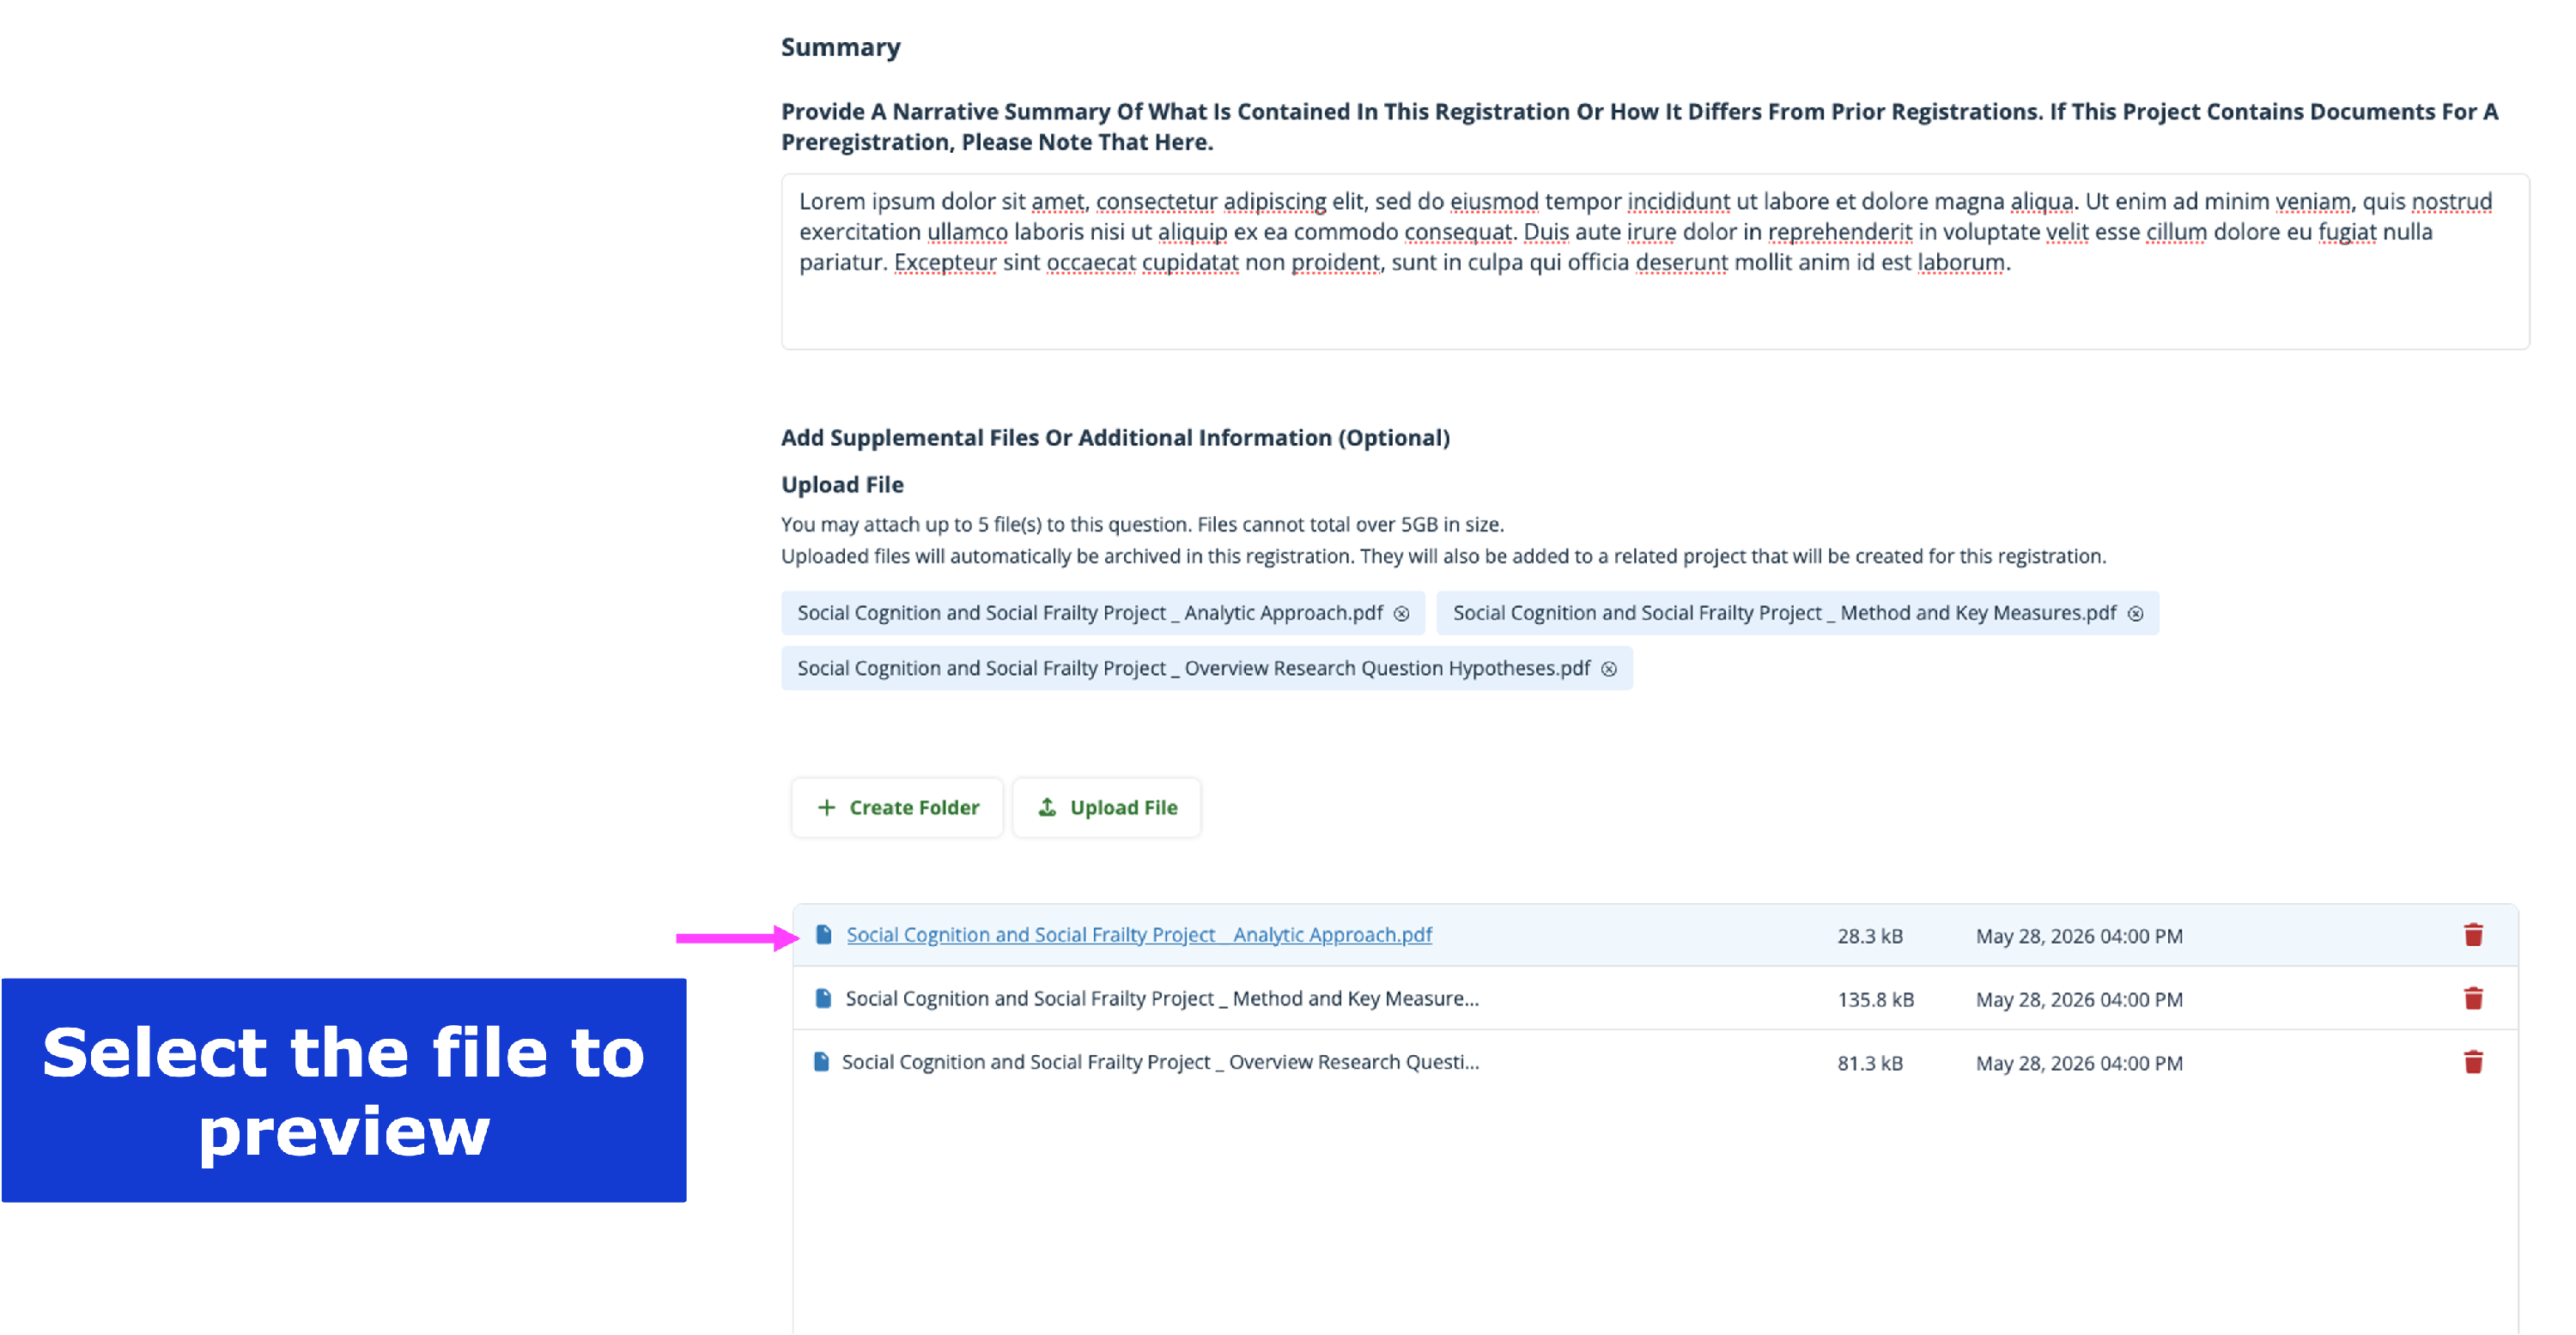
This will open a preview of the file in a new tab
Edit Draft Registrations
Each research registration template is structured differently, with their own sections and questions. The sections are listed across the top of the dashboard.
Example 1: Open Ended Registration

Example 2: OSF Preregistration

You can navigate the different sections in the research registration template by either using the top panel (1) or pressing the Next and Back buttons (2).

If a section shows in RED or with an exclamation mark (!), it is required for submission.

Registration metadata
Metadata is descriptive information about your work that helps other researchers discover, cite, and evaluate relevant studies. This includes: Title, Description, Contributors, Licenses, Institutional Affiliations, Subjects, and Tags. NOTE: This section is identical for all registration templates.
Title
You can edit or change your title if needed by editing the registration metadata. Select edit next to the Title section of the metadata, edit the text and select “Save”.

Manage Contributors
You can add additional contributors at this time, whether or not they already have an OSF account.
When adding contributors, they will need to be assigned specific permissions. All co-authors are given read+write permissions by default. All permission levels can be bibliographic contributors; a non-bibliographic contributor will not have their name associated with the registration, but will maintain the granted permissions. The different levels of permissions are:
- Read: The contributor can view the registration, but does not have permission to edit.
- Read + Write: The contributor can view the registration, but does not have permission to edit. The author can add supplemental files.
- Administrator: The contributor can view and edit the registration, add supplemental files, manage authors and permissions, start an update, and submit a request to end an embargo early. For updates and ending embargoes early, all admins will receive an email notification to approve or reject the request. See our guides on the 48 hour auto-approve process.
If a contributor already has an account, they can be added as a registered user. Select “Add Contributor by Search”

- Then search for the contributor by name.
- Select the contributor.
- Select the appropriate permissions.
- Select "Next".

Adding an Unregistered Contributor
If a co-author already has an account, they can be added as a registered user. Select “Add Contributor by Search”
- Select “Add Unregistered Contributor”
- Enter the contributor a) name and b) email address.
- Select “Add”

You can remove contributors using the RED trash can, edit permissions by clicking the {V} arrow button, and change bibliographic status.

Reorder Authors
The order in which your authors appear in the "Authors" list is the order in which they will appear in citations. To reorder authors, select the icon with three bars, then drag and drop the authors into the correct order.
License
A license tells others how they can use your work in the future and only applies to the information and files submitted with the registration. For more information, see this help guide.
Select a license by clicking the dropdown menu to select an option.

Subjects
Subjects allow users to categorize their work for easier search and identification by other researchers. You can use the Search field to find more subject areas.

Tags
Tags are an excellent way of highlighting keywords to help your work appear in a researcher's search criteria. Start with the generic terms associated with your project (ex. Virology) and work towards more specific terminology (Covid-19).

Saving
Your draft is automatically saved so you and/or your collaborators can return later. The template autosaves when you move from section to section by selecting “Next”. You can exit the template and return to the draft at any time.
When you have finished editing your draft registration, press “Submit”.
Submit Your Registration
You can submit your registration once the draft is completed.
Registration includes two processes: submission and archiving. Submission includes the steps to submit a registration, which is slightly different depending on if you started a registration from scratch without a project or started it from a project or component. Archiving includes the steps of storing the submission in the OSF database and contributor approval.
Submitting Your Registration
“Review” is the last page for all registration templates. Review your answers, if you are ready to submit, then select “Register”.

If you see anything you want to change, use the top navigation bar (1) or the "Back" button (2) to navigate to that section and update your information.

If you are registering from a project, you will be asked if you want to include any components. This will not be displayed if you created a registration from scratch or if your project did not contain any components.
Read and ensure you are comfortable with the contents within the window, then select “Continue”. An additional window with information about registration embargo options will appear. Decide if you want to make your registration public immediately or keep it private (put it under embargo), see below for further details.
Privacy Settings
Once you have submitted your registration, you will have two options: 1) make your registration public immediately, OR 2) enter your registration into embargo, which will make it private until the end of the embargo date.

Public
If you wish for your registration to be publicly available, select “Make registration public immediately”. Then select “Submit”.

Selecting Make registration public immediately will make the registration public. The registration will then get assigned a DOI.
Note: DOIs are available only for public registrations
DOI or Registration number
IF your registration is public it will automatically get a DOI, this is your registration number.
The FULL DOI link is located on the Metadata section of your registration

a PARTIAL DOI is displayed on the registration overview page.

Embargo
Selecting “Enter registration into embargo” will display a Choose Embargo End Date button. Note: If you plan to submit your registration for blinded peer-review, check to make sure that no identifying information is included in any of the metadata or attached documents when you submit your registration and that you EMBARGO your registration.
Select the Choose Embargo End Date button to display a calendar window. Select a date that the embargo will end and the registration will be made public by either navigating via the Calendar window OR entering the date in the format: YEAR-MONTH-DAY (XXXX-XX-XX). You can embargo it for up to four years.
Example: if I’m registering on September 10, 2025, I can put the embargo until September 9, 2029 (the registration embargo will end at midnight).
Then, select “Submit”.

Selecting Submit will take you to the registration pending page. If you start a registration from scratch, a project will be made available for you to support your research needs and collaboration, regardless if the registration is approved by your administrators or not.
Archiving Your Registration
Important: Do not add, edit, or delete any files or contents during the archiving process. Doing so results in archiving failure, and a new registration will be required.

Approving your Registration
When a registration is submitted, all admin contributors on the project are notified via email. Admin contributors are given the chance to approve or cancel the registration via notification email within 48 hours after submission. After 48 hours, the submission will automatically be approved, unless submitted to a Community-run Registry. The registration will show Pending Approval, during this time.


The Registration will be approved (and either become public or enter embargo) if any of the following criteria are met, and the date the registration is “approved” will be the submission date:
- All ADMIN contributors have approved the submission
- 48 hours have passed (whichever comes first)

If one admin contributor rejects the registration, the submission will be cancelled and it will be returned as a draft. You will be notified via email if an administrator rejects the submission.
Viewing your registrations
You can view all of your registrations from your “My Registrations” page. From the main OSF page, navigate to your “My Registrations” page, Select “My OSF” and then “My Registrations”. Your “My Registrations" page will appear. You will see all your draft and submitted registrations.
Drafts:

Submitted:

On each registration card for submitted registrations, there will be an indication of the moderation state. Examples include: "Accepted", “Pending registration approval”, and “Embargo”.
Accepted - This means your registration is approved and PUBLIC

Pending registration approval- This means your registration needs to be approved.
Embargo - This means your registration is approved and PRIVATE

Submit a Registration to a Community-run Registry
OSF Community-run Registries are customized, branded registries hosted on the OSF Registry infrastructure to empower communities to set standards to advance research rigor. Community-run registries hosted on the OSF include: Stiftelsen DAM, Global Flourishing Studies (GFS), and Real World Evidence (RWE).
A Community-run registry is hosted by OSF Registries and enables communities to set their own standards for registration with custom registration templates, moderated registration submissions to curate and enforce standards, and offer DOIs and metadata for enhanced discovery and reuse.
This help guide contains instructions on how to access a branded registry, start a registration that is associated with a branded registry, and the moderation workflow. You can navigate to those specific sections by selecting the links below.
Access and Discovery of a Community-run Registry
Community-run registries are accessible via a link that is disseminated from the associated group’s communication channels (contact that organization for more information). These links will take you to the discover page where you can search for accepted, public registrations submitted to that registry or submit one yourself.
Example: Global Flourishing Study - https://osf.io/registries/gfs
Create a Registration Submission for a Specific Registry
You must be on a Registry’s page to submit a registration or preregistration to the registry. You can access the specific registry page from the Registries Discover page, by clicking on the registry icon.

Once on the page, select the “Add a Registration” button in the top navigation bar.

This will take you to the Add New registration page, where you can start a new preregistration or registration. See section Create a Registration.
Example: Stiftelsen DAM - https://osf.io/registries/dam
Create a Registration Submission for a Specific Registry
You must be on a Registry’s page to submit a registration or preregistration to the registry. You can access the specific registry page from the Registries Discover page, by clicking on the registry icon.


This will take you to the Add New registration page, where you can start a new preregistration or registration. See section Create a Registration.
Moderation
Community-run registries may choose to moderate the submissions and withdrawal requests they receive from authors. Moderators look at and evaluate the contents of each submission and withdrawal request to determine if it aligns with the branded registry’s content policies and procedures.
Add Metadata to Your OSF registration
Once you have created an OSF registration, you can enhance it with some additional metadata regarding the type of resources included and funding information. This enhanced information will increase the likelihood of your content being found and understood. Adding information about funding agencies may also assist in assuring compliance with funder mandates.
Editing Registration Metadata
Registration metadata can be edited in two ways.
1) When you are logged into your OSF account and viewing your registration, you will see that the metadata listed in the right column of the registration page is editable by selecting the “Edit” button.

2) From the registration page, you can also navigate to “Metadata” in the left side navbar.

This will open all the metadata fields that are editable: 1) Title 2) Contributors, 3) Description, 4) Resource Type 5) Funding/Support, 6) License, 7) Affiliations 8)License 9) Publication DOI, 10) Tags, and 11) Subjects. The DOI created for the registration, Registration DOI, is also included in the metadata but it is not editable.
Registration Metadata Layout:

Edit Title
Select the “Edit” button next in the Title section. This will open the Title section, where you can edit the Title and then click Save.

Edit Contributors
Select the “Edit” button next in the contributors section. This will open the Contributors section, where you can add or remove contributors and update permissions.

Reorder Contributors
The order in which your authors appear in the "Authors" list is the order in which they will appear in citations. To reorder authors, click the icon with three bars, then drag and drop the authors into the correct order.


License
Edit Description
You can also edit the registration description by selecting the “Edit” button in the description field. Then modify the description as appropriate.

Resource Information metadata
Several fields on the metadata editing page do not appear during the registration creation process. If you are creating a new registration without having created a project first, or if you did not add metadata to your project, these fields will initially be blank. If you are creating a registration from an OSF Project that does have this metadata, it will be pre-populated in these fields.
You can add or edit any of these fields by selecting the “Edit” button in the field.
The first new section is related to Resource Information. These fields describe the type of materials you are storing and the language. At this stage, we are describing the registration as a whole, not specific files (metadata for those can be added next).
-
Resource type presents you with a dropdown list of choices provided by the DataCite schema. This information is critical when creating a DOI for your project. A blue information icon provides additional information about resource types.
- The resource language asks for a predominant language for your registration. These choices are again selected from a dropdown list. Since this list is longer, you may want to start typing in the language name to find it more quickly.
Once the type and language have been added, select the “Save” button to record your changes.

Funding/Support metadata
The next section presents Funding or Support Information. If your research is the result of funding from an organization in the Crossref Funder Registry you can search for and add that funder name to your project. This will add both the funder name and their ID number to your metadata enabling that funder to find your registration more easily.
Additional information about the award title, a URI where more information can be found and an award number can also be added.
If you have been the recipient of funding from more than one body, select the “Add button to add more funders. Once all funding information has been added, select the blue Save button to record your changes.

Edit Affiliations
To edit the affiliations associated with your registration, select the “Edit” button in the Affiliated Institutions field. Then select or unselect the affiliations to link to your registration. Then select “Save”.

Edit License
To edit the license associated with your registration, select the “Edit” button in the license field. This will allow you to change the license.

Edit Tags and Subjects
The final metadata sections allow you to add subjects and tags to aid in discoverability and description. Subjects are chosen from the list by selecting the checkboxes. More specific options can be found by selecting the blue arrow next to a term to expand the fuller list.

Tags are an excellent way of highlighting keywords to help your work appear in a researcher's search criteria. Start with the generic terms associated with your project (ex. Virology) and work towards more specific terminology (ex. Covid-19). To add or edit tags, simply type in the tag field.

Subjects allow users to categorize their work for easier search and identification by other researchers. You can use the Search field to find more subject areas.
DOI or Registration number
IF your registration is public it will automatically get a DOI, this is your registration number.
The FULL DOI link is located on the Metadata section of your registration
a PARTIAL DOI is displayed on the registration overview page.
Update a Registration
Updating a registration is a process of transparently reflecting necessary changes to a study design. The changes should be implemented only to reflect events outside your control or include unexpected anomalies.
Before starting your first update, read our Introduction to Updating to determine if updating is the best action for you. Below are helpful instructions to guide you through the updating process.
Starting an Update
Admin Collaborators can start an update through the Project, their My registrations Page, or directly from the registration Overview page.
From the Project
Navigate to the project with the affiliated registration you want to update.
In the Project, select the “Registrations” tab. Then select “Update”. You will only see “Update” for the registrations on which you are an admin contributor.

A new draft update is created so you can start including your updates.
From the “My Registrations” page
Navigate to your “My Registrations” page. Make sure you are in the Submitted section. Then select “Update”.

A new draft update is created so you can start including your updates.
From the registration overview page
Open your registration. Select the “Updates” dropdown at the top of your registration. Then select “Update”.

A new draft update is created so you can start including your updates
Entering updates
You will be prompted to enter a justification for the update. The Justification tab is where contributors explain why the updates are needed. Explanations are entered in a required text box field. This field must have information entered in order for the update to be submitted.

The updatable draft fields are prepopulated with the registration’s previous responses. Go to the questions that have the content you need to update and simply edit the text. For example, updated text is highlighted in yellow below. NOTE: Changes must be made to at least one field during the update to be able to submit the update.

We recommend that contributors enter the justification for their edits in the justification tab as they make their updates. Note: Files cannot be added or removed during a registration update at this time.
Then Review the registration update and submit for approval. When a registration is submitted, all admin contributors on the project are notified via email. Admin contributors are given the chance to approve or cancel the registration update via notification email within 48 hours after submission. After 48 hours, the update will automatically be approved, unless submitted to a Community-run Registry. The registration will show “Update in progress", during this time.

Accessing a Draft Update
You can access your update draft several ways, including: through email notifications, the project, your “My Registrations" page, or directly from the registration overview page.
From an Email
Open the email that the system sent you stating that one of the Admins initiated an update. Click the link telling you to “Open it directly”.
From a Project
Open your project. Select the "Registrations" tab. Then select “Continue Update”.

From the “My Registrations” Page
Open your "My Registrations" page. Make sure you are on the Submitted section. Then select “Continue Update”.

From registration overview
Open your registration. Select the “Updates” dropdown at the top of your registration. Then select “Continue Update”.

Saving Updates to Return to Them Later
Updates are saved automatically when you navigate to a new section. You can check when the system last saved your work by looking at the right pane.
Deleting an Update
You can access your update draft several ways, including: through email notifications, the project, your “My Registrations" page, or directly from the registration overview page.
Select "Continue Update"

You will then have the option to "Delete Draft Update"

Confirm that you wish to "Delete" the draft update, this is IRREVERSIBLE, once a draft has been deleted it cannot be recovered.

Create a View Only Link (VOL)
Whether your registration is public or private (embargoed), you can create a view-only link. This link can also be anonymized, masking author names in the “Contributors” section as well as hiding contributor names on the registration's "Overview" page and in the "Recent Activity" section - this is particularly useful in blinded peer review!
If your registration is embargoed, a view-only link offers a way for you to share the private contents with non-contributors. Only admins on a registration can create view-only links. This feature will not be visible to read and read+write contributors.
Create the Link
Open your registration, then select Navigate to the “Contributors” tab on the left-side panel.

This will open a page where you can create the View Only Link (VOL). Under View-Only Links, select “Create”.

This will open a window where you can create the link.
1) Enter a name for the link, 2) Determine if you want to anonymize the link, and 3) select “Next” to create the link.

The link will now appear in the “Contributors” tab.

Copy and Share the Link
Select the Copy icon to the right of the link. The link will be copied to your clipboard for sharing.

Remove a View-only Link
Removing the link will prevent anyone who has the link from continuing to access your project or its components. In the "View-only Links" section of the "Contributors" tab, select the trash can icon to the right of the link.

A modal will appear asking you to confirm the removal.
Select “Delete”.

The view-only link will be removed from your registration.
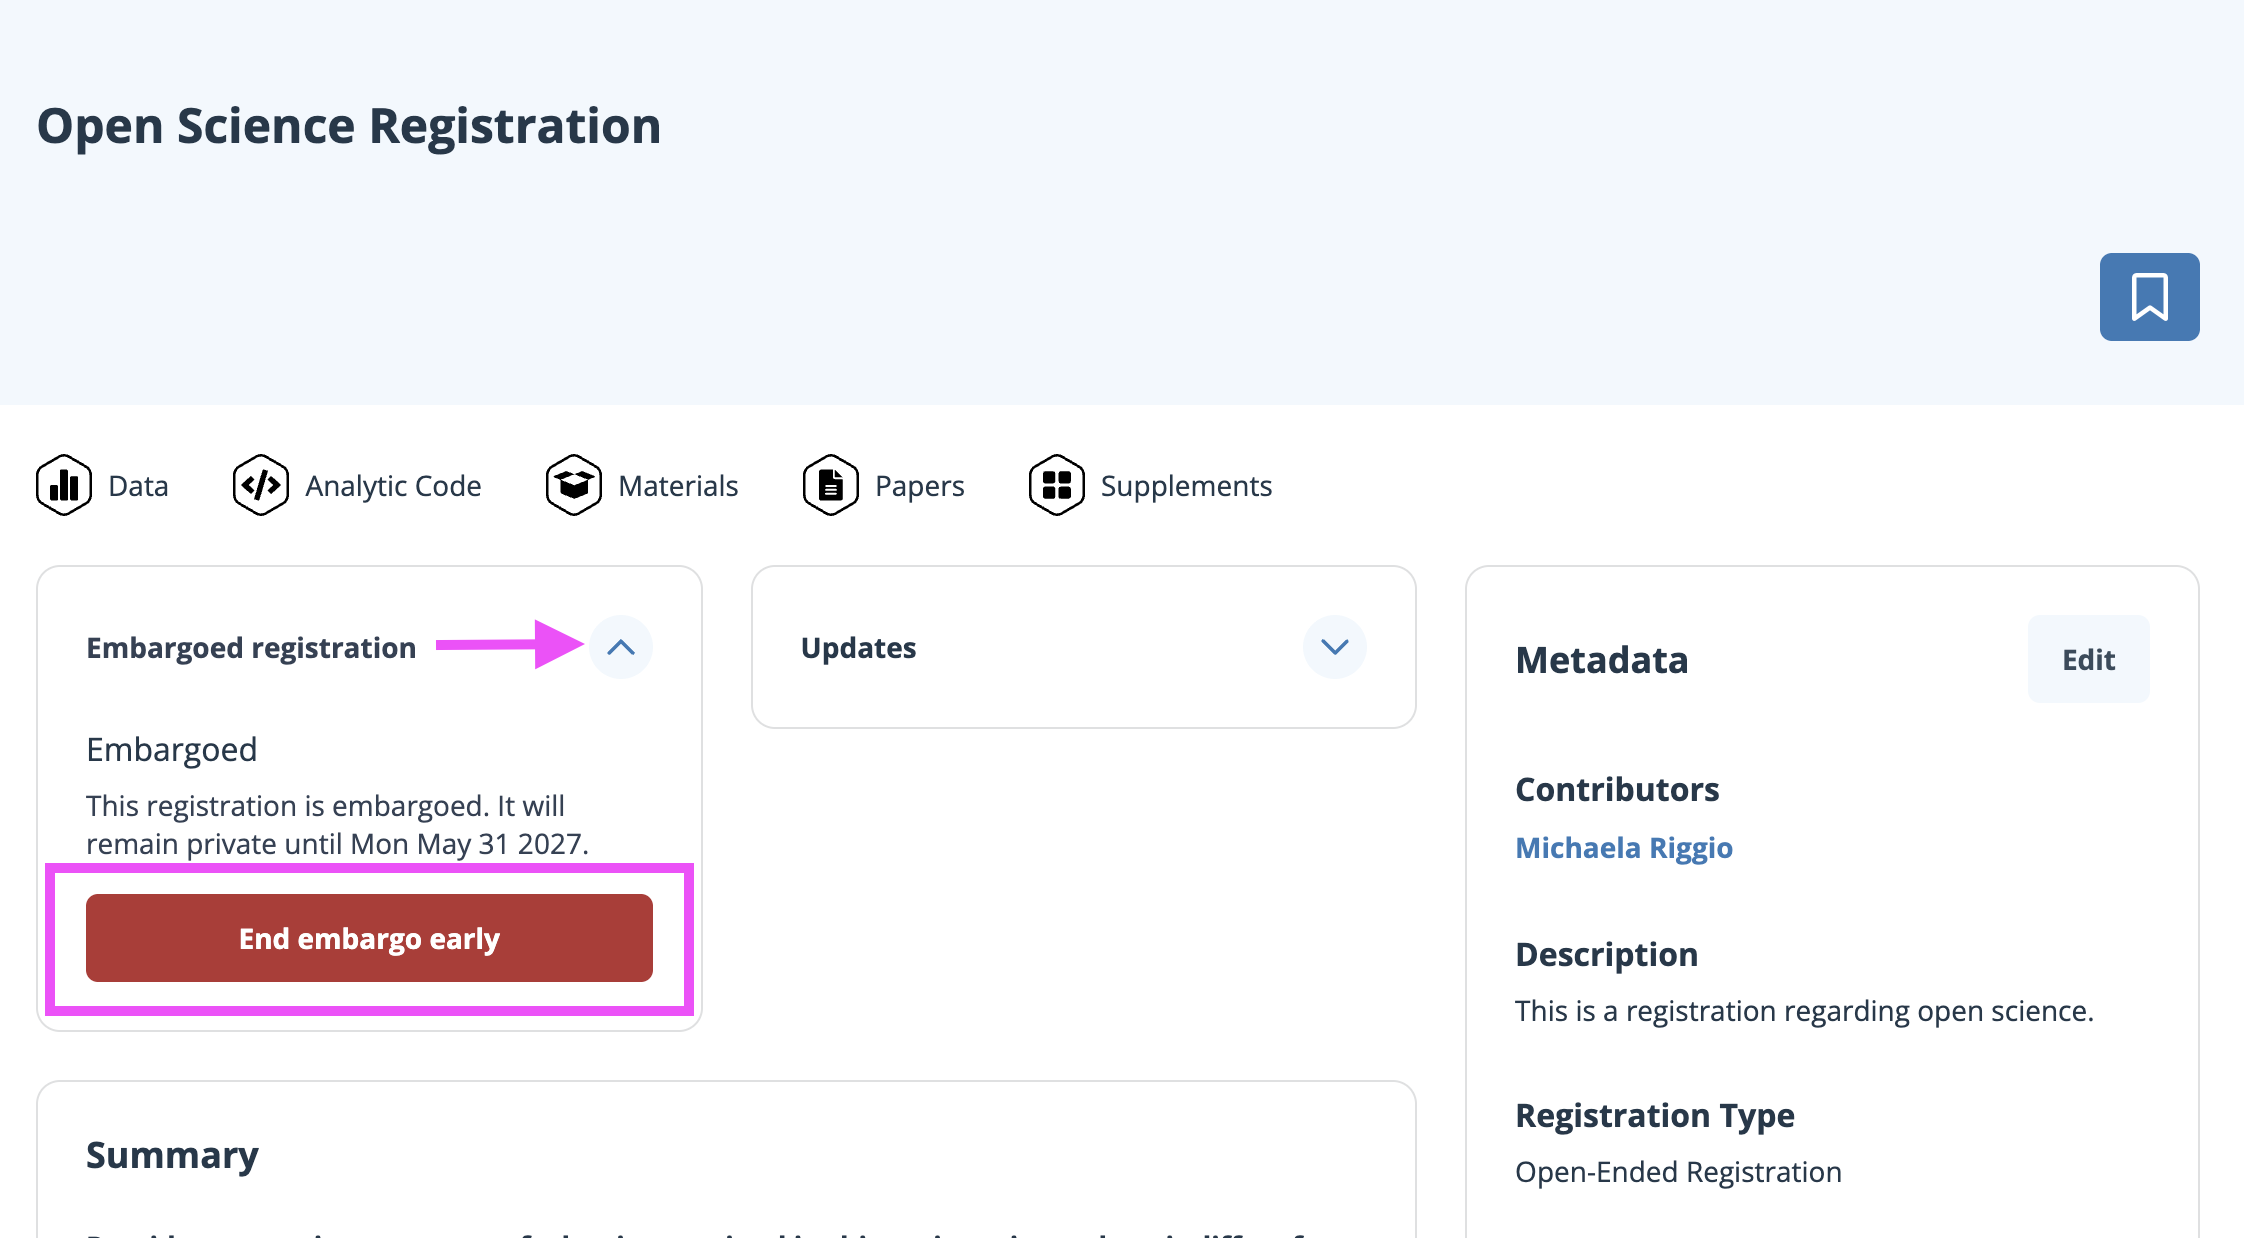
End Embargo Early
To end an embargo early, you will open the registration that you want to end the embargo on, then select the Embargoed registration tab on the top left and select “End Embargo Early”.
You will then be asked to confirm that you want to end the embargo early.

Then request to end the embargo will be submitted for approval by all admin contributors on the registration. Admin contributors are given the chance to approve or cancel the embargo termination request via notification email, the request to end the embargo early will automatically approve after 48 hours.
Withdraw a Registration
Withdrawing a registration removes its contents from the OSF. Withdrawn registrations will maintain basic metadata (e.g. title, contributors, DOI, etc.) about the registration, as well as a justification for its withdrawal, but the registration form, files, and other content will be removed. Please note that registration withdrawal is irreversible.
IF your registration is embargoed, you will need to end the embargo in order to withdraw the registration.
Open the registration that you want to withdraw, then select the Public registration tab on the top left. You will then be able to select “Withdraw registration”. Once you have selected “Withdraw registration” you will have to enter a justification reason for the withdrawal. Once a justification has been entered you can select “Withdraw”.

Your registration will now show “Pending withdrawal” this will be visible to all contributors as well as anyone viewing the registration.

You will receive an email in which you can either approve or cancel the withdrawal of your registration. All administrators on the registration need to approve in order for the registration to be withdrawn. If no action is taken within 48 hours, then the registration will be withdrawn automatically.
When all administrators approve the withdrawal of the registration, the registration's content, such as the registration form and attached files, will be removed. However, the "Registration Overview" page will continue to exist with the following differences:
- The "Registration Overview" page will have a note at the top of the page indicating that the registration is withdrawn.
- The "Registration Overview" page will also maintain basic information, such as its title, contributors, date created, date registered, date withdrawn, DOI, description, and the justification for its withdrawal.
- NOTE: The justification for withdrawal will be displayed on the registration tombstone page, seen highlighted in yellow.

On the original project's "Registrations" page, the registration will be marked with a "Withdrawn" label.

Forced Withdrawal
Moderators on Branded Registries reserve the right to forcibly withdraw any registration that violates the policies of the branded registry. Contributors will be notified by email of the withdrawal and its reasoning.
Add Resources to your Registration
Open Practice Badges
Open Practices Badges are given when a researcher links a resource to their registration. Researchers are responsible for adhering to the criteria for each badge (see details below). Open Practice Badges are used as a method to normalize and incentivize open science practices.
Open Practice Badges tell readers, funders, and journal editors that you are complying with transparency expectations — see badges below for details.
A growing trend in journals is to share and display open science badges when publishing articles. You can find a list of participating journals here.
Earning an Open Practice Badge
Simply ensure that you meet that badge’s criteria (see below), have the resource stored in a repository, and add the Resource with its DOI. Displaying a badge on your registration means that all contributors have permission and legal authority to all resources for each badge and assert that the resource meets each badge’s criteria.

Badges Available and Criteria
Each badge has its own set of criteria that contributors agree to adhere to when linking resources to their registration. Below is a summary for each badge.
Data
The Open Data badge is awarded when digitally shareable data necessary to reproduce the reported results are publicly available.
|
|
|
| Examples |
|

Analytic Code
The Open Analytic Code badge is earned by making the analytical code needed to reproduce the reported analysis publicly available.
|
|
|
| Examples |
|

Materials
The Open Materials badge is earned by making the components of the research methodology needed to reproduce the reported procedure and analysis publicly available.
|
|
|
| Examples |
|

Papers
Manuscripts generated from a study.
The Papers badge is earned by making any manuscripts, papers, reports, and articles that were generated from the study publicly available.
|
|
|
| Examples |
|

Supplements
The supplements badge is earned by making any other resources related to a study that do not align with any of the previous items publicly available.
|
|
|
| Examples |
|

Add an Open Resource Badge to Your Registration
To add a resource to your registration, you can navigate to the resources section two ways.
From the Registration Overview Page
From the registration overview page, select any resource icon. Note: Icons will be grey if there isn’t an associated resource.

Once you select the resource icon, a window will open where you can select “Add Resource” to open the window where you can add the resource.

From the Resources Tab
From the Registration, select the “Resources” Tab. This will open a window where you can select “Add Resource” to open the window where you can add the resource.

In the “Add Resource” window, you have the option to add any of the resources mentioned above: Data, Code, Supplements, Materials, Papers, and Supplements.
To add the resource, 1) Enter the DOI, resource type, and description, 2) select Preview, and if everything is correct, 3) select “Add Resource”.

This will add the resource to your registration.
You can continue to add resources as necessary. They will be viewable via the “Resources” tab.

And the Registration overview. On the Overview page, linked resources will have a colored icon.

Archived Links
If you link projects or registrations to an OSF project, these links are also available on the registration when it is published. These links cannot be modified later, and changes to the links on the original project are not reflected on the registration.

Add a metadata record to your Registration
Files in your Registration
Add metadata to a File
FAQs
What's the difference between Preregistration and registration?
While the definitions for each can vary across open science experts, the difference is normally when the (pre)registration is submitted in the research life-cycle. Preregistration is normally submitted prior to any data collection or analysis, while registrations can be submitted at any time.
Where is my registration number?
Your registration number is the DOI and can be seen on the right-side panel of your registration.

What is a registration? How is it different from a project?
A registration is a frozen version of your project that can never be edited or deleted, but you can issue a withdrawal of it later, leaving behind basic metadata. The project can continue to be edited and updated, providing you the option to register your project at different points throughout the research cycle.
When you create the registration, you have the option of either making it public immediately or making it private for up to four years through an embargo. A registration is useful for certifying what you did in a project in advance of data analysis, or for confirming the exact state of the project at important points of the life cycle, such as manuscript submission or the onset of data collection.
Can I upload a document to my registration update?
Documents cannot be uploaded or updated to any (pre)registration after it is submitted or to any update. However, you can link documents from a public project, newly submitted public registration, or any file on an outside repository via a DOI.
What if I don’t get an email to approve/reject my registration?
Registrations will automatically approve after 48 hours. If you do not receive an email to approve/reject your registration it will automatically approve. If you need to “reject” your registration to make changes, reach out to support support@osf.io and they can assist you with rejecting the registration.
Can I modify a document in my registration?
Documents that are uploaded to or submitted with a registration cannot be modified once the registration is submitted.
Can I reinstate a withdrawn registration?
Withdrawn registrations cannot be reinstated or resubmitted. You will need to submit a new registration.
Can I transfer/move a registration from one project to another?
Registrations cannot be moved or copied to another project because they need to retain their file structure and integrity.
Who approves/ rejects registrations?
Admin contributors on the registration can approve and/or reject registrations. If you are submitting to a Community-run Registry, then they will need to approve or reject your submission.
Why can I not approve a registration or preregistration via email?
Depending on your permission level on the registration draft, you will receive a different email. If you are a “Read” or “Read and write” permission level, you will receive an “Approval not requested” email as shown below.
Approval Not Requested:
If you are an admin, you will receive an “Approval requested” email as shown below.
Approval requested:
I received the approval email when submitting a registration, but received a “Unable to resolve” error message. What should I do?
If you receive this error upon submitting a registration, let our support team know (email support@cos.io ) and we will investigate. The good news is, OSF registrations are a non-moderated service. This means that you are in charge of accepting your submission.
For a registration to be approved, the admin on the registration will accept the submission by email. If not, the registration will be auto-approved 48 hours after the submission, even if you encounter this error.
What if I need to withdraw my registration?
To withdraw your registration, follow this help guide.
Why is there an “associated OSF project” on my registration?
Readers, funders, and fellow contributors can easily access the collaborative OSF project that is associated with the registration. This allows them to see the study progress even after the registration has been completed and the study has begun.
Is it possible to perform a retrospective registration of my study?
Journals typically require registrations to be completed prior to data analysis. You can complete registration as long as you are not at that point in the research life-cycle.
What if my registration shows pending after 48 hours has passed?
Contact our support team using the Support Center beacon, which can be found on the bottom right side of any OSF support page:
How to send a submitted registration back to being a draft?
After a registration has been submitted, an administrator on the registration can reject the submitted registration on the confirmation email sent to administrators upon submission. Once rejected, the registration will return to a draft.
Is the copyright holder field typically the PI, the institution, or the funders?
The copyright holder is responsible for owning the copyright on the work. This can vary depending on your research situation and project.
Will my submission be reviewed by a moderation team prior to approval?
Registrations that are not submitted to a Community-run Registry are reviewed and approved by the administrators on the registration. This approval process will be sent to each administrator on the registration in an email sent upon submission.
How many days are required for the registration process?
Registration can be submitted and approved by the administrators on the registration via email instantly. If a registration is submitted, and the administrators on the registration do nothing, the registration will be automatically approved after 48 hours.
The email I received says that in 48 hours, the registration will be automatically published. Does that mean that if I don't do anything, it will get published anyways?
Yes, If a registration is submitted, and the administrators on the registration do nothing, the registration will be automatically approved after 48 hours.
What documents are required?
Registrations are a formal, transparent “story” of your study. This story describes what your research planned to do, any updates that needed to be made, and the results. It is best to provide as detailed a plan as possible for the archiving process, so preparing any documentation you need to tell your “story” is ideal.
Registrations can always be Updated post-submission, but currently, any files attached to registration can not be updated.
What do I do in the event that one of the required fields is not relevant to our study?
Registration fields are intended to help you share a complete picture of your study. Think through all aspects of your study to see if anything is, or may be related to, that field. If not, provide an explanation as to why that field doesn’t pertain to your study.
Can I make a private registration? How can I make an embargoed registration public?
Yes, registrations can be made temporarily Private (Embargoed) for up to 4 years from the date of submission. (Learn more about ending an embargo)
Once public, can I make my registration embargoed (private)?
No, once a registration has been made public it will remain public and can not be embargoed again. You can withdraw the registration by leaving the metadata on the registration using this help guide.
Will my manuscript be flagged for plagiarism because I have the same protocol registered on the OSF website?
While the existence of the preregistration could flag automated plagiarism detection software, it is important to keep the methods and language identical through your process of planning and writing up results, so as to not introduce any confusion.
Quoting longer sections of text or simply citing your preregistration in either footnotes or in the citation section will clarify where the content comes from. If questioned by the editor, a simple note explaining that the content is included in a registered and citable location will assuage any concerns.
What is the size limit for a registration?
Registrations archive and preserve both OSF Storage and add-ons connected to projects. Registrations must be 5GB or less across all storage being registered.
If you need to create a registration larger than 5GB, contact our support team using the support center beacon found on the bottom right side of any OSF support page:
What if I don't want to register anything in OSF?
Registering is an optional feature of OSF.
Why can't I see my registration?
You may be in the project rather than the registration. To go to your registration, open the project that you registered, and select the Registrations tab in the navigation bar. You'll be taken to the "Registrations" page, where all registrations associated with the project will be listed. Select the registration you want to view from the list.
Alternatively, you can access all your registrations by selecting the My Projects tab in the navigation bar, then selecting All my Registrations from the sidebar, and selecting the registration from the list.
Why can’t I see my registration draft?
All registration drafts for your account can be found on your Registration Draft Dashboard. If you cannot see the draft here, please contact the OSF support team using the support center beacon.
How can I tell if my registration is registered?
After submitting your registration, you should receive an email titled "Registration pending for one of your projects", in which there will be a link to approve your registration. If you didn't receive this email, try checking your spam or quarantine folders to see if the email was sent there.
All admins on the registration can approve the registration by selecting the link. If an admin disapproves the registration, the registration will be canceled. If the admins do not take action via the email, the registration will become registered automatically after 48 hours.
48 hours have passed, but my registration is still pending. Why isn't it registered?
The 48-hour cycle runs from midnight on the day you submitted the registration to midnight on the second day. Try checking back at midnight.
If you need to register before midnight, you should have received an email titled "Registration pending for one of your projects" in which there will be a link to approve your registration. If you can't find this email, try checking your spam or quarantine folders to see if the email was sent there.
If I make my project public, will that make my registrations public, too?
The privacy settings of projects and registrations are independent from each other. Making your project public will not affect the embargo on the registrations. The only way to make a registration public is to actively end the embargo.
My registration is public but I need it to be private. How do I make it private?
Once a registration has become public, it cannot be made private. However, if you need to, you can create a new, embargoed registration, and then Withdraw The Original One.
For transparency and best practices, please provide a link to the new registration in the justification for withdrawal and provide a brief explanation of the reason for withdrawal.