Welcome to OSF Preprints
This Article Is Licensed Under CCO For Maximum Reuse.
The following is a Table of Contents that links directly to specific sections within the guide.
- Overview
- OSF hosted Community-run Preprint Servers
- Creating a preprint
- Start your Preprint
- Managing your preprints
- Resubmit your preprint
- Delete a preprint draft
- Edit your preprint
- Create a New Version
- Withdrawing a Preprint
- Submitting to a Moderated Service
- Cite a preprint
- Download Preprints
- Preprint analytics
- FAQs
Overview
OSF Preprints is a network of community-run preprint servers that provide a platform for scholars to upload working papers, preprints, and published papers, with the option to link data and code. Preprints are generally shared through specialized preprint servers like PsyArXiv, SocArXiv, MetaArxiv, and Law Archive, offering a way to share your research quickly, receive feedback from the community, and gain a wider audience for your work. All of the community-run preprint servers on the OSF follow the same upload process and follow pre-moderation policies, where submissions are in a private, pending state until a moderator accepts or rejects them. If accepted, preprints receive a DOI and a persistent URL to allow your preprint to be cited, and the option to add supplemental files, like data or analysis scripts.

Creating a Preprint
How to Prepare Your Preprint
-
Get permission from all authors to share the preprint
- Before posting a preprint, verify that you have permission from the original author and all co-author(s) to share the work. By sharing a preprint, you confirm that all authors agree with sharing it and that you have the right to share the preprint.
- Confirm any conflicts of interest from all co-authors so you can disclose the COI for the preprint. Examples of potential conflicts of interest include: financial involvement within any related entities, such as honoraria, grants, speaking fees, employment, consultancies, stock ownership, expert testimony, and patents or licenses.
- Determine the authorship order
- Communicate with your co-authors that you want to share your article as a preprint and determine the order in which the names should appear
- Decide how you want to license your preprint
- It's important to choose the appropriate license to apply to your preprint in order to communicate how you want others to share your work. That said, it's not required to license your preprint.
- In general, licenses recommended are CC-0 1.0 Universal and CC-By Attribution 4.0 International. These are open licenses. Additional licenses are available on some of the community-run preprint services.
- Learn more about the different licenses at Creative Commons or Choosealicense.Com
- Prepare your preprint file
- You should have your preprint in an easily accessible file. It is advisable to use non-proprietary file types like PDF. These document formats are easier to share and reuse, and will render with fewer complications than proprietary filetypes like Microsoft Office filetypes.
- Preprints are part of the scholarly record. You should assume that your preprint will always be publicly available. Check that you’ve removed any information from your preprint that shouldn't be shared publicly
- Write the abstract
- Plan your abstract ahead of time, and make sure that it’s at least 20 characters long.
- You can either type your abstract or copy and paste it into the textbox during the upload process. You can’t upload an abstract as a file
- Prepare supplemental materials
- Author assertions about the availability of public data increase transparency for readers and make it easier for readers to find the data underlying your preprint. Gather DOIs or persistent links to any of the data used in the analyses in your preprint to provide along with the preprint.
- If you have supplemental materials that you want to share along with your preprint -- code, protocols, surveys, data, etc.-- these files will be stored in an OSF project that will be connected to your preprint. You can add supplemental materials at any time, and they can always be removed. If you do not have an OSF project specifically designed for supplemental data you will be able to create one during the preprint submission process and if you already have one you will be able to link it
- Choose disciplines
- Decide which discipline(s) best fit your preprint. It's required to add one top-level discipline, and you can get more specific by adding subdisciplines.
- The disciplines and subdisciplines available will vary by preprint server. To see the disciplines offered by the community-run preprint servers, you can browse the subject areas on each preprint server's "Search" page. See our Search And Discover Preprints help guide for instructions.
- If you don't see your discipline, you can tag your preprint with your specific subject area(s).
- Choose a preprint service
- PsyArXiv, SocArXiv, LawArXiv, Thesis Commons, and several others have partnered with OSF Preprints infrastructure to support preprint sharing across different disciplines. You should upload your preprint to whichever preprint service best fits your topic and the community that you would like to reach. If there isn’t a community-run preprint service for your discipline on the OSF, check out these external options: https://spi-hub.app.vumc.org/pp-service/browse or https://asapbio.org/focus-areas/preprints/preprint-resource-center/.
These are the preprint services currently hosted on the OSF. They represent research communities and disciplinary areas.
OSF hosted Community-run Preprint Services
| Preprint service | Description |
| SocArXiv | Open archive of the social sciences |
| PsyArXiv | A free preprint service for the psychological sciences |
| BioHackrXiv | Preprints for BioHackathons |
| BodoArXiv | Open Repository for Medieval Studies |
| CoP | A Preprint service for Venous Diseases Maintained By The College Of Phlebology |
| ECSarXiv | A free preprint service for electrochemistry and solid state science and technology |
| EdArXiv | A Preprint Server For The Education Research Community |
| FocUS Archive | A free preprint service for the focused ultrasound research community. |
| Law Archive | Open Archive for Legal Scholarship |
| MediArXiv | Open Archive for Media, Film, and Communication Studies. Visit mediarxiv.com for more information. |
| MetaArXiv |
An interdisciplinary archive of articles focused on improving research transparency and reproducibility Maintained by The Berkeley Initiative for Transparency in the Social Sciences (BITSS) |
| NewAddictions X | A free preprint service for the field of new and emerging addictions. Supported by the International Society for the Study of Emerging Drugs – ISSED. |
| PaleorXiv | A preprint archive for Paleontology |
| Thesis Commons | An open archive of Theses |
Start your Preprint
Select a preprint service
The OSF is home to community-run preprint services that allow you to share your preprint (pre-publication) with a community of researchers.
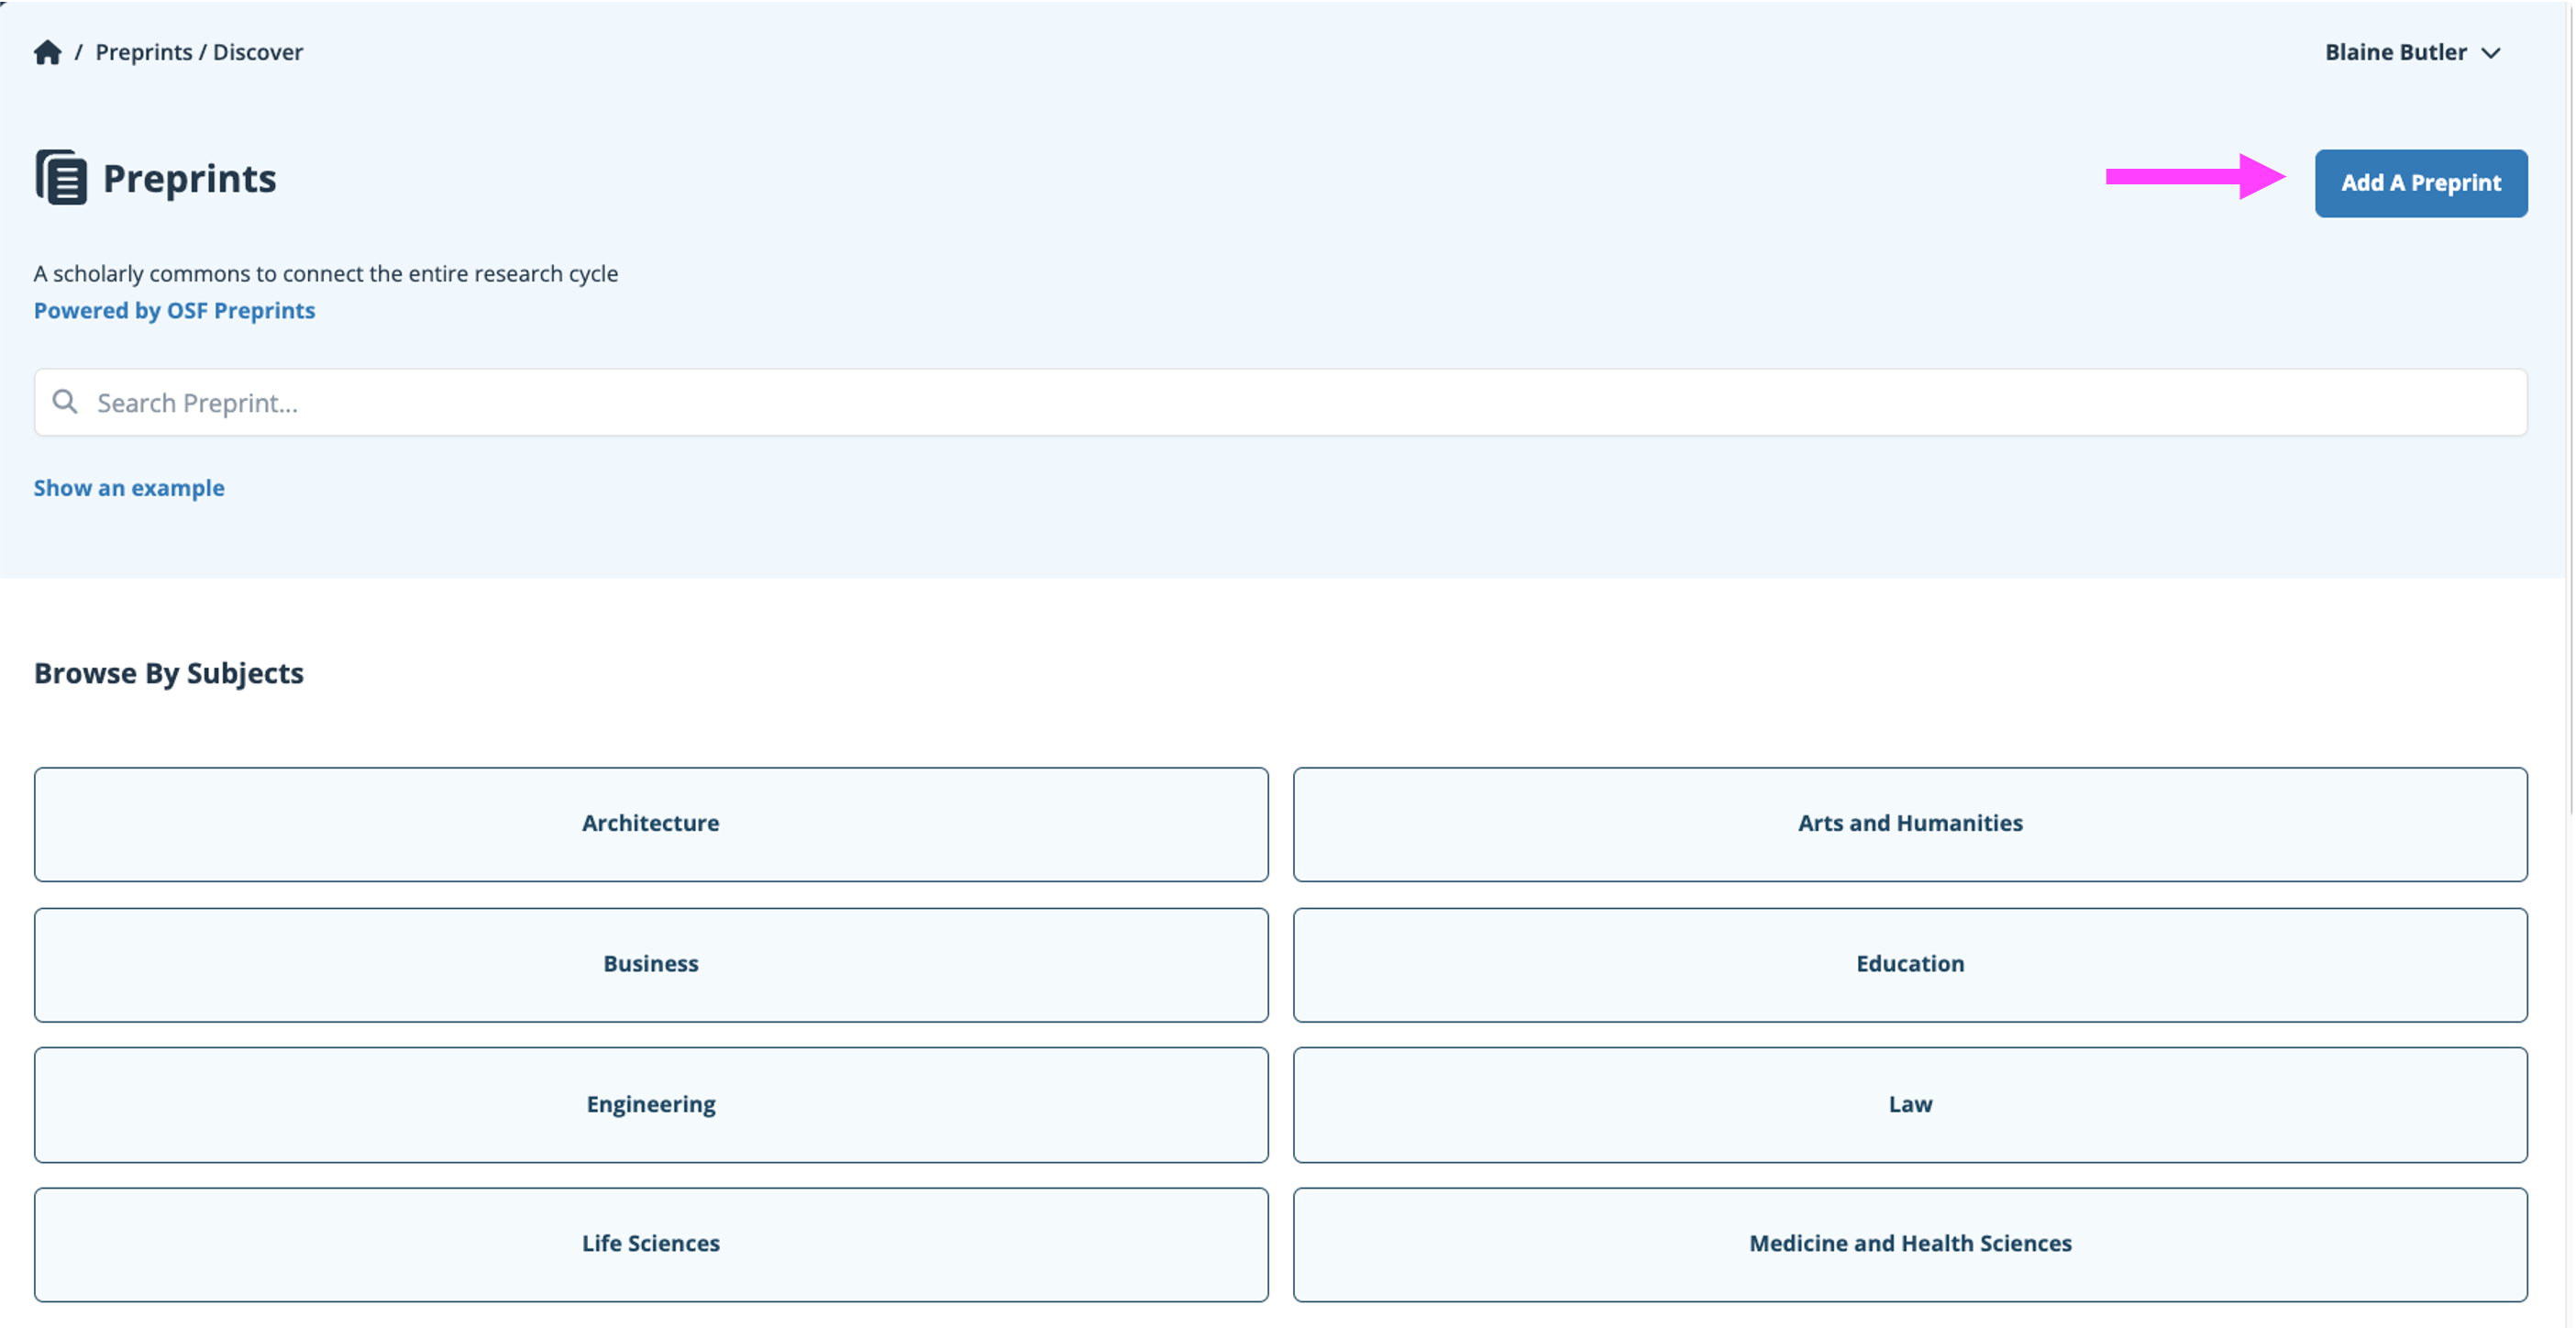
You can select a preprint service either from the preprint discover page by clicking the “Add a Preprint” tab found at the top of the preprint discover page:
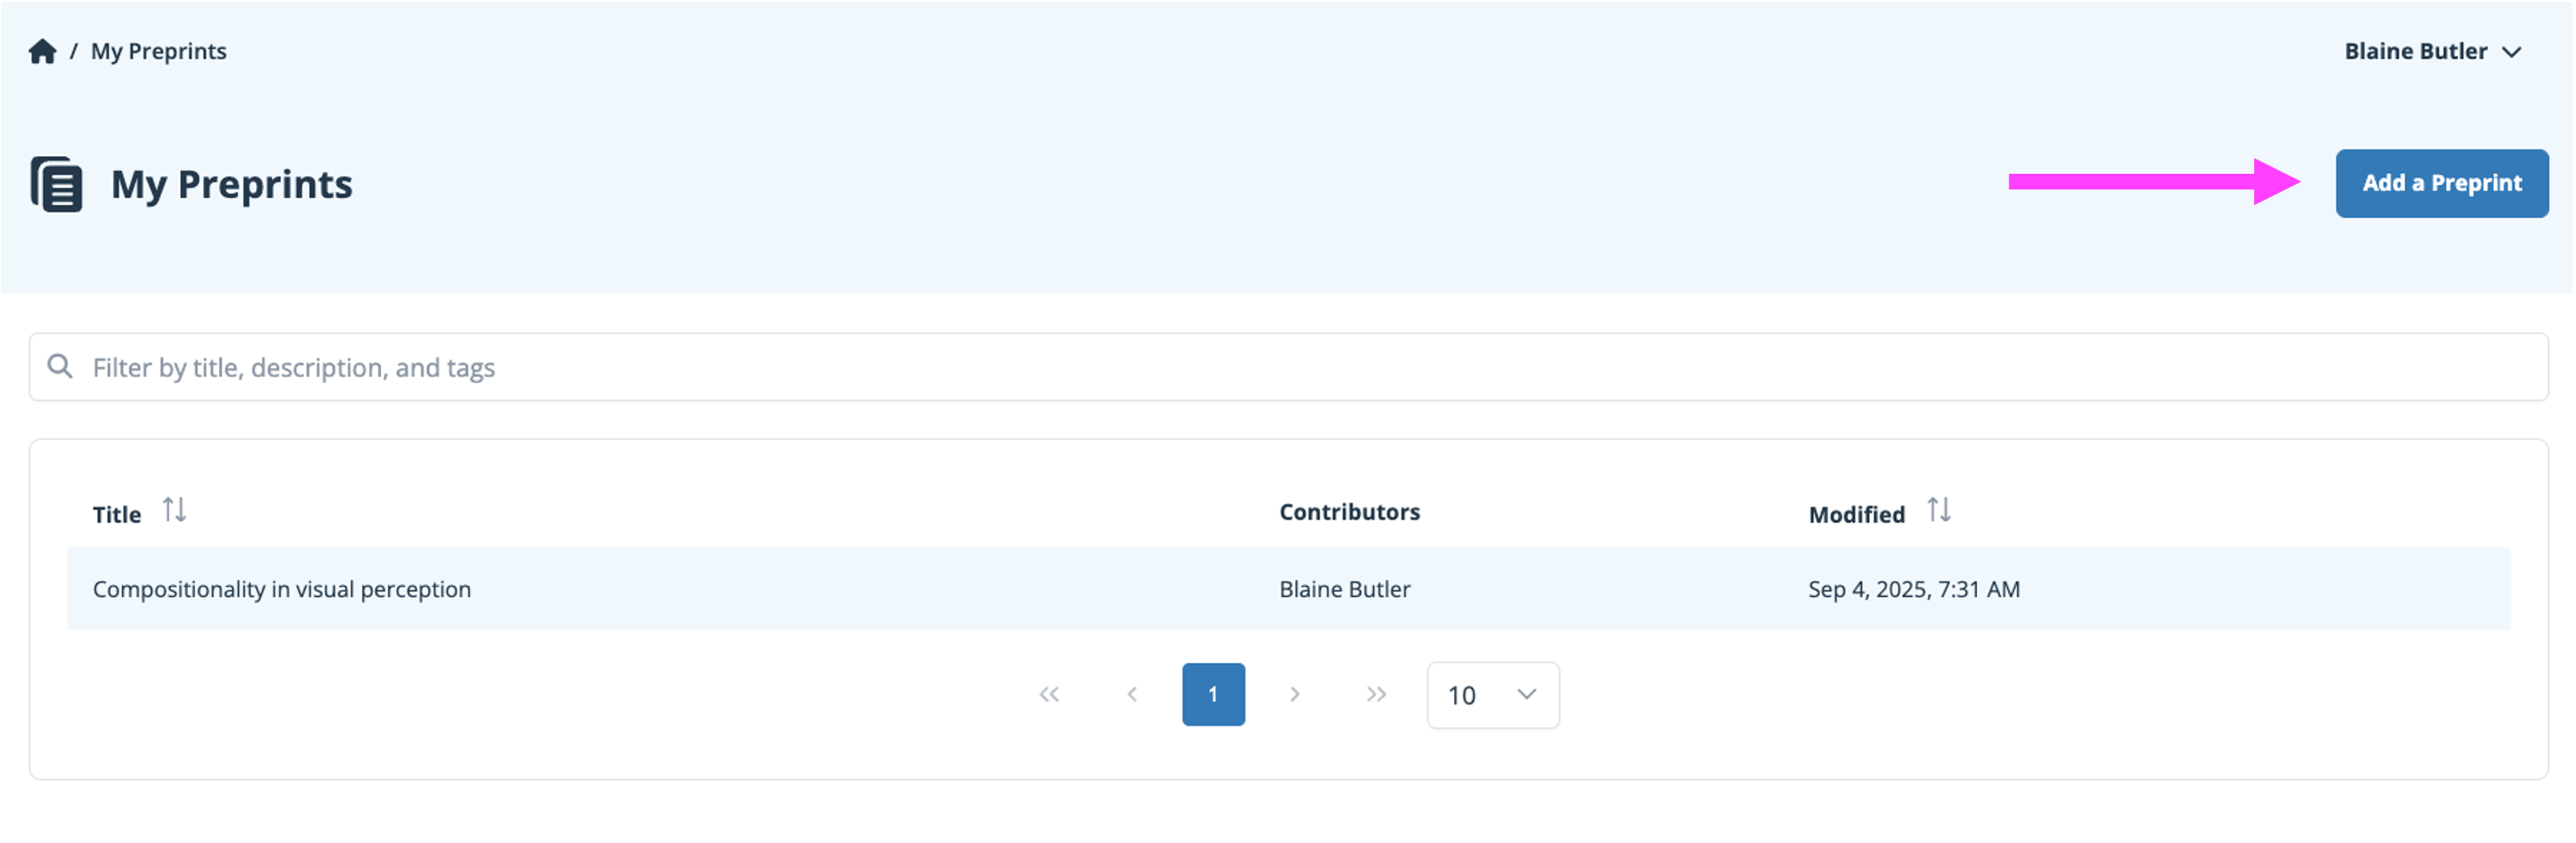
OR from your “My Preprints” page:
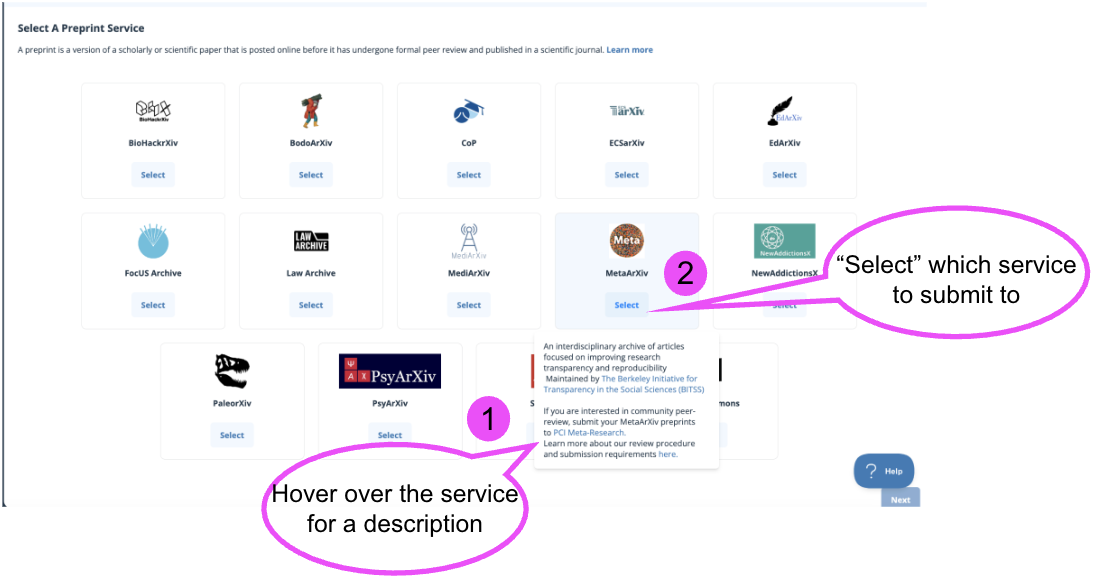
This will take you to an all-encompassing list of our preprint services. For a description, hover your cursor over the preprint service you wish to submit to. Once you have chosen which service you wish to submit to, click the “select” box.
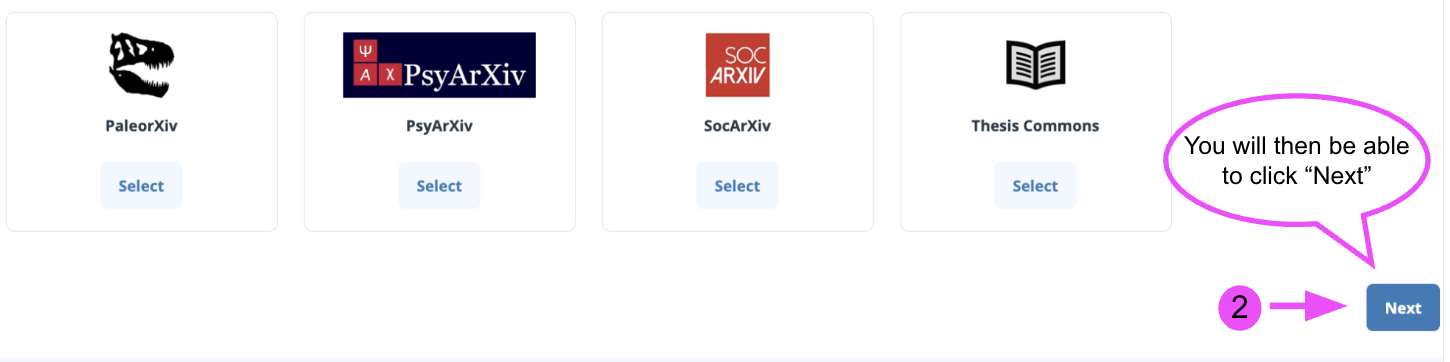
You will be able to click the “Next” button.
This will take you to the submission workflow.
Fields on a Preprint submission:
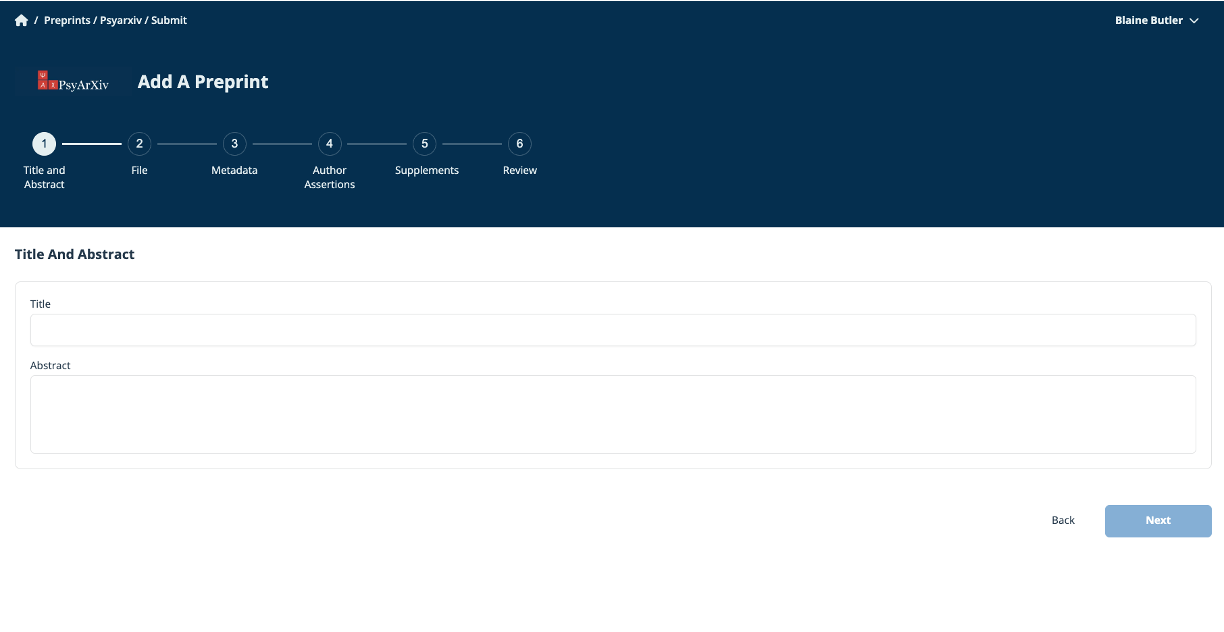
Title and Abstract
Enter Title and Abstract
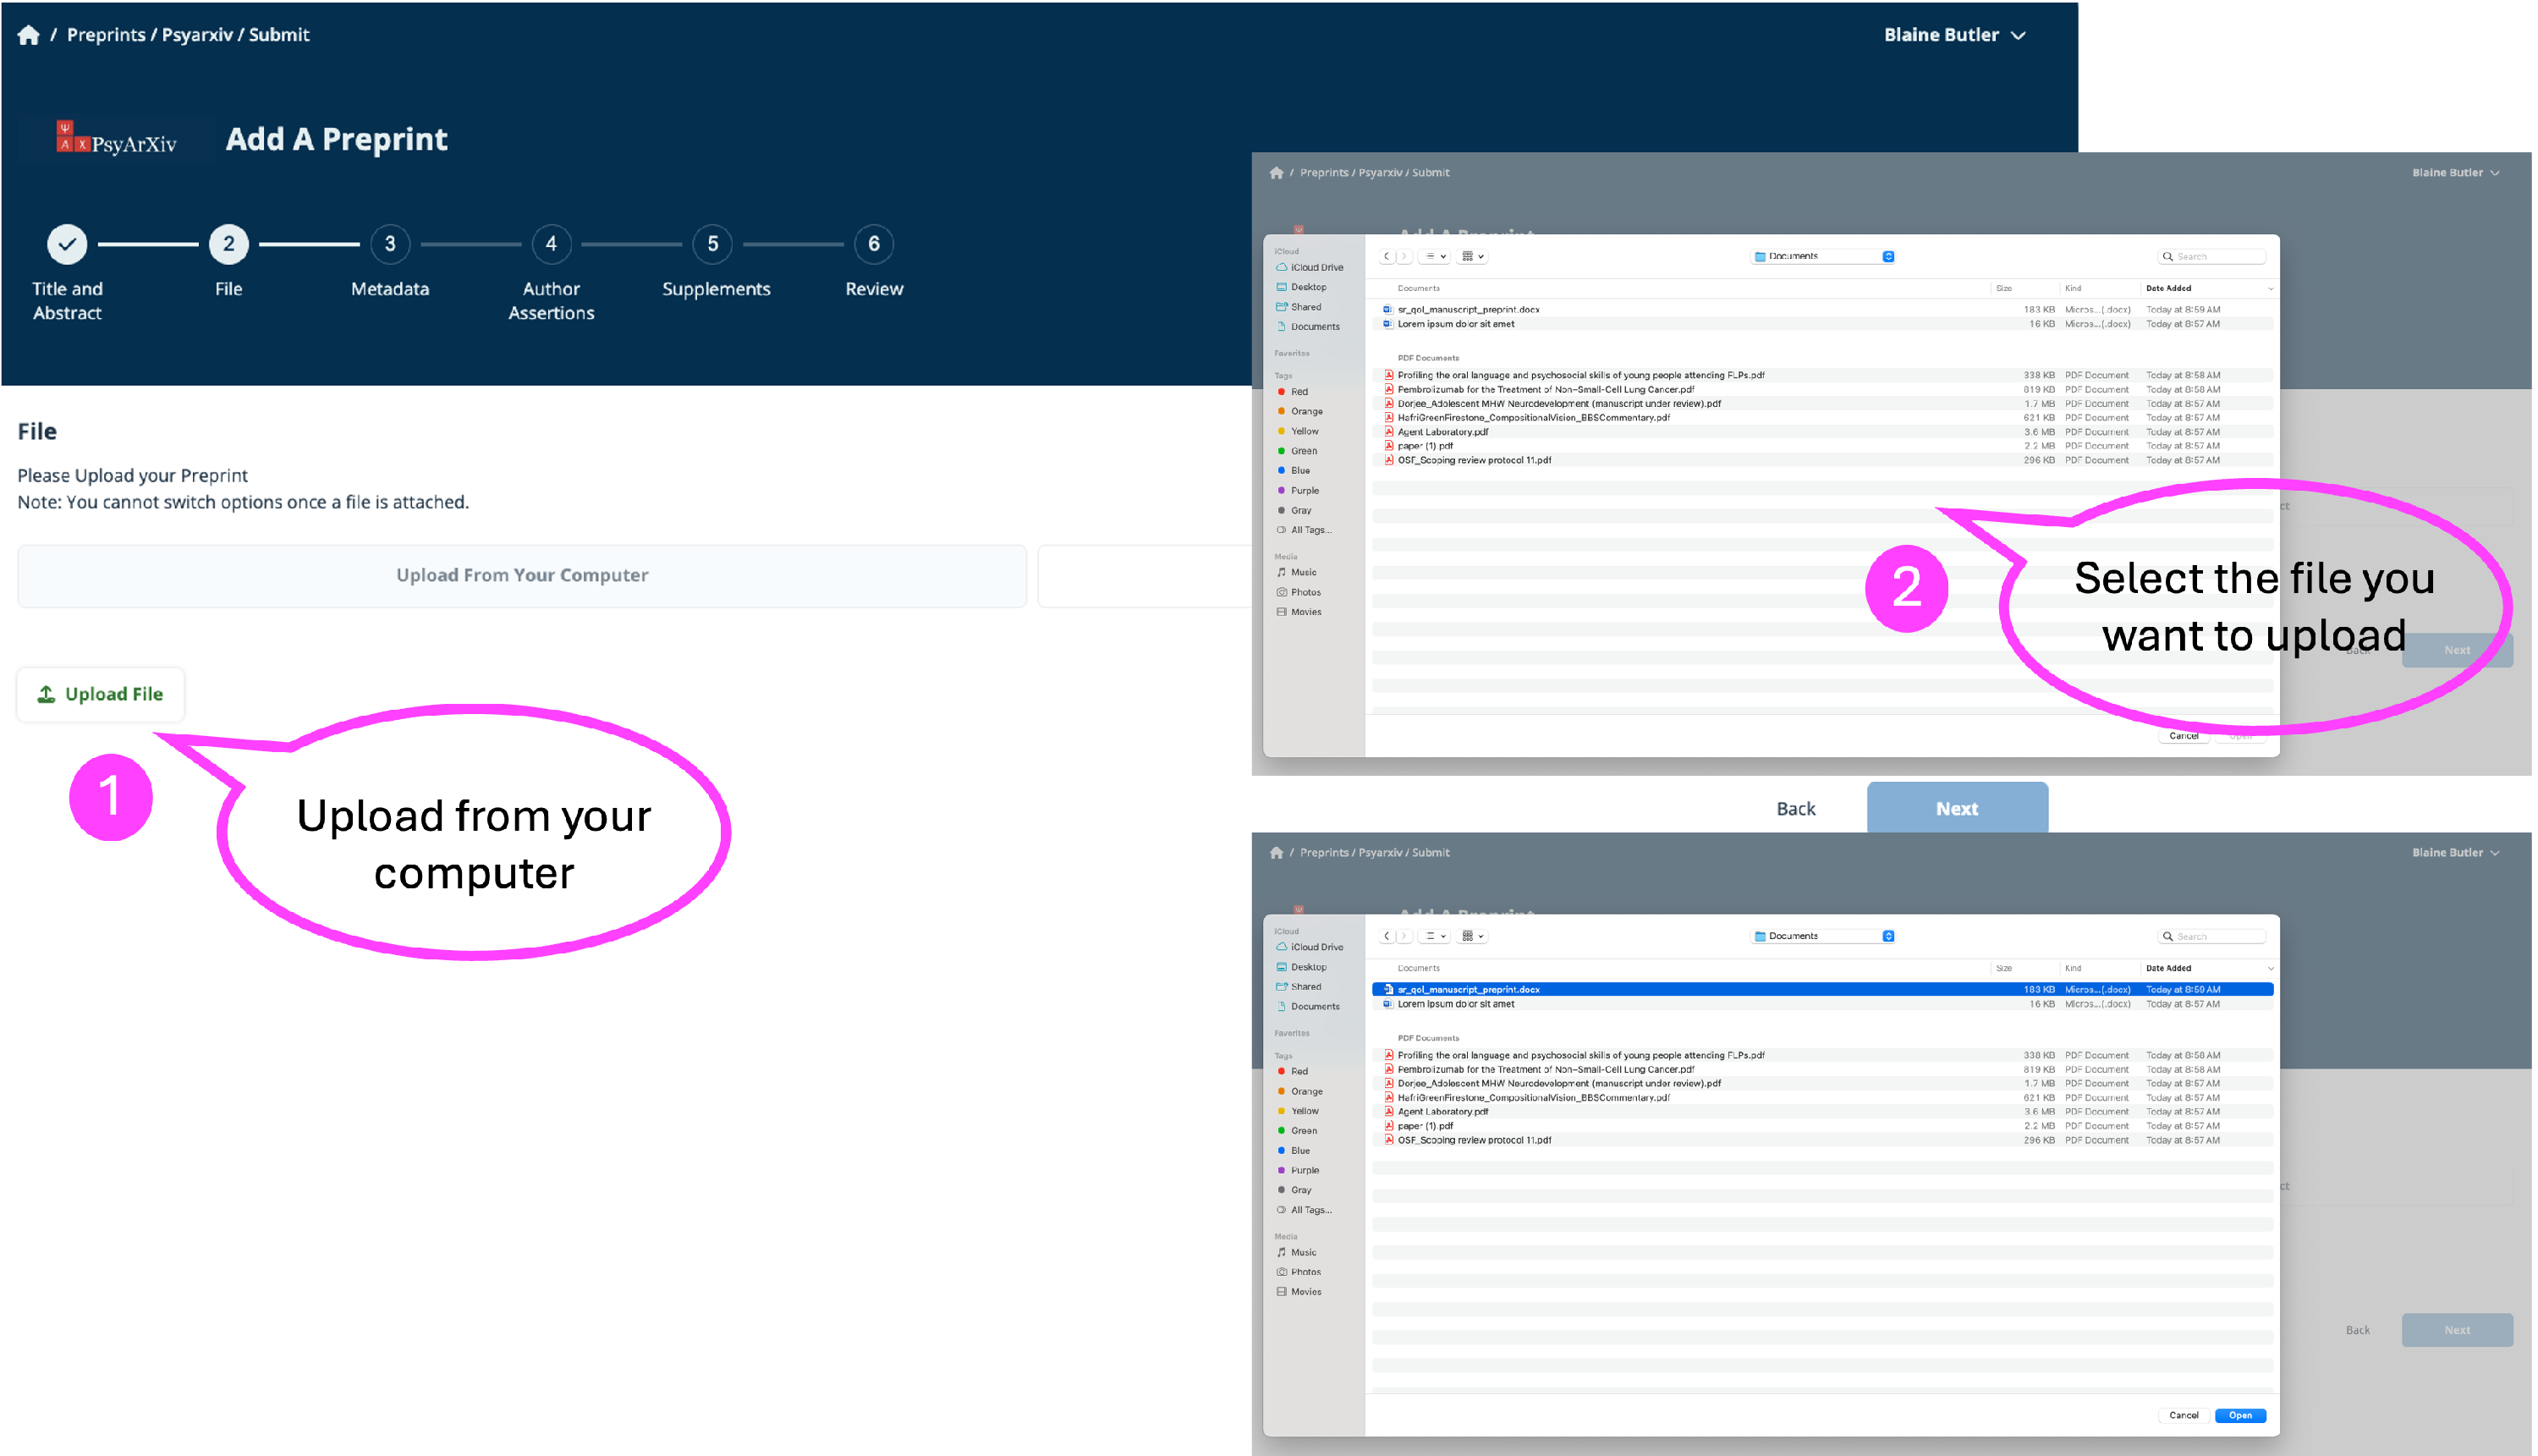
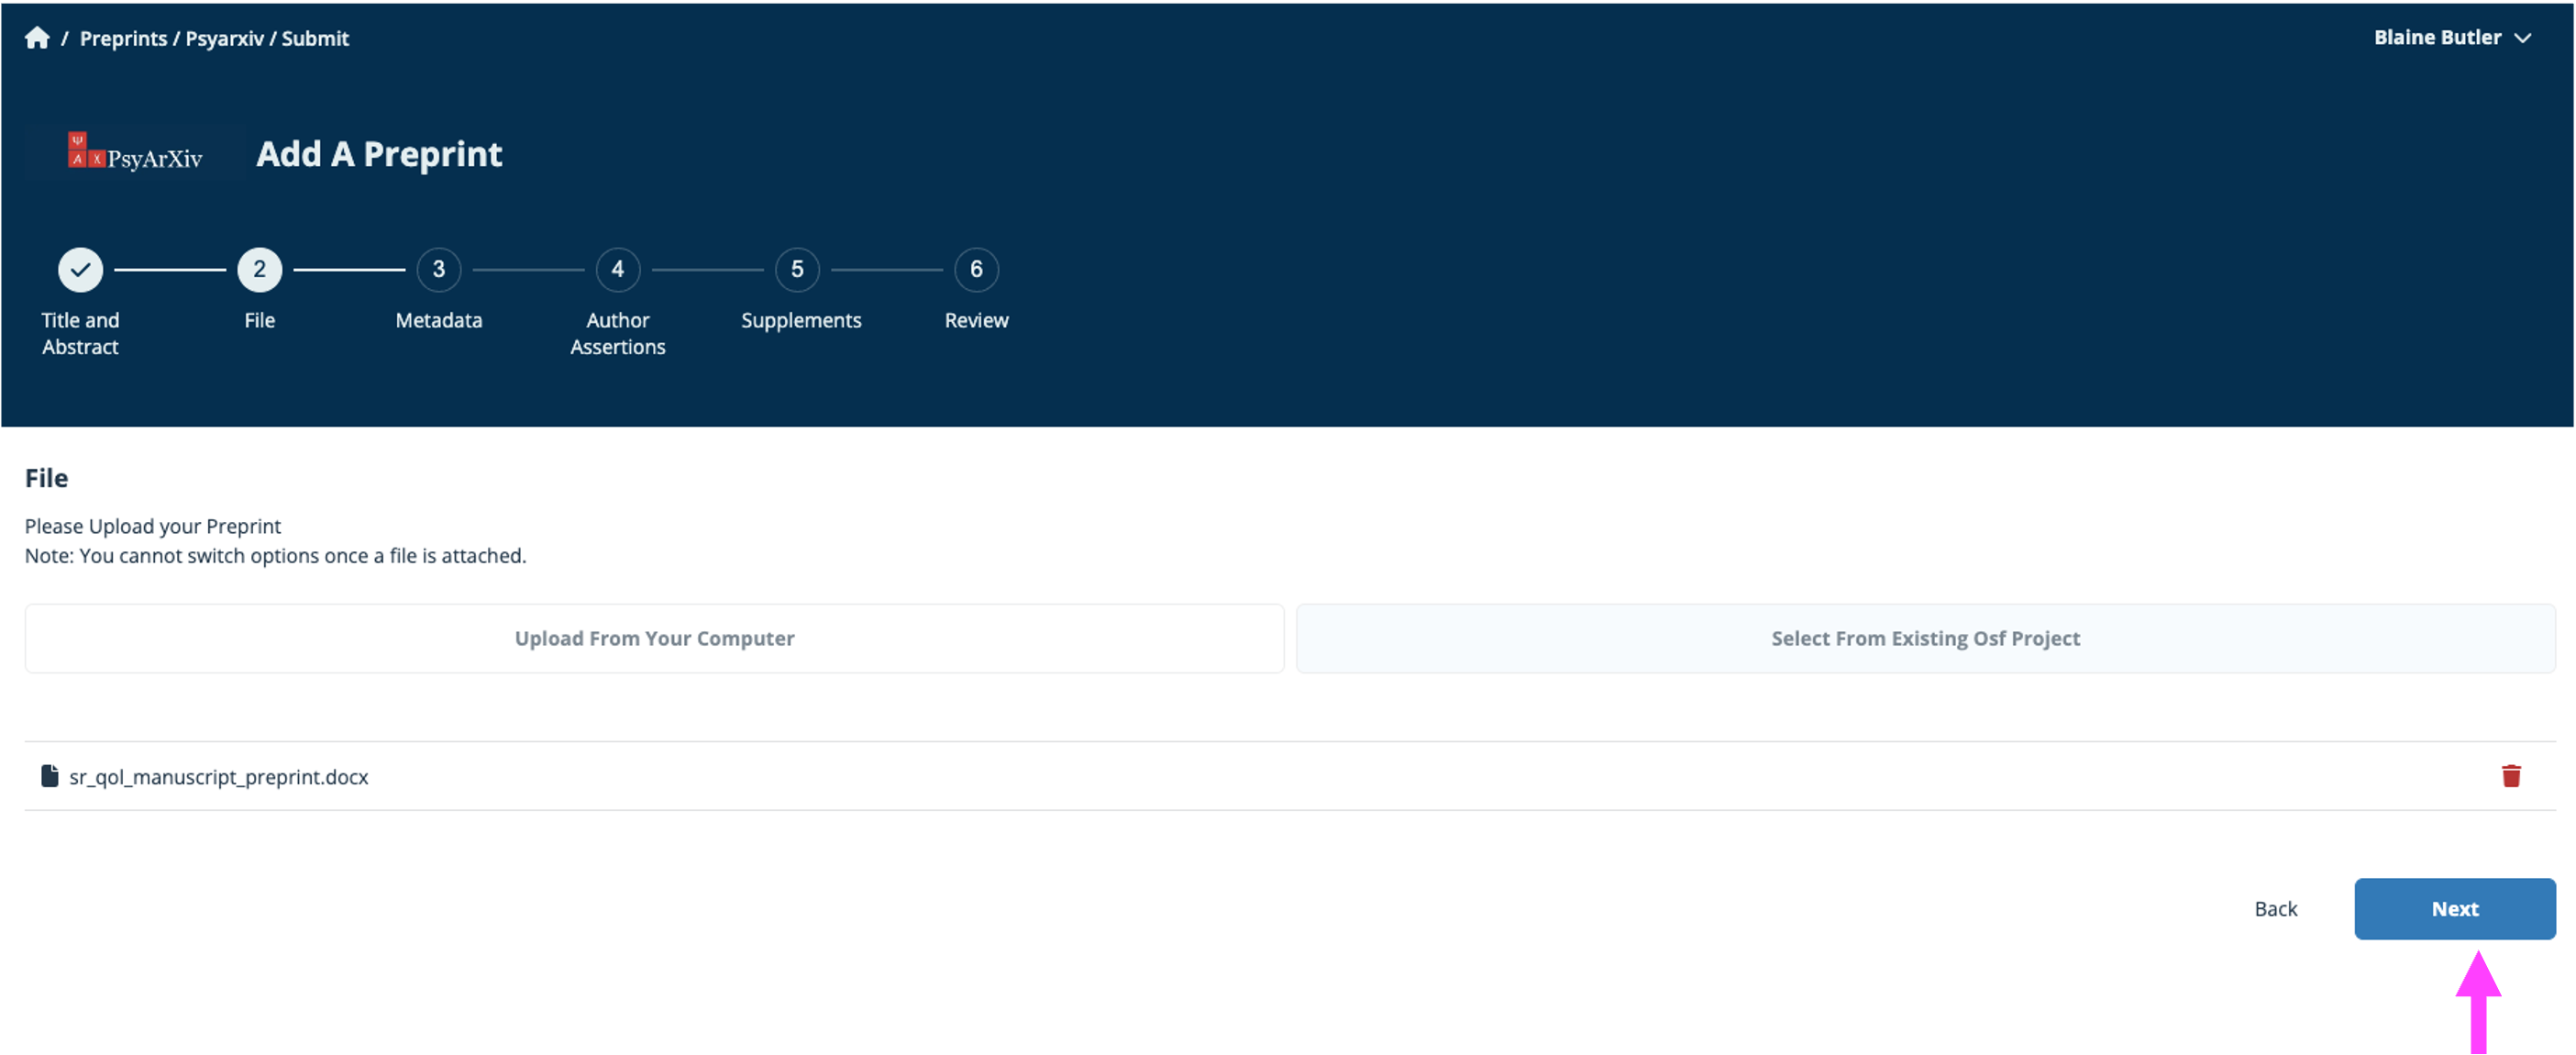
File : Upload the File from Your Computer

- Select “Upload From Your computer”
- Select “Upload file”
- Navigate to the file you want to upload
- Once you have selected the file you want to upload, select “Next”.
- You should see the file in the file section, verify that the correct file is there, then select “Next”.
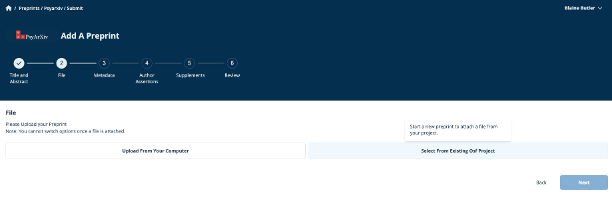
Upload the File by selecting from an existing OSF Project
-
Select the Project containing the preprint file you want to upload.
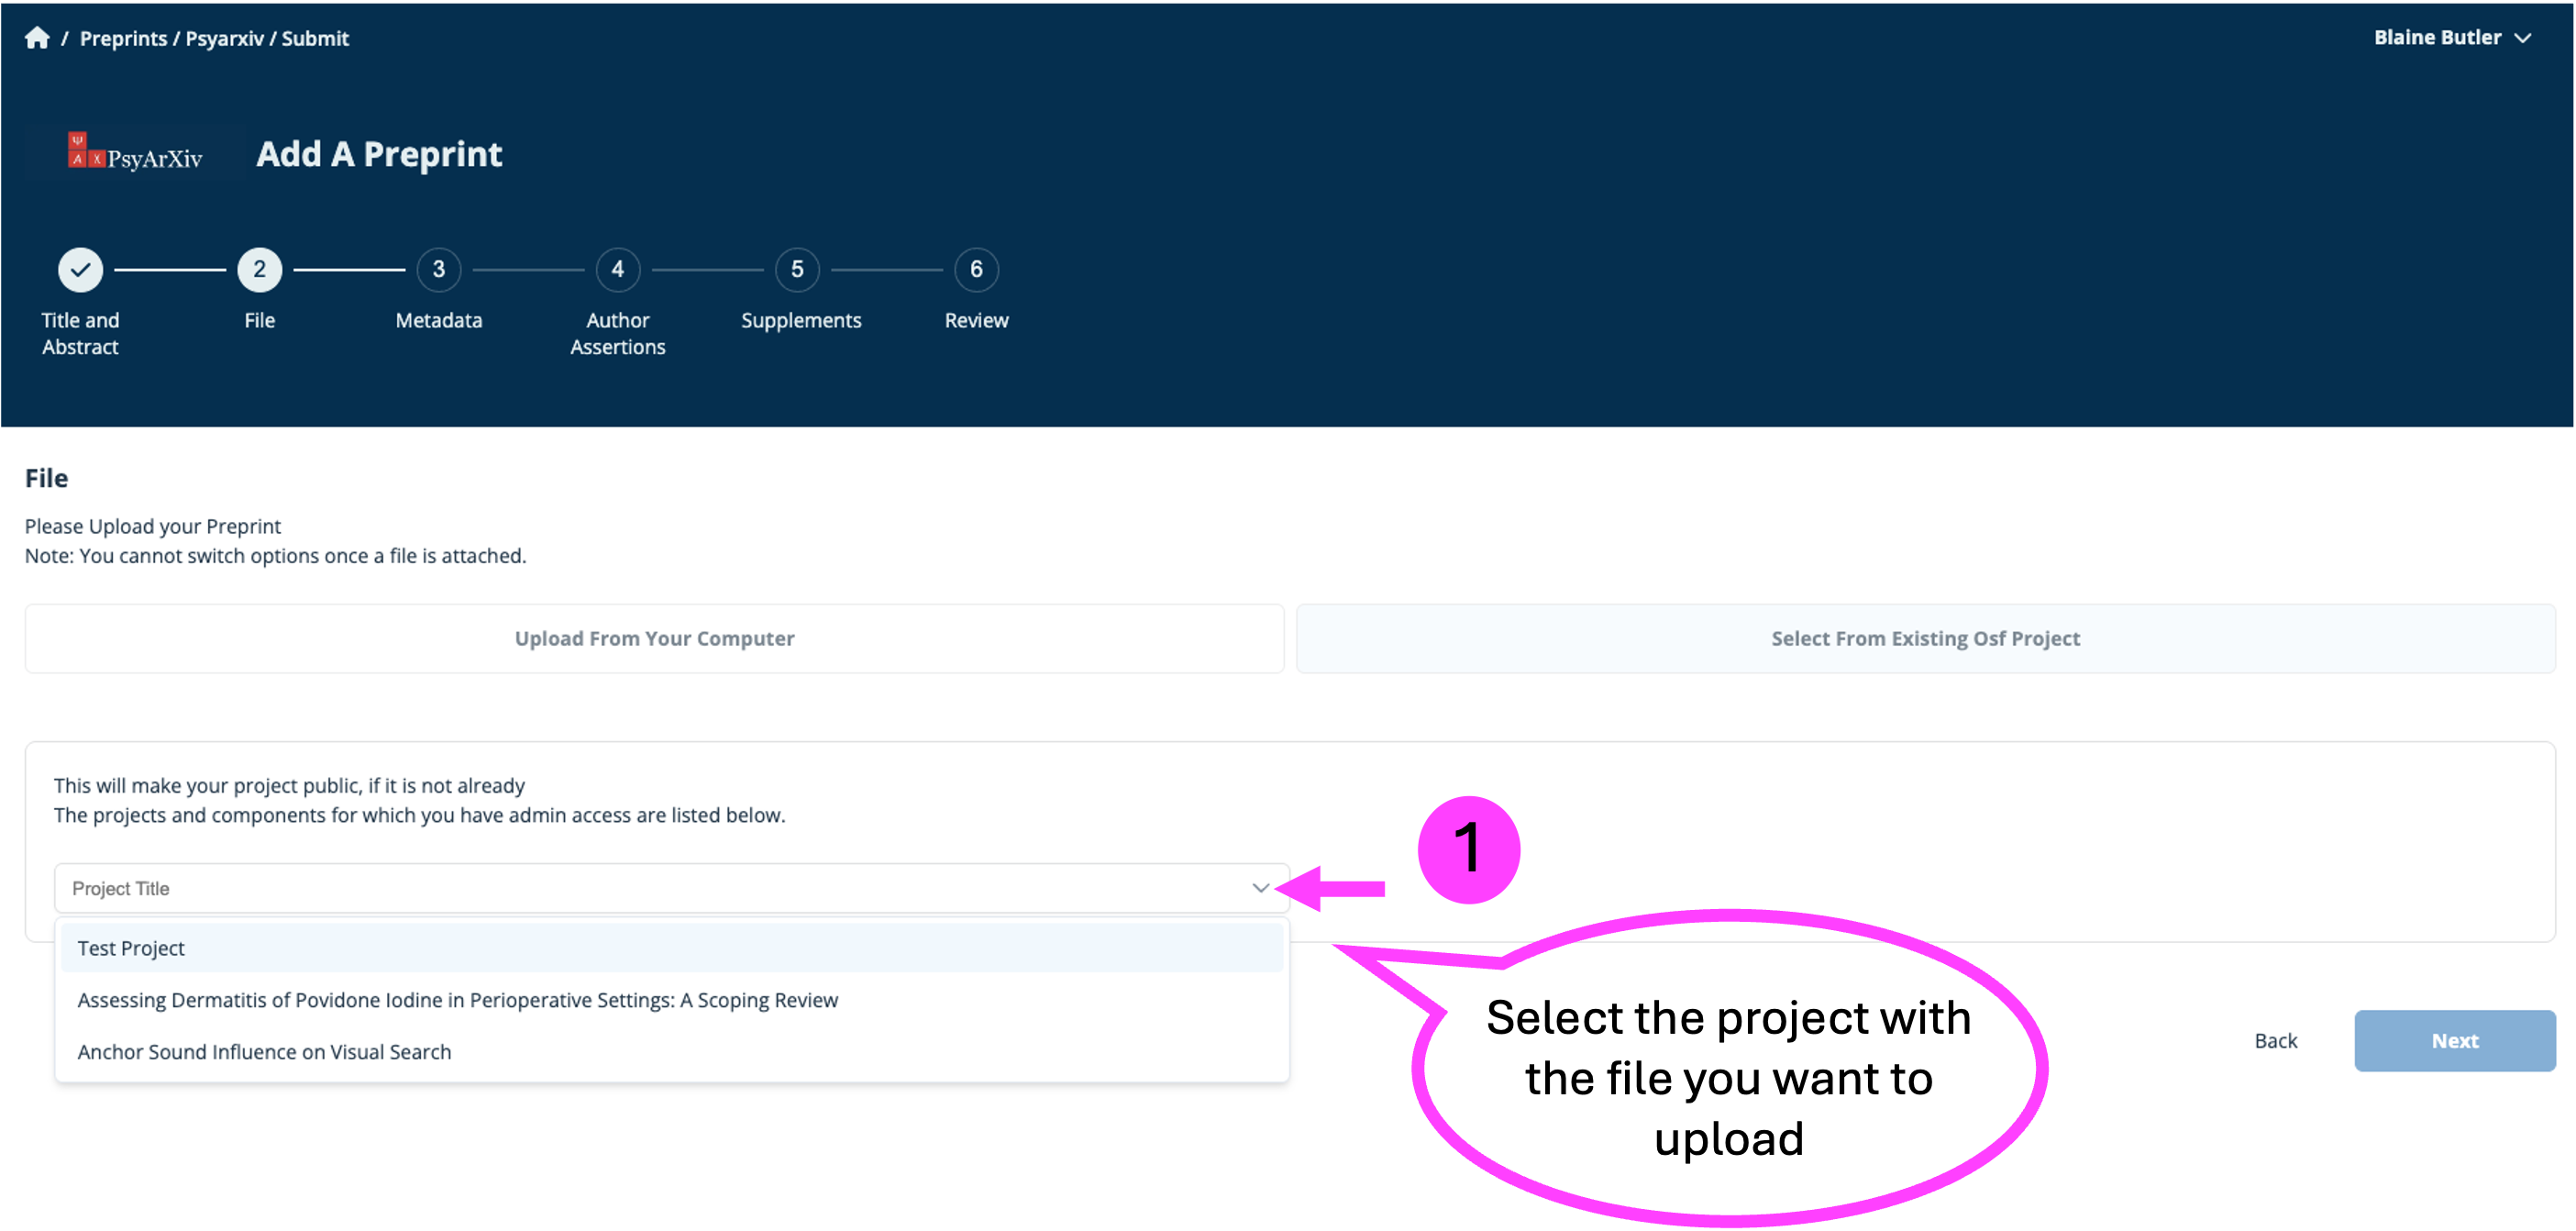
-
Select the file that you want to upload
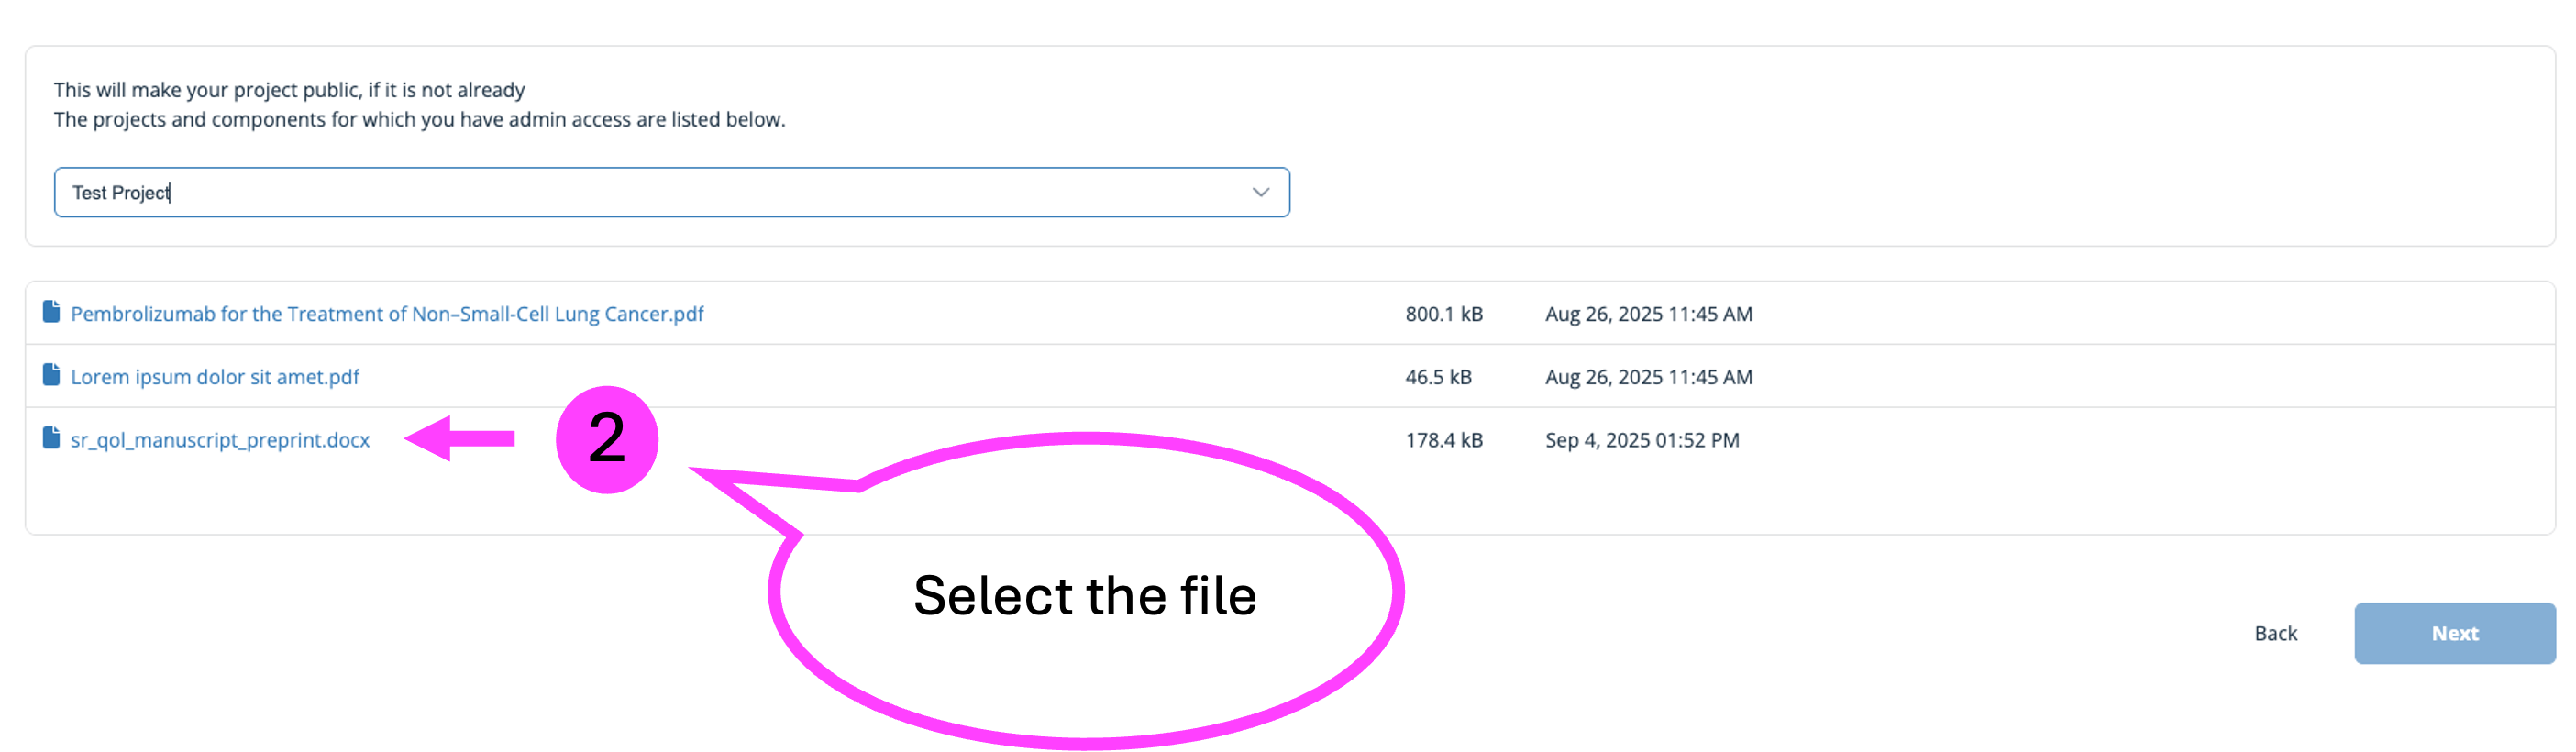
-
You should see the file in the file section, then select “Next”


Metadata
Metadata is identifying data about your work and is used to help other researchers find, cite and identify appropriate studies. This includes: Contributors, Licenses, Institutional Affiliations, Subjects, Tags, and any associated DOIs for published articles.
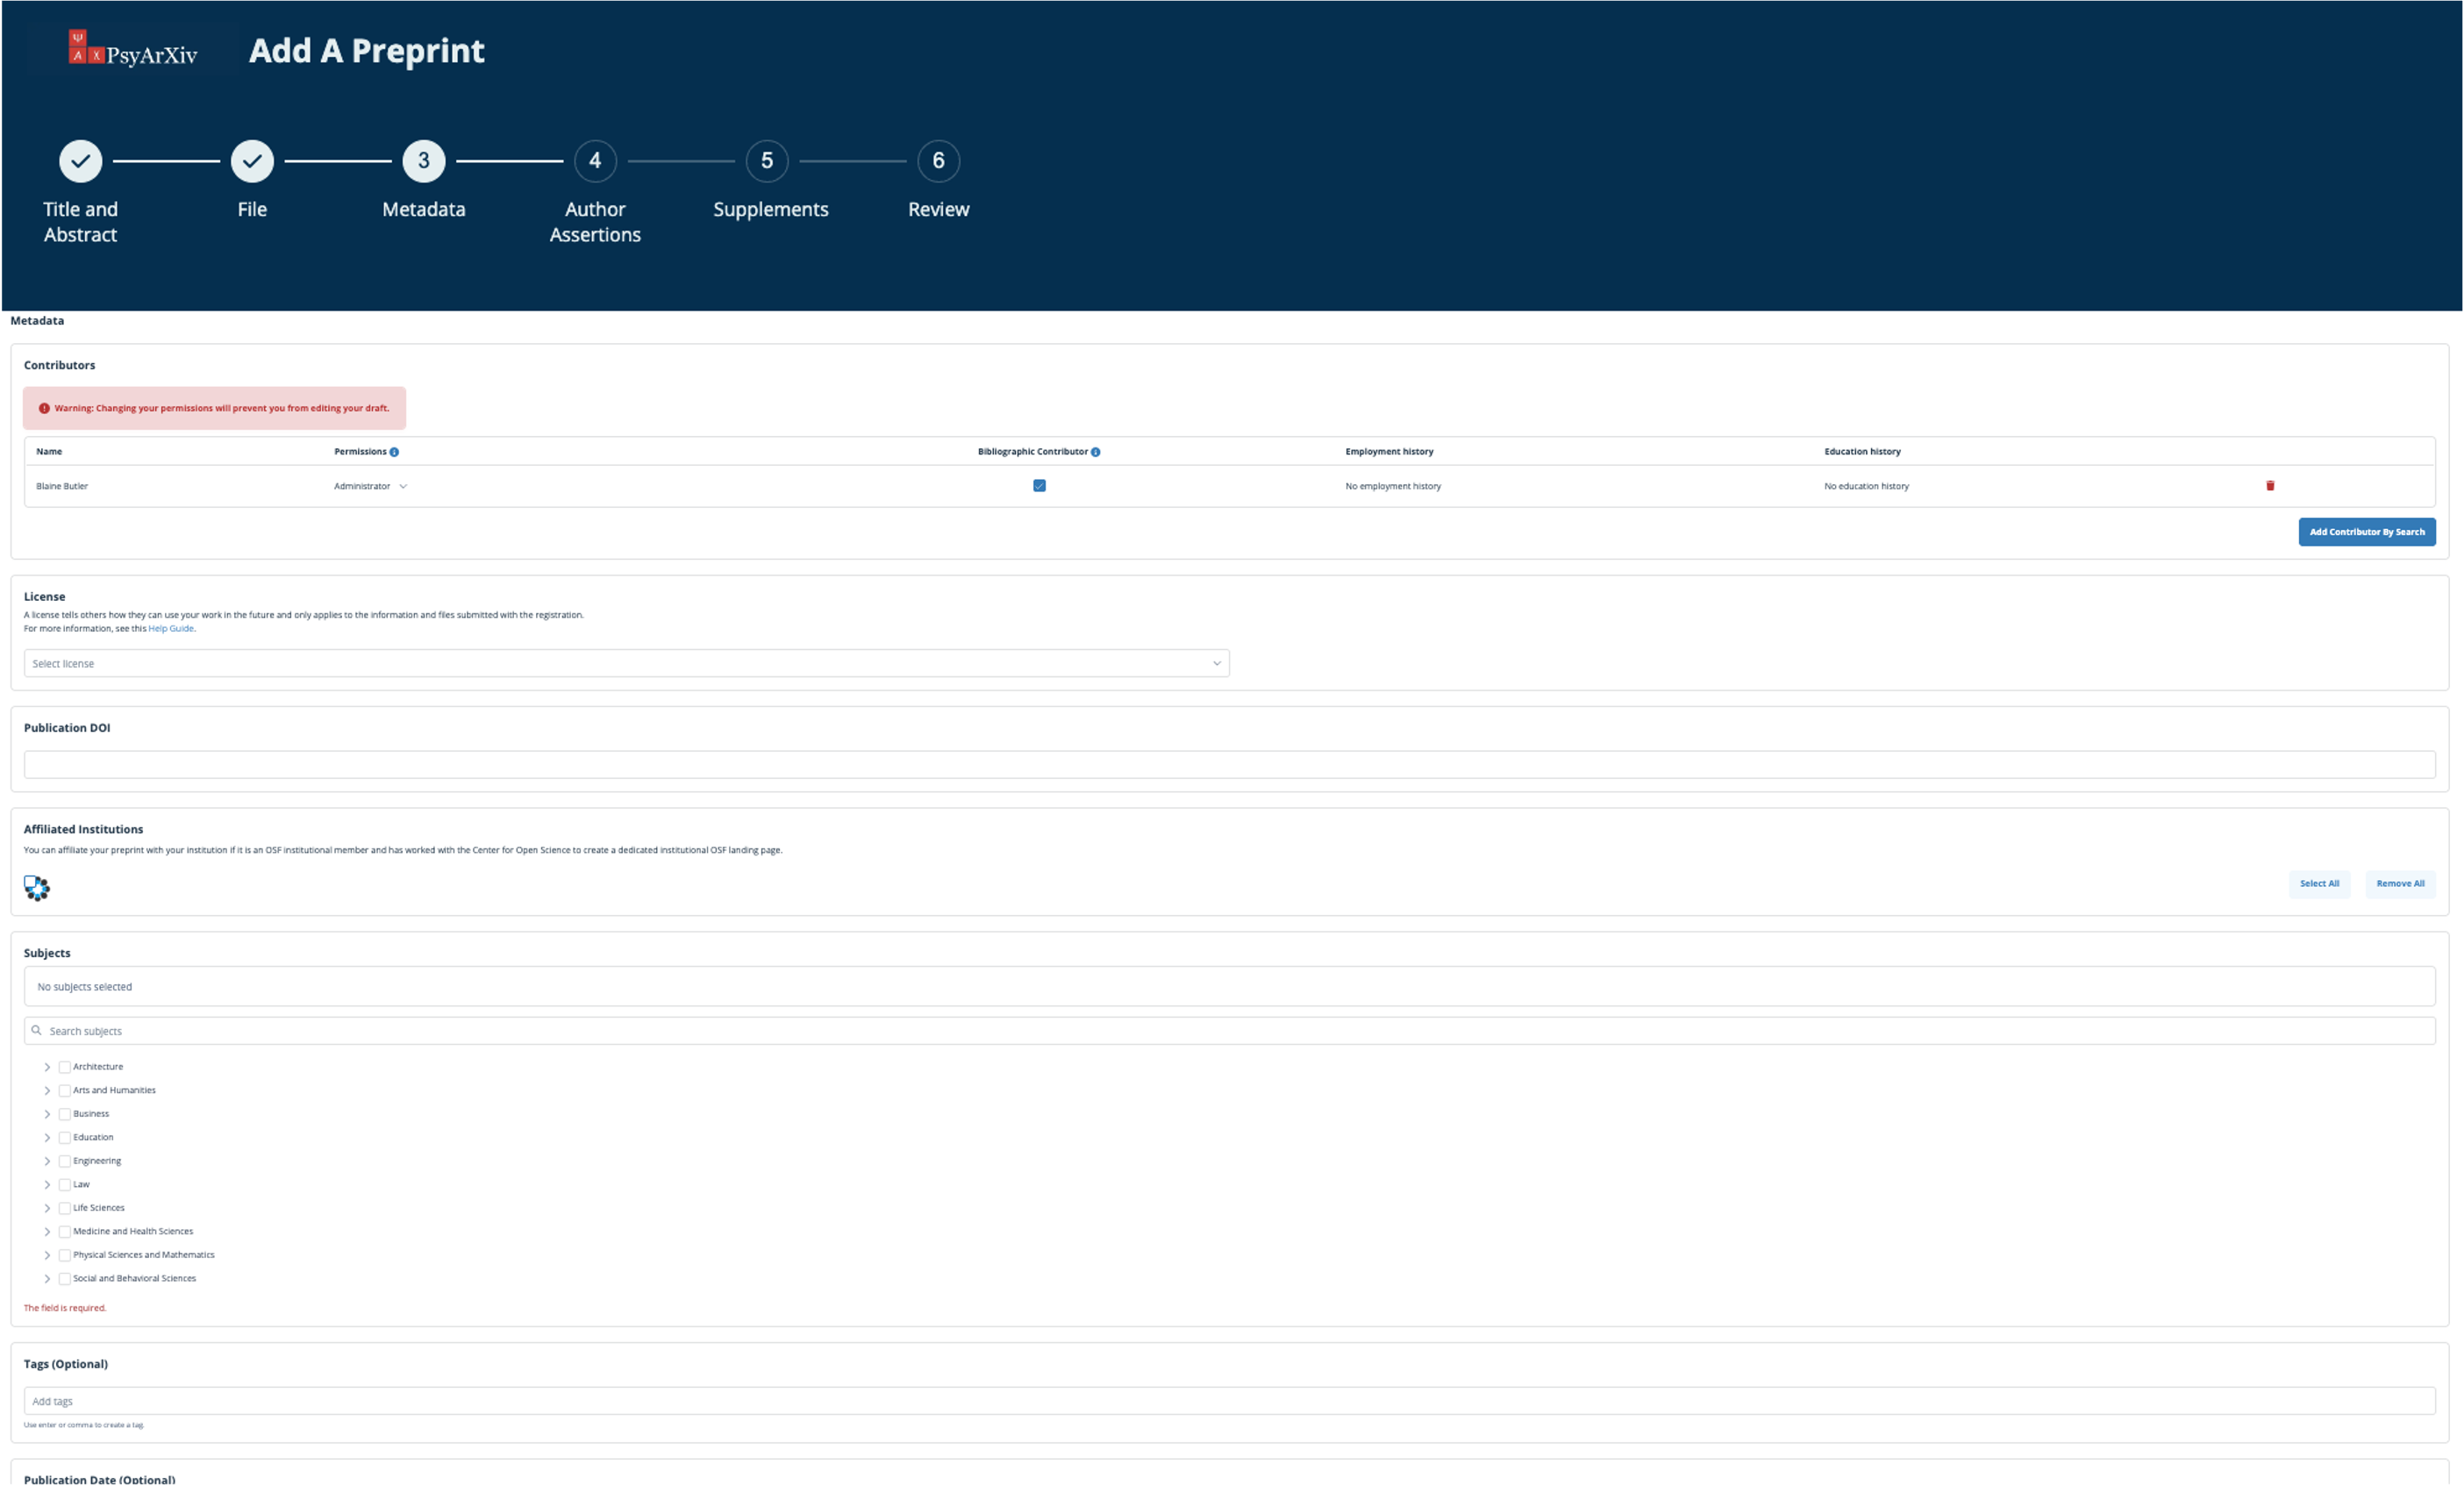
Contributors
You can add other co-authors at this time, whether or not they already have an OSF account.
When adding contributors, they will need to be assigned specific permissions. All co-authors are given read+write permissions by default. All permission levels can be bibliographic contributors, a non-bibliographic contributor will not have their name associated with the preprint, but will maintain the granted permissions. The different levels of permissions are:
- Read: The contributor can view the preprint but does not have permission to edit.
- Read + Write: The contributor can view the preprint but does not have permission to edit. The author can add supplemental files.
- Administrator: The contributor can view and edit the preprint, add supplemental files, and manage authors and permissions.
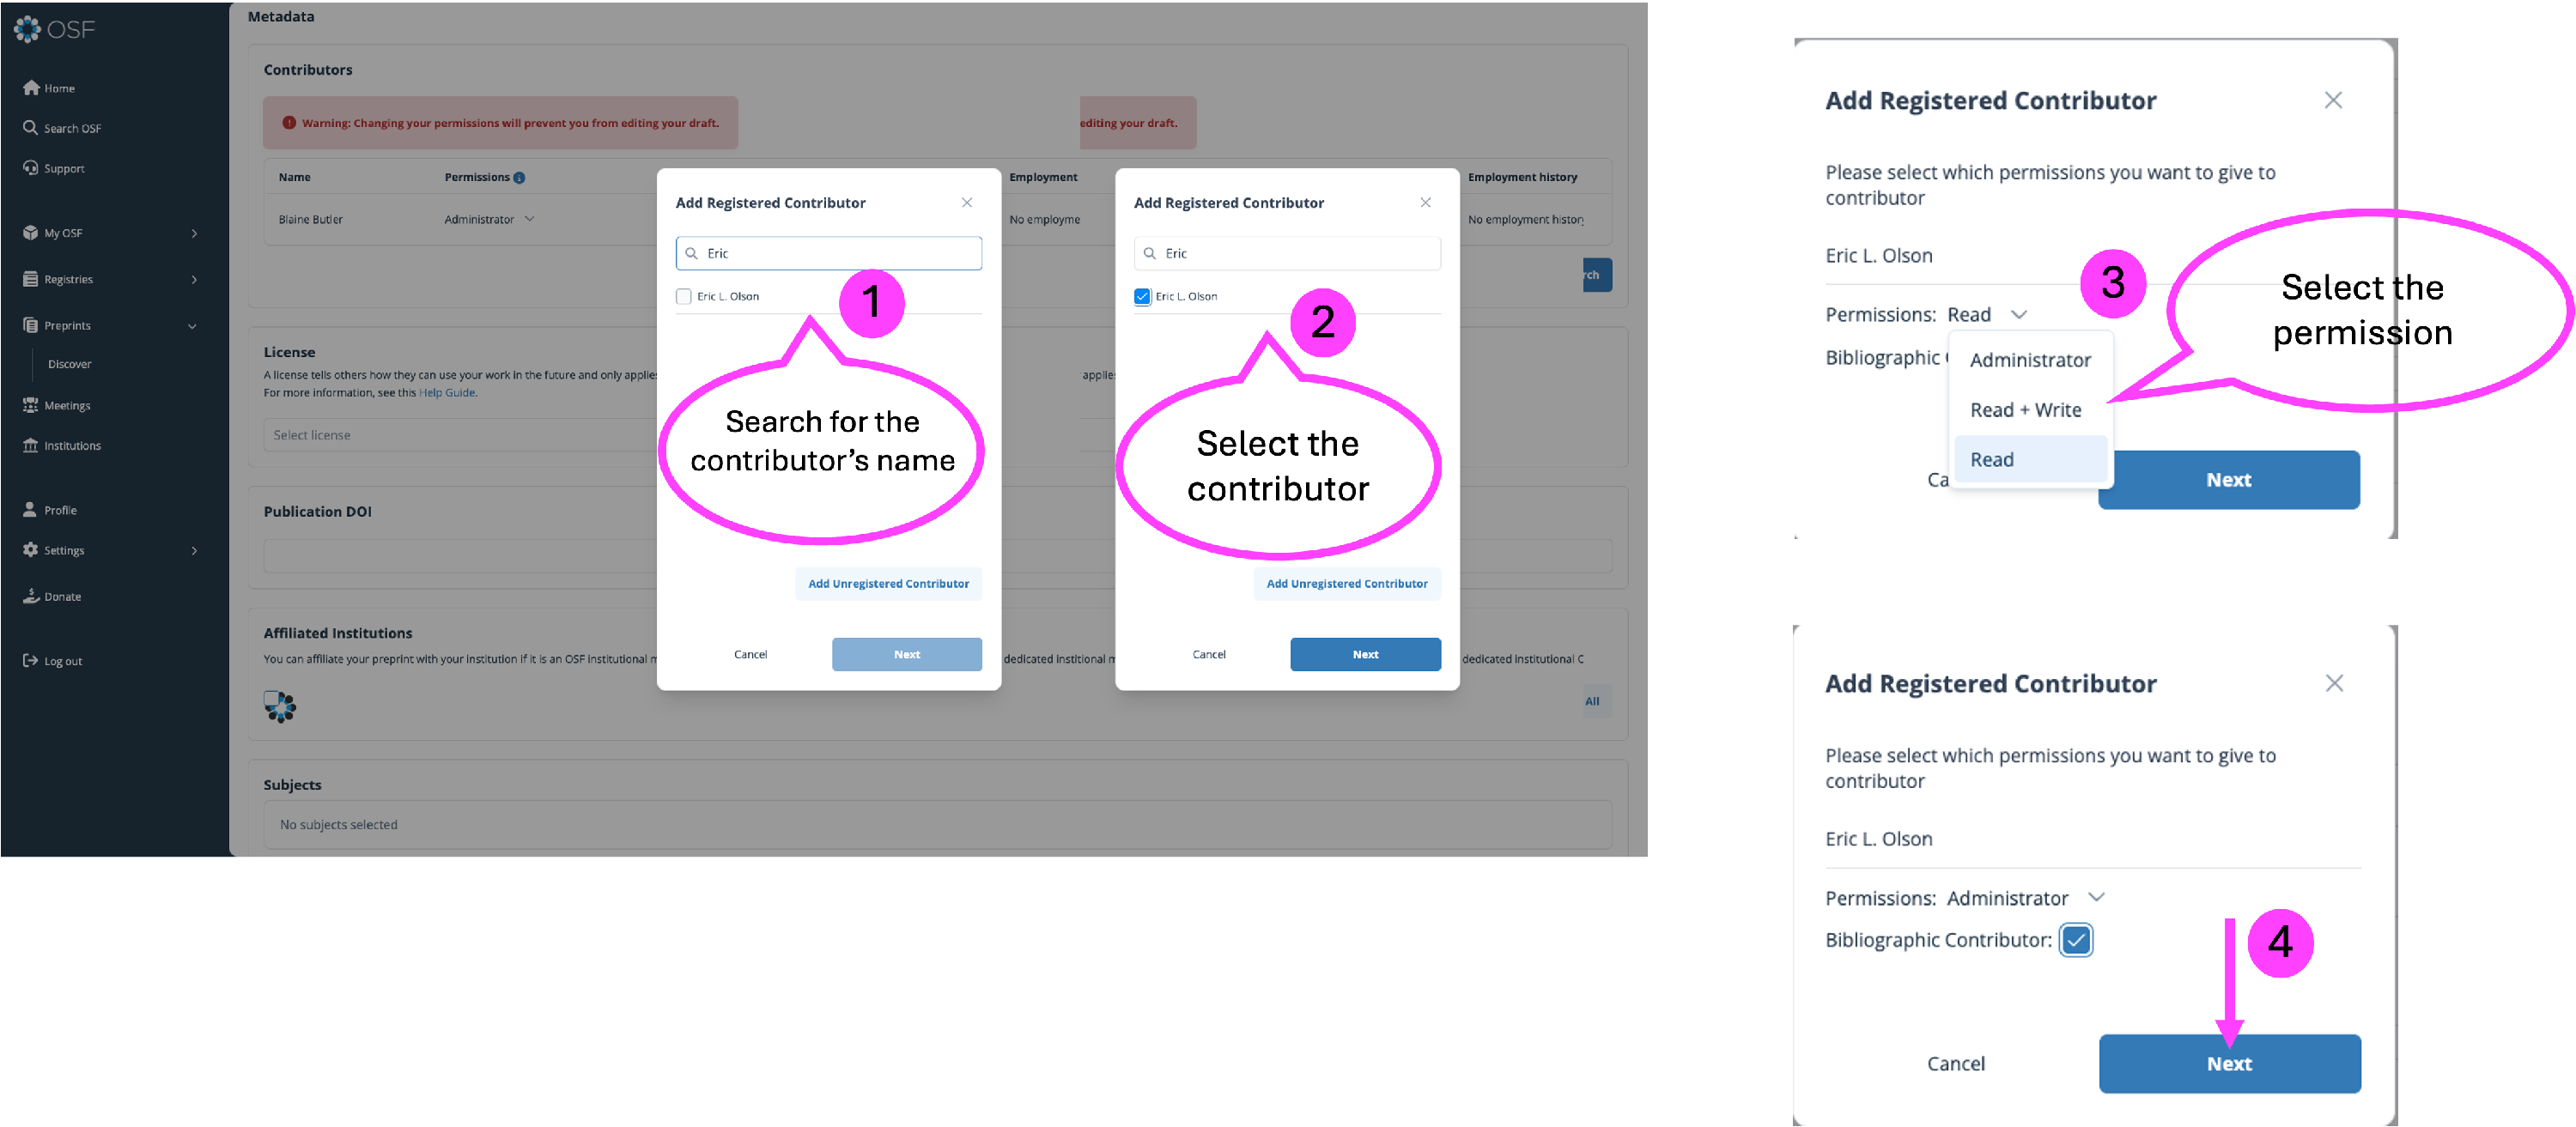
If a co-author already has an account, they can be added as a registered user. Select “Add Contributor by Search”
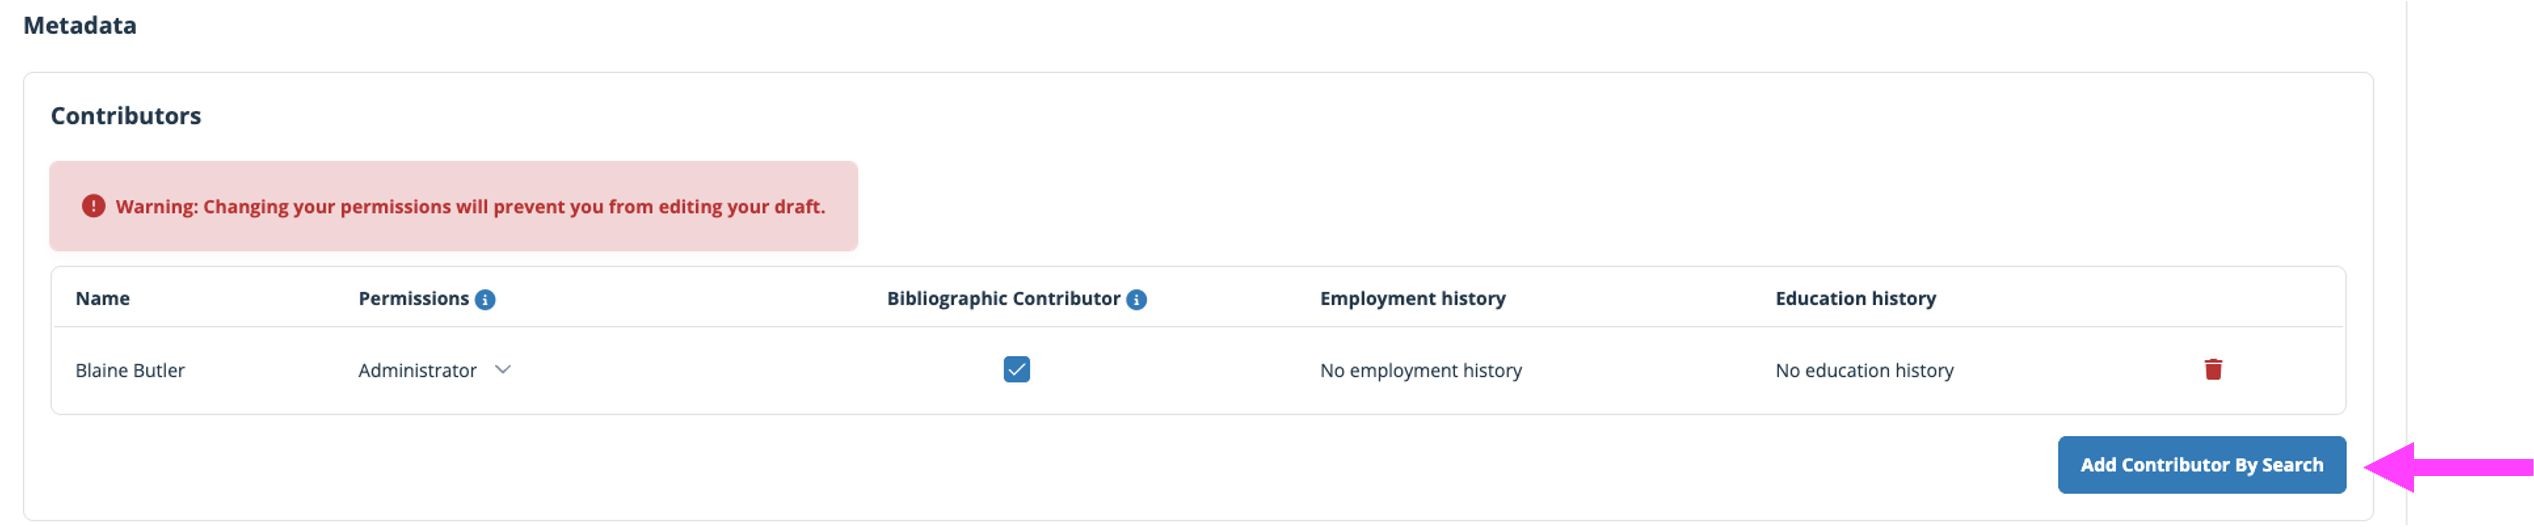
- Then search for the contributor by name.
- Select the contributor.
- Select the appropriate permissions.
- Select "Next".
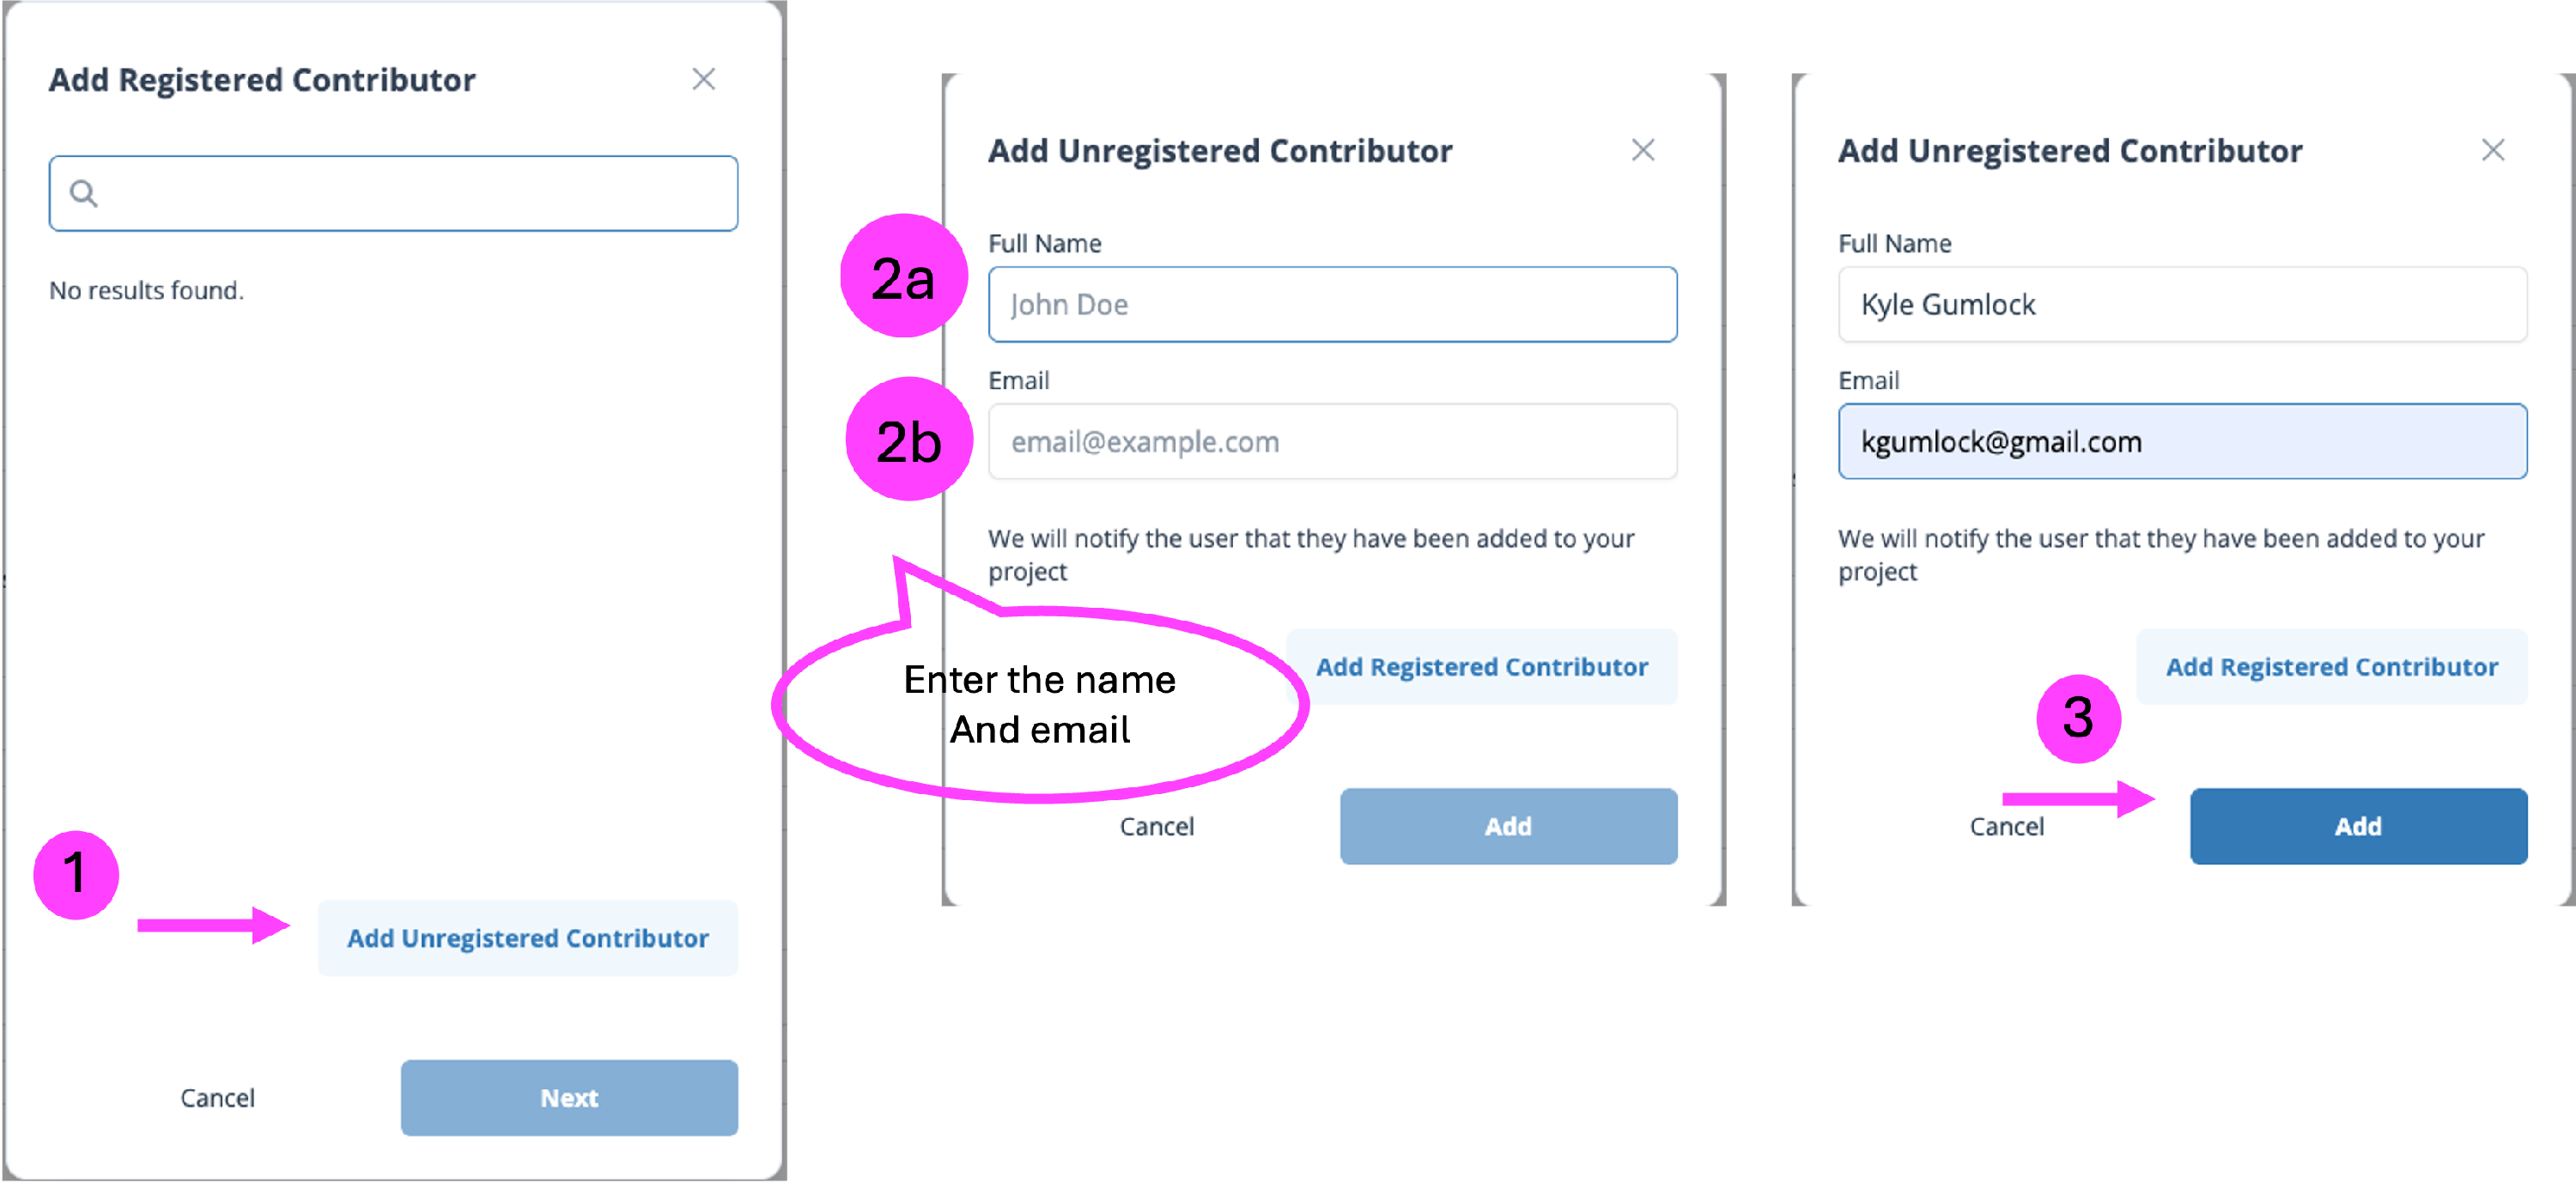
To add an unregistered contributor:
- Select “Add Unregistered Contributor”
- Enter the a) contributor name and b) email address.
- Select “Add”
You can remove contributors using the RED trash can, edit permissions by selecting the clicking the {V} arrow button, and change bibliographic status.

Reorder Authors
The order in which your authors appear in the "Authors" list is the order in which they will appear in citations. To reorder authors, click the icon with three bars, then drag and drop the authors into the correct order.

License
A license tells others how they can use your work in the future and only applies to the information and files submitted with the registration. For more information, see this help guide.
Select a license by clicking the dropdown menu and selecting an option.

Affiliated Institutions
OSF institutions are a pay-for-service tool for universities and research institutes to house, aggregate, and develop a community among their researchers. As a researcher, if you are a part of one of these institutions, you can connect your preprint with your institution's branding by clicking the box.
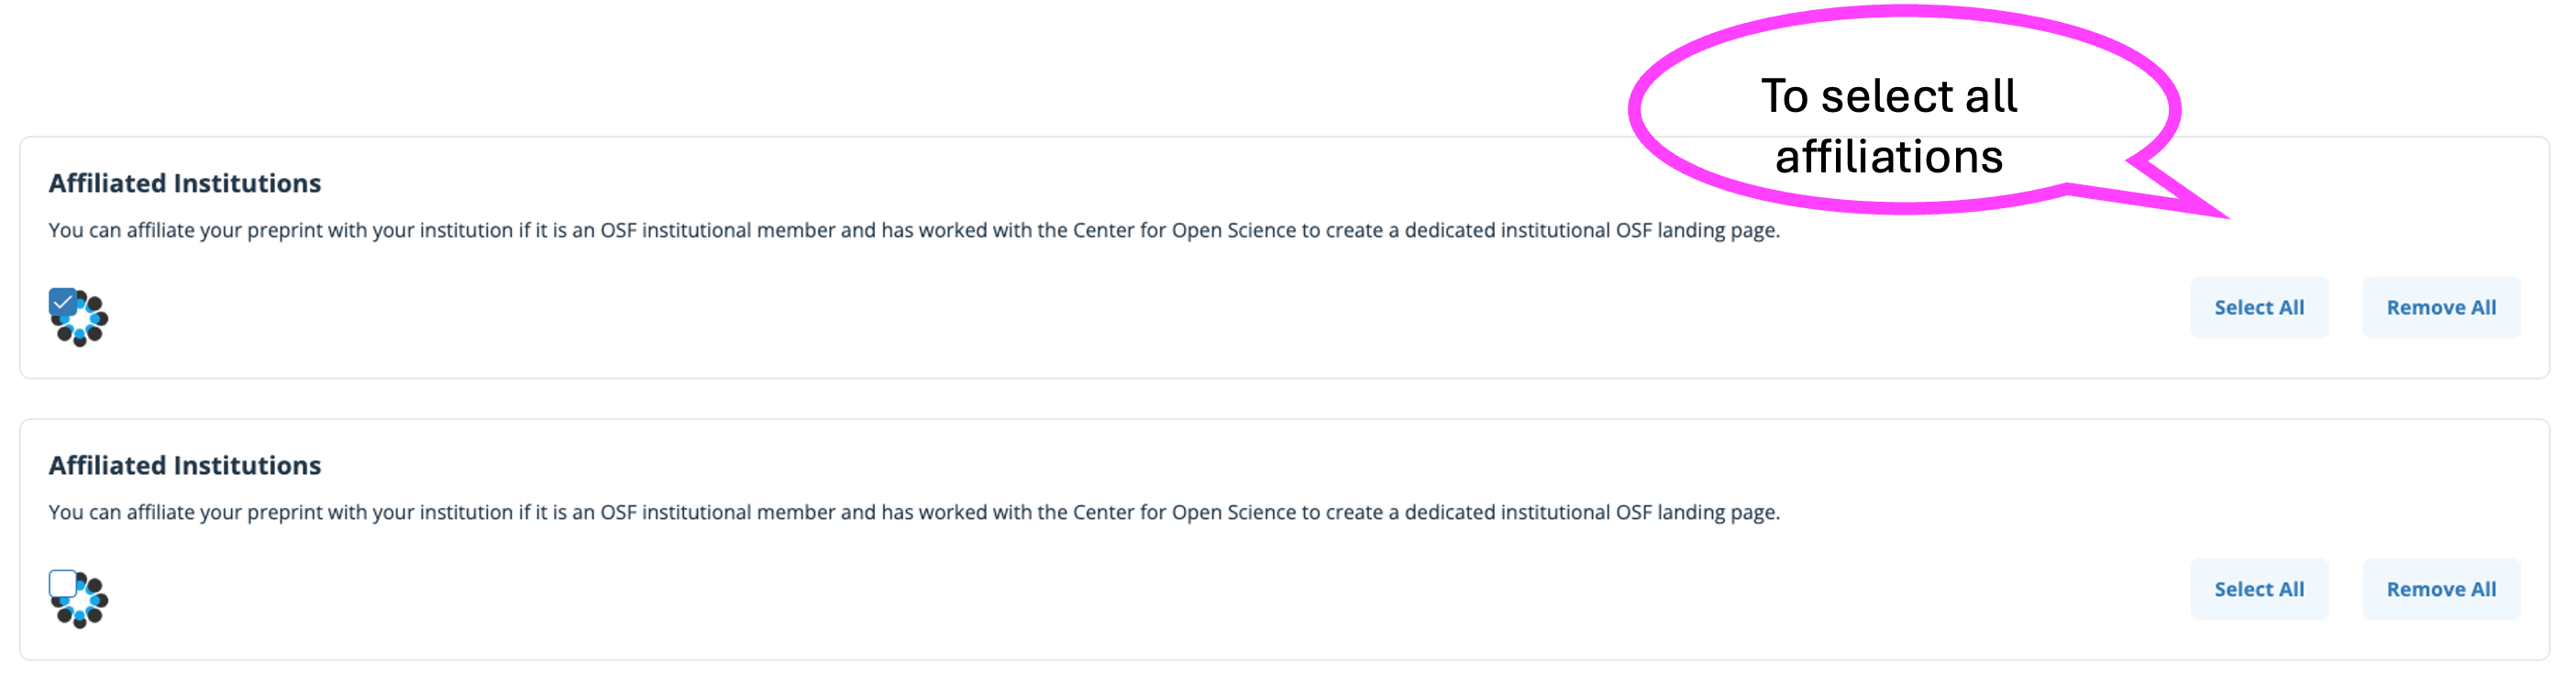
All of the institutions that are connected to your account (normally through an email domain) will display. If you need more information about connecting your institution to your account, please see the institution section
Subjects
Subjects allow users to categorize their work for easier search and identification by other researchers. You can use the Search field to find more subject areas.

Tags (Optional)
Tags are an excellent way of highlighting keywords to help your work appear in a researcher's search criteria. Start with the generic terms associated with your project (ex. Virology) and work towards more specific terminology (Covid-19).

Publication DOI (Optional)
Have you already published this preprint in a peer-reviewed journal? You can provide the DOI number. This information can be added/ edited after the submission of the preprint.

Publication Date (Optional)
Have you already published this preprint in a peer-reviewed journal? You can provide the Publication date. This information can be added/ edited after the submission of the preprint.

Publication Citation (Optional)
On each preprint service homepage, you can select the green “Submit a preprint” Button and start the submission process to that specific preprint service.

Author Assertions
Author assertions about the availability of associated public data, associated preregistrations, and disclosure of any Conflicts of Interest (COIs) increase transparency for readers and make it easier for readers to find the associated data underlying your preprint. Please note that not all preprint providers require author assertions as part of their submission process.

Conflict of Interest
Conflict of interest (COI) disclosures increase transparency for readers. Examples of potential conflicts of interest include: financial involvement in any entity, such as honoraria, grants, speaking fees, employment, consultancies, stock ownership, expert testimony, and patents or licenses. COIs can also include non-financial interests such as personal or professional relationships or pre-existing beliefs in the subject matter or materials discussed in this preprint.
The COI assertion is made on behalf of all the authors listed for this preprint.
Do you have a Conflict of interest disclosure to assert for this preprint? Select Yes to disclose any conflicts of interest (COI).

If No is selected, the authors assert that there are no COIs.
Public data
If any of the data used in the analyses in your preprint are publicly available, select Available to indicate this. A box will appear for you to enter link(s) to your publicly available dataset(s). If your preprint involves multiple datasets posted at different URLs, click the ‘plus’ icon to add more boxes. Only put one URL per box.


If No is selected, the author asserts that data associated with analyses in the preprint are not publicly available. A required text box will appear. Use this box to give more information about why data is not publicly posted, or how others might access the data if it is available under limited circumstances (e.g. after signing a data-sharing agreement).

Public Preregistration
If you registered or Pre-registered your study prior to your preprint and they are publicly available, select Available to indicate this. Two boxes will appear, one to help you indicate the type of registration you created (Analysis Plan, Study Design, or Both), and the second to provide a link to that registration/ pre-registration. A box will appear for you to enter link(s). NOTE: Must be a valid URL, to your publicly available dataset(s). If your preprint involves multiple registrations, Click the “Add another” to link to another. Only put one URL per box.

If you have a registration or pre-registration that is not publicly available (it may be embargoed), select “Unavailable” and describe why.

If Not Applicable is selected, the author asserts that no analyses are reported in the preprint, and so there is no data that could potentially be made publicly available.

Supplements (Optional)
This is an optional stage to connect any associated data, codes, protocols, or other supplementary materials found on an OSF project that help inform the preprint.
You can either: 1) connect an existing OSF project, or 2) create a new OSF project.
Connect an existing project
After clicking “Connect And Existing OSF Project”, choose one of your existing projects from the drop-down menu, to connect the project click on the project title when highlighted. Then select “Next”.


Create a new project
If you are looking to create a new OSF project to connect to your new preprint submission, start by clicking the “Create A New OSF Project” button. A pop-up window will appear. Fill out your #1 project title, #2 Storage Location, #3 Affiliation, and #4 then click the “Next” button.

Review & Submit
Once you have reviewed and confirmed your information, click the blue “Submit” button

After submission, your preprint will enter moderation. More information on the moderation process can be found in our preprint moderation guide
Managing Preprints
Now that you have uploaded your preprints, you can manage them with the following instructions. Please see our help guides below and a sneak preview to help with your preprint goals.
Navigate to Your Preprints
After submitting a preprint, your preprint submissions will be aggregated in a central location for ease of access and navigation.
First, sign in to OSF. Then, from your Dashboard, under “My OSF” select “My Preprints”.

Resubmit a Rejected Preprint
If your preprint is rejected by a moderator with instructions on how to make it suitable for acceptance, you can resubmit it. 1) View the moderators feedback. 2) Then if you only need to make changes/edits to the metadata select "Edit and resubmit", 3) If you need to upload a new file, select "Create New Version".

Review moderator feedback
Select the text "Show moderator feedback"
A pop up displaying the moderator feedback will be displayed, NOTE: this is only available to admin contributors on the preprint.

Edit and Resubmit
If you need to make changes to the metadata, such as contributor order. Go through the Edit preprint process and submit again.

Create New Version
If you need to upload a new file including minor changes to the preprint cover page, this option will allow you to do that.

You will then be able to edit all the pieces of your preprint: Title and Abstract, File, Metadata, Author Assertions, and Supplements.
Delete a Preprint Draft
If you need to delete a preprint draft you can do that by selecting the "Delete" button on the bottom of the preprint page.
- On the New Version Page select "Delete".
- Confirm you want to Delete your draft.
You can create a new version with a different file after deleting this draft.

Edit Your Preprint
You can edit your preprint to update its title, version, subject, license, abstract, DOI, and authors. To edit your preprint navigate to the preprint and select the “Edit Preprint” button. NOTE: Changes made during the Edit workflow are automatically saved without requiring "submit".

You will then be able to edit all the pieces of your preprint: Title and Abstract, Metadata, Author Assertions, and Supplements, except for the file.

Edit Publication DOI (Optional)
Do you need to add the published peer-reviewed version of this preprint? You can provide the DOI number. This information can be added/ edited after the submission version of this preprint.

Edit Contributors
"Metadata" Section in the Edit Preprint workflow
Contributors
You can add other co-authors at this time, whether or not they already have an OSF account.
When adding contributors, they will need to be assigned specific permissions. All co-authors are given read+write permissions by default. All permission levels can be bibliographic contributors, a non-bibliographic contributor will not have their name associated with the preprint, but will maintain the granted permissions. The different levels of permissions are:
- Read: The contributor can view the preprint but does not have permission to edit.
- Read + Write: The contributor can view the preprint but does not have permission to edit. The author can add supplemental files.
- Administrator: The contributor can view and edit the preprint, add supplemental files, and manage authors and permissions.
If a co-author already has an account, they can be added as a registered user. Select “Add Contributor by Search”
- Then search for the contributor by name.
- Select the contributor.
- Select the appropriate permissions.
- Select "Next".
To add an unregistered contributor:
- Select “Add Unregistered Contributor”
- Enter the a) contributor name and b) email address.
- Select “Add”
You can remove contributors using the RED trash can, edit permissions by selecting the clicking the {V} arrow button, and change bibliographic status.
Reorder Contributors
The order in which your authors appear in the "Authors" list is the order in which they will appear in citations. To reorder authors, select the icon with three bars, then drag and drop the authors into the correct order.

Create a New Version of a Preprint
Preprints hosted on the OSF (i.e. PsyArXiv, SocArXiv, etc) have been updated to include DOI versioning where new file versions will be given versioned DOIs to better align with best practices from the Crossref Metadata Working Group: preprint versioning (See our blog post), Crossref is the organization utilized by all preprints hosted on the OSF for minting preprint DOIs. This feature will also support emerging publishing models like MetaROR’s Publish, Review, Curate, which separate the traditional publishing process into distinct phases. This empowers researchers to confidently share their work, integrate feedback, and publish in innovative venues, such as overlay journals. Pre-moderated workflows are submitted to moderators for approval prior to becoming public. Therefore, each version of a Preprint must be accepted before an admin can “Upload a New Version”. NOTE: Only admin contributors are allowed to create a new version.
The URL/GUID for all versions of a preprint will have a version appended, including the first version. For example, the first version of a preprint will look like "https://osf.io/preprints/osf/abcde_v1", and subsequent public versions will have the version number increase.
NOTE: New versions with a different DOI will have their own analytics. This includes views and downloads.
Uploading a new version of the preprint file will create a new timestamped version of your preprint using the same URL as the original. The new preprint version will have its own distinct Digital Object Identifier (DOI), and each version will be accessible through the interface.
To do this, navigate to your preprint. Then select “Create New Version”

You will then be able to upload a new file for the preprint.

Delete A Draft Preprint Version
If you need to delete a preprint draft you can do that by selecting the "Delete" button on the bottom of the preprint page.
- On the New Version Page select "Delete".
- Confirm you want to Delete your draft.
You can create a new version with a different file after deleting this draft.
Viewing previous versions of a preprint
Each version of a preprint, once approved by moderation, will be issued a DOI. This DOI can be used to connect your preprint to other works as part of your research project. For information on connecting your work see our connecting your work help guide.
Each version of a preprint is now accessible on the preprint detail page. To navigate to a previous version of a preprint, find “Preprint DOI” located in the right-hand column on a preprint page.
You can then select from the drop-down menu which version you would like to display. And then click the “View Version” link. Withdrawn versions will have a tombstone page that will also have a dropdown for viewing but will not show the withdrawn files, only the metadata.
You can download an active version of a preprint by selecting that version of the preprint and clicking the blue download button. The selected version will be downloaded onto your computer for you to read.
Withdrawing a Preprint
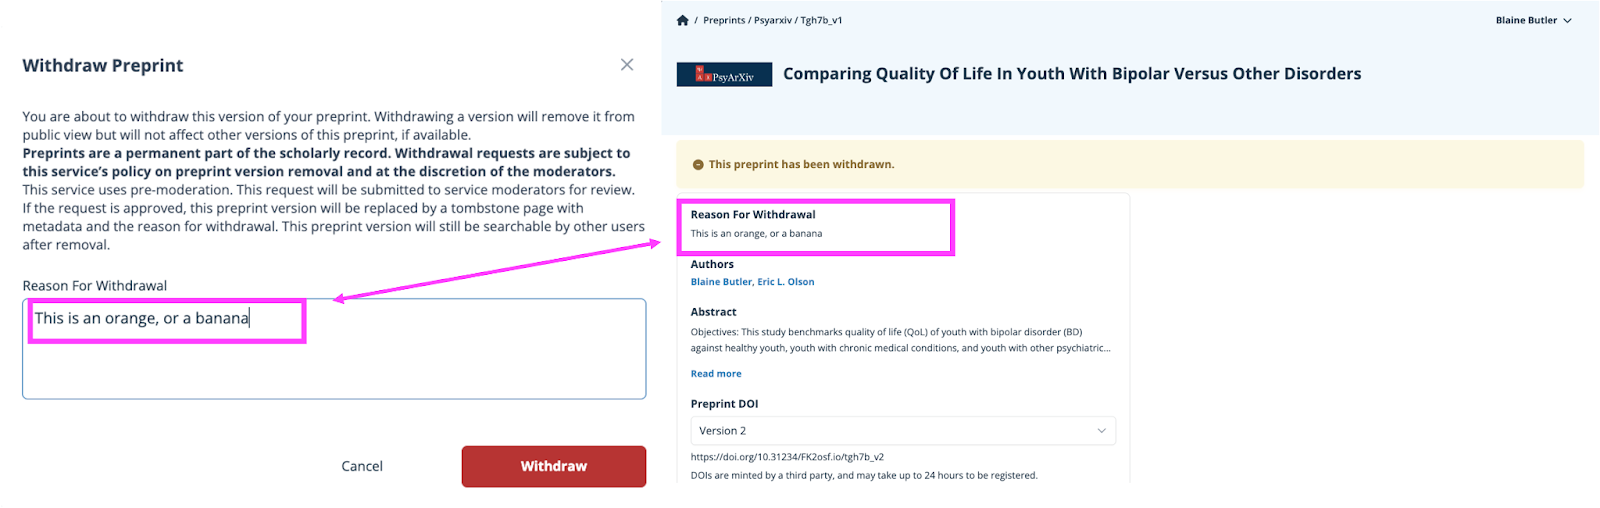
Because preprints are part of the scholarly record, they cannot be deleted. However, preprints can be withdrawn, removing the content but leaving behind basic metadata like title, authors, and the reason for withdrawal, if the author chooses to provide it. All pre-moderation preprints can be removed/withdrawn without moderator approval before the preprint has been accepted. If the request occurs before the preprint has been accepted there will not be a tombstone page, which is a special type of landing page describing the item that has been withdrawn, since a DOI has not been issued. Once the preprint has been accepted, moderator approval is required for withdrawal. All withdrawal requests for moderated services are approved at the discretion of the moderation team. To request a withdrawal. Navigate to the preprint page. Then select the “Withdrawal” button. Note: Only Administrators on a preprint can submit a withdrawal request.
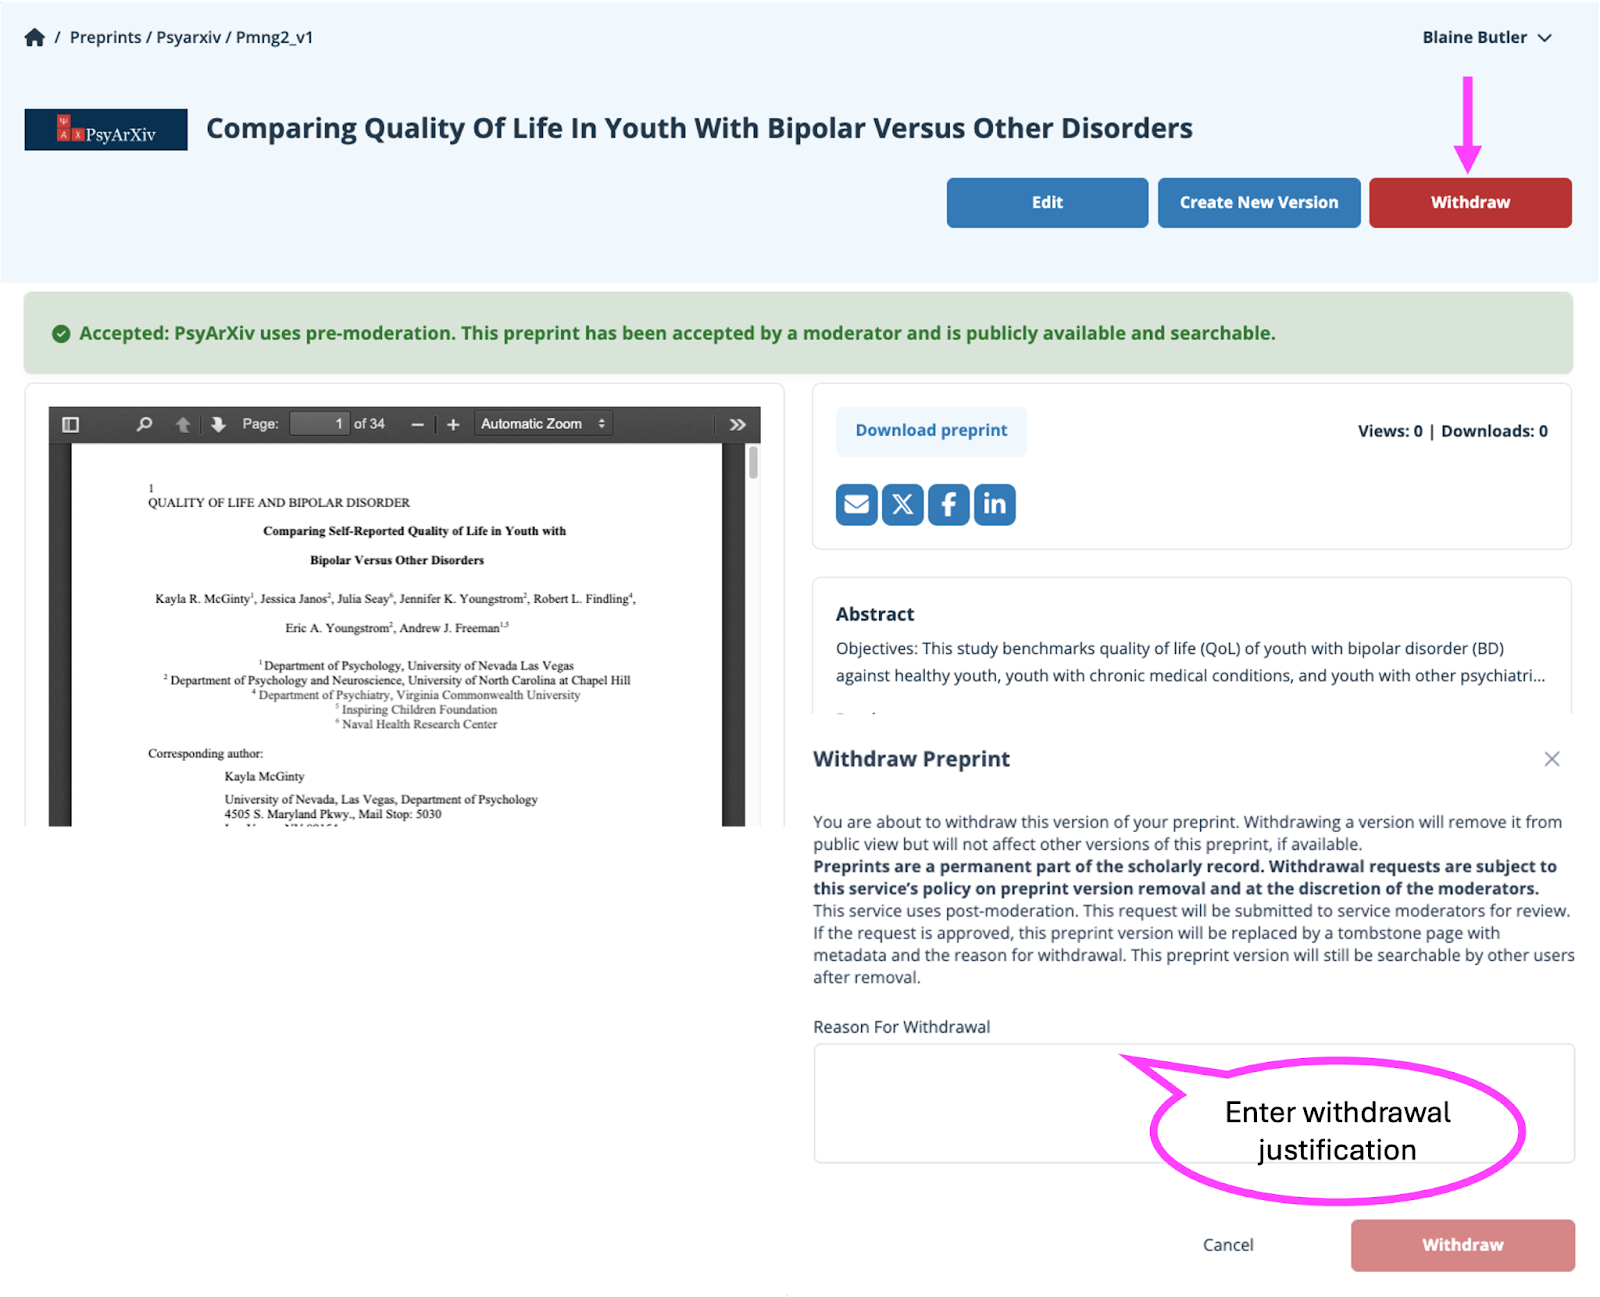
Once you have submitted your withdrawal request, the preprint will show pending withdrawal when you view it, however, this will not be viewable to anyone who is not a contributor.


NOTE: The language used in the "Reason for withdrawal" will be displayed on the withdrawal Tombstone page.
Submitting to a Moderated Preprint Service
Currently, all community-run preprint servers on the OSF use pre-moderation. Moderators using pre-moderation will accept or reject preprints upon submission. General preprint moderation policies can be found here.
Check a preprint service's submission guidelines (if available) in the footer to determine if your content is suitable for their service.
Pre-moderation
Submissions to a pre-moderated preprint service will be in a private, pending state until a moderator accepts or rejects them. Moderators may provide feedback. Moderators may be anonymous or may choose to share their identities.
Pending status
After you submit your preprint, a yellow banner will appear at the top of your preprint page with a "pending" status.

Accepted status
If your preprint is accepted, you will receive an email notifying you of the decision.
There will be a green banner at the top of your preprint page with an "Accepted" status that is visible only to the authors.

If the moderator has provided feedback, you will see a "Moderator feedback" button on the right side of the banner. Click this button, and the moderator's feedback will appear. Moderators may choose to be anonymous, in which case their name will not be listed.
Your preprint will be made public upon acceptance.
Rejected status
If your preprint is rejected, you will receive an email notifying you of the decision.
There will be a red banner at the top of your preprint page with a "Rejected" status.

If the moderator has provided feedback, you will see a "Moderator feedback" button on the right side of the banner. Click this button, and the moderator's feedback will appear. Moderators may choose to be anonymous, in which case their name will not be listed.

Your preprint will be removed from the preprint service upon rejection.
Cite Preprints
First, open the preprint that you want to cite.
Then scroll down to the "Citations" section on the right. APA, MLA, and Chicago styles are listed by default, click the carrot to display the citations.

Copy and paste the citation into your bibliography.

Generate other styles
To generate a different citation style, click inside the menu, and type in the citation style that you want to use.
The citation will be generated below the menu. Example: Cell.

Download Preprints
Each preprint is equipped with a download, and view counter. Please note that these counters exclude downloads and views by contributors of the preprint.
You can download preprints in two ways.
-
You can use the download button on the top right of the preprint detail page.
-
You can use a direct download link. The download link format is: https://osf.io/download/GUID_v1. For example, https://osf.io/download/q4emc_v1.

Preprint Analytics
Each preprint is equipped with a download, and view counter. Please note that these counters exclude downloads and views by contributors of the preprint.
Preprint views:
When a preprint is viewed by a user that is not a contributor to the project, the view count will increase by 1.
Preprint downloads:
When a preprint is downloaded by a user that is not a contributor to the project, the view count will increase by 1.

Preprint FAQs
What is a preprint? How are preprints good for my career? Where should I upload my preprint? Read these FAQs to Learn more about preprints and how they benefit your research.
Have a question that isn't answered on this page? Ask us at contact@osf.io or using the support center beacon.
What is a preprint?
A preprint is a complete manuscript shared with a public audience without peer review. Often, preprints are also submitted for peer review and publication in a traditional scholarly journal. Preprints uploaded to a community preprint server accelerate scholarly communication and public access.
Building Trust
Can a preprint be private?
No, all preprints are public unless the preprint is in moderation by a preprint service.
If preprints are intended to be public, why is my preprint private?
If your preprint is private, it is possible it has been flagged as SPAM. To have your preprint reviewed, please fill out our evaluation form on this support page.
Can I update my preprint? What else can I share?
New versions of a preprint can be uploaded to OSF Preprints so that authors and the public have access to the most current version and previous versions. Preprints have persistent URLs and can be cited. Supporting data and code can be shared alongside the manuscript. How to update a preprint edit your preprint.
Why do preprints exist?
Journal peer review can be a slow process. Rapid dissemination of research ideas and data benefits researchers, their funders, and the public. Preprints provide a mechanism for authors to receive more rapid feedback on their research.
Which communities support preprints?
Many communities support the sharing of preprints. For example, the physics community developed ArXiv over 20 years ago. BiorXiv and PeerJ are preprint servers primarily for the life sciences community. PsyArXiv, SocArXiv, Law Archive, and numerous other emerging groups have partnered with OSF Preprints to support preprint sharing in psychology, the social sciences, and engineering, respectively. You can access these community-run preprint servers through the OSF Preprints Discover page or by going to their individual preprint landing page. Find a preprint service.
What is the moderation process for community support preprints?
Preprint communities utilize pre-moderation workflows. Pre-moderation communities will review all preprint submissions prior to making them public on their site. Post Moderation communities will allow all preprints to be posted publicly immediately upon submission and the moderation team will review and remove any rejected preprints at a later date. Preprint community moderation teams often work on a volunteer basis, so please allow at least 2 weeks for the moderation teams to review the submission. Want to understand moderation better?
Why is it important that OSF Preprints is open source?
Our source code is free and open to the public to contribute to and use. Open source code has many advantages, including sustainability. The code base for the OSF and OSF Preprints is entirely open source, allowing other groups to contribute to and expand the platform.
What if I have a copyright claim on something posted to OSF Preprints?
The Center for Open Science complies with the Digital Millennium Copyright Act. If you feel your copyright has been infringed, please send notice to our designated agent, as laid out in Section 20 of our Terms of Use.
If I post a preprint, is it considered prior publication? Will I be able to publish my manuscript in a journal later?
Preprints are not generally considered as publications. Most journals will accept articles that have been shared as preprints; however, some journals will not. We recommend you check the journal’s policies on this matter prior to submitting an article that you have previously shared as a preprint. You can find information about most journal policies at https://openpolicyfinder.jisc.ac.uk
Can I add my publication DOI to my preprint?
Yes, you can add a publication DOI to your preprint on OSF. Edit your preprint metadata and include a publication DOI.
How should I license my preprint?
Open, non-restrictive licenses are available for you to apply to your preprint upon submission. Licencing is not mandatory, however, it is encouraged as it communicates to others how you want them to use and share your work. No license implies that you as the author hold full copyright, meaning no one can use or adapt your work without your permission.
choosealicense.com will help you decide which license to choose, depending on how you want others to use and share your work. You can further read the terms and conditions of licenses on Creative Commons. If submitting to a journal, you can look up the journal on https://openpolicyfinder.jisc.ac.uk to see which license they recommend you use. If the journal isn’t listed, you can consult the journal editors to seek their advice.
Motivation
Is sharing preprints good for my career?
Posting a preprint allows you to receive rapid feedback on your research and find a broader audience for your work. Since journal peer review can be slow, creating a preprint allows you to receive feedback and have impact immediately. And, by sharing a preprint openly, even those without access to paywalled journals can discover and read your work pre- or post-publication.
Won't I be scooped if I share a preprint before it's accepted for publication?
Posting a preprint can actually prevent scooping. Because preprints are time-stamped upon creation, you've established the precedence of your work by posting one.
Why should I use one of the community-run preprint servers on OSF Preprints for my preprint?
When you share a preprint on a community-run preprint server hosted on the OSF, you can easily share supplemental files like data and code with it. DOIs will be generated for all preprints, and you also have the option to add the DOI of the publication associated with the preprint. Further, the URL assigned to your preprint is a persistent, globally unique identifier, meaning it will always point to your preprint and can be used in citations. You'll have access to these supplemental files as well as to full abstracts. There is no paywall for these preprint servers and there are licenses available if you wish to license your preprint.
How can readers provide feedback?
You can communicate and provide feedback to preprint authors in the following ways:
- Most community-run preprint services on OSF integrate with Hypothes.is - a third-party annotation tool - to allow you to annotate preprints and provide feedback to the authors. Please see our help guide for step-by-step instructions on how to add annotations to a preprint.
- Authors can share their contact information on their preprint as a means for readers to send them feedback.
Community-run Preprint Servers
There are multiple community-run preprint servers. Where should I put my preprint?
You should upload your preprint to whichever preprint server best fits your topic and the community that you would like to reach. If there isn't an OSF community-run preprint server for your discipline, other options are available https://spi-hub.app.vumc.org/pp-service/browse .
Can I upload to more than one community-run preprint server?
Currently, you can only share your preprint on one community preprint server. However, to improve discoverability across communities, all preprints shared on community-run preprint servers are indexed and searchable via osf.io/preprints.
How were the available subject areas chosen and what are they used for?
The subject areas are defined by the BePress taxonomy. Selecting subjects effectively can improve the discoverability of your work.
I don't see my subject. How can I get one added?
Right now, it is not possible to add subjects. However, you can add tags with additional subject areas or keywords to improve discoverability.
How can my organization create a community-run preprint server?
COS supports communities operating their own community-run preprint services using OSF Preprints as the backend. Fill out a request form here to get started. Visit our Preprint Overview page for more information or contact us with any questions or by using the support center beacon.
How should I prepare for submission?
It's important to have your preprint in the state in which you want it to appear prior to sharing it. Below we provide a checklist to plan how you want your preprint to appear. See our Share a Preprint help guide for instructions on how to upload a preprint.
- You should have your article ready to upload in an easily accessible file. Make sure that you've removed any personal information from your article that you don't want to make public.
- Determine the discipline(s) that best fit your preprint. The disciplines and subdisciplines available will vary by preprint server.
- Choose whether or not you want to license your preprint. See the licenses question for more information on the available licenses.
- Write your abstract, and make sure that it's at least 20 characters long. You can either type your abstract or copy and paste it into the textbox during the upload process. You can't upload an abstract as a file.
- Communicate with your co-authors that you want to share your article as a preprint and determine the order in which you want the names to appear.
Discoverability
Is there a way to remove a specific version of a preprint? Or prevent it from being cited?
Yes, specific versions of your preprint can be withdrawn.
How do I find preprints?
OSF Preprints hosts several community-run preprint and paper services. Examples of disciplinary preprint services hosted on OSF include: PsyArXiv, SocArXiv, Law Archive and other newer discipline areas like NewAddictionsX.
Where are OSF Preprints indexed? How will they be discovered?
All preprints submitted to OSF community-run preprint services are indexed by major search engines, Google Scholar, and SHARE.
Why isn't my preprint showing in Google Scholar?
There are several reasons why your preprint may not be showing in Google Scholar. Below is a checklist to help you understand why your preprint may not be indexed, and what you can do on your end to ensure it gets indexed as soon as possible:
- Does your preprint have a publication DOI associated with it? If yes, and that publication is already indexed in Google Scholar, then the preprint will be read as a new version of the archived publication and will be indexed during full index rebuilds which happen twice a year.
- Do you have a single-author name, e.g. "Maria", "Mohamed"? Google Scholar does not currently support preprints with single-author names. Please add a second part to your author name from your OSF profile.
- Is your author name formatted all-lowercase? If so, this will be read as an error in Google Scholar. Please capitalize the first letter of each part of your name, e.g. "John Doe" from your OSF profile.
- Is your author name formatted all-uppercase? If so, these names will not be read in Google Scholar. Please capitalize the first letter of each part of your name, e.g. "John Doe" from your OSF profile.
Sometimes Google algorithms may take time to update, also if you have recently made changes to your preprint, this may take time for it the update to be captured by the Google algorithm
Why isn't my preprint showing in search results?
Is your preprint on one of the OSF community-run preprint services hosted on the OSF? If so, your preprint should be indexed in OSF search in a few minutes. If it's not, please report it to our support team, support@osf.io.
How do others discover that my preprint has been published?
Preprint DOIs are generated automatically when you upload a preprint. If your work has been published, you can provide the DOI of your associated journal article to let others know that your preprint has been published.
What registration agency does OSF community-run preprint services use, and what metadata is sent?
The community-run preprint services on the OSF register DOIs through Crossref. Crossref uses a preprint-specific metadata schema that makes it easy to connect preprints with their published articles and ORCID profiles (if authenticated with OSF). Metadata sent to Crossref includes the service name (e.g. PsyArXiv, Law Archive, etc.), preprint title, authors, date uploaded, URL, etc. The is PreprintOf relationship field is also sent to associate a preprint/postprint with their publication if you include a publication DOI with your preprint submission.
How should I cite a preprint?
Each preprint has an auto-generated citation that you can use. Default citation styles are APA, MLA, and Chicago. Additional citation styles can be generated directly from the preprint page. See our the section on Citing your preprint for step-by-step instructions on how to cite preprint.
How do I delete my preprint?
Preprints are part of the scholarly record and cannot be deleted. However, you can request to withdraw your preprint from the service, see section on Withdrawing your preprint. If your request is accepted, all versions of the preprint file will be removed and basic metadata (authors, DOI, etc.) will be left behind.
This Article Is Licensed Under CCO For Maximum Reuse.